
Improve Indoor Air Quality with Smart Home Automations
Copy the sense → decide → act loop that measurably improves indoor air: a monitor, a threshold rule, and an actuator response, tiered for Matter/Thread, Zigbee/Z-Wave, and Home Assistant setups. Includes the PM2.5, CO2, and humidity trigger thresholds to automate, plus the calibration checks that keep an automated loop trustworthy.
The useful smart-home question is not “Which indoor air quality gadget should I buy?” It is: when the air gets worse, what changes without someone opening an app?
A working indoor-air automation is a control loop: sense the air, decide against a labeled threshold, then act through ventilation, filtration, or source-control support. That sounds plain because it is. It is also the part that actually matters. In a peer-reviewed California wildfire study of roughly 5,000 homes, automated central-air optimization cut indoor PM2.5 exposure by up to 54±5%, and by 61±5% on peak smoke days, at about $5 per month in operating cost.[1] The important lesson is not that every home needs that exact HVAC setup. It is that automatic control changed exposure, while a dashboard alone would only have watched the number climb.
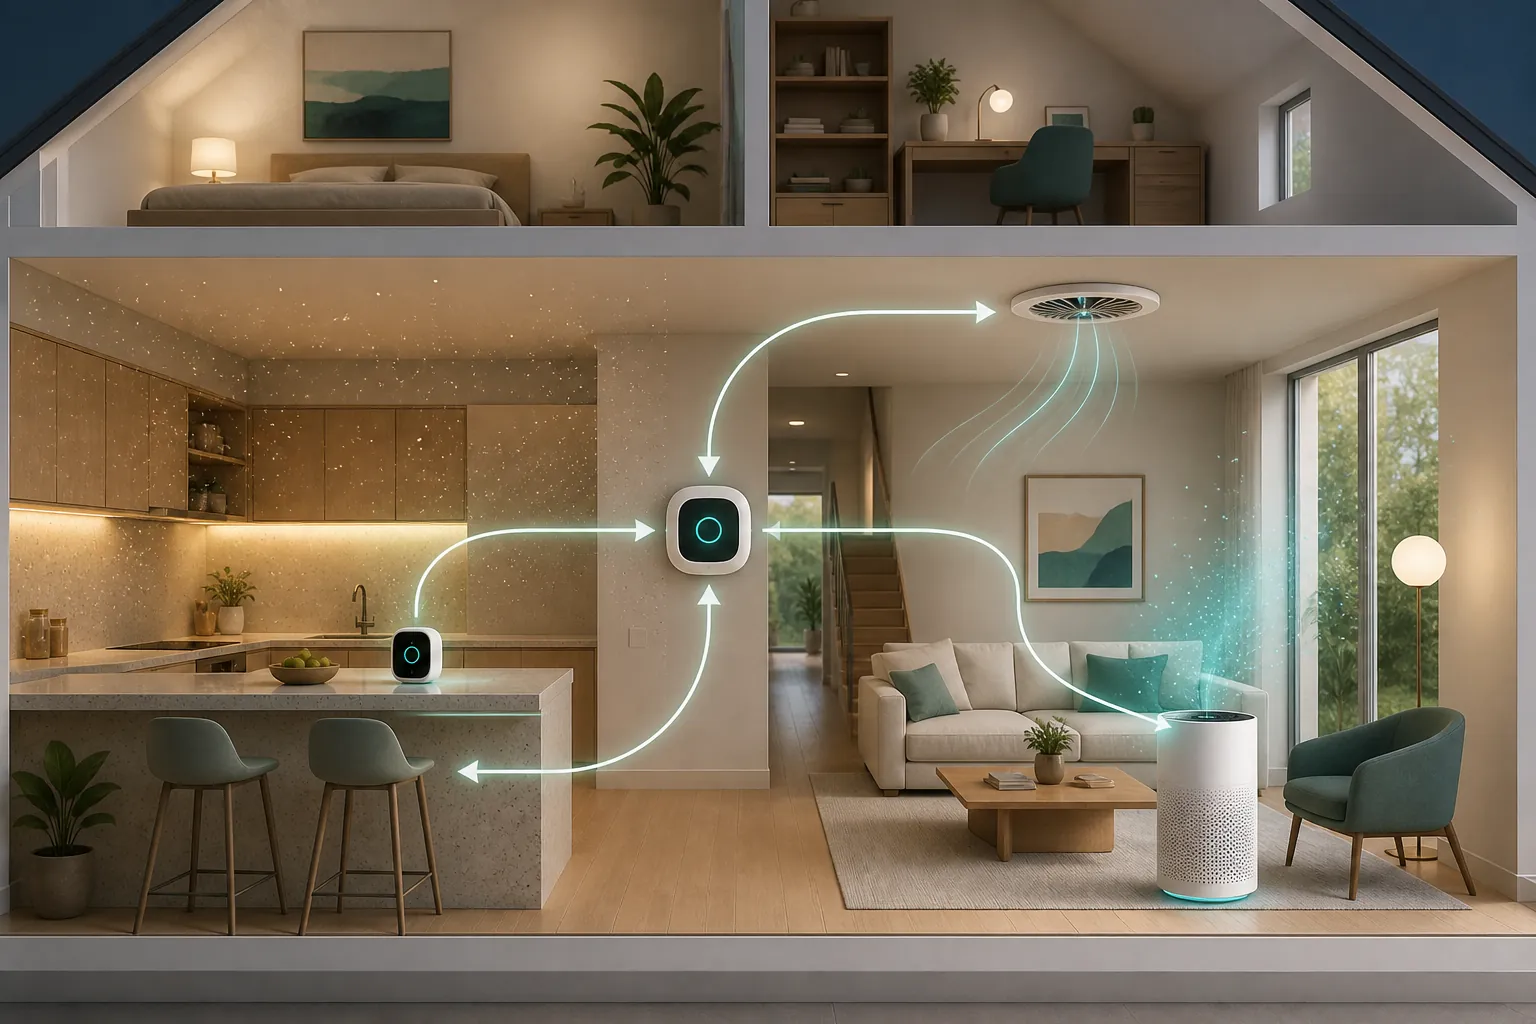
Keep the architecture this small until it proves it needs to grow.
| Loop part | What it does | Good enough version |
|---|---|---|
| Sense | Measures one pollutant or condition in the room where the problem happens | PM2.5 sensor in a kitchen or living area, CO2 sensor in an office or bedroom, humidity sensor in a bathroom |
| Decide | Compares the reading to a threshold or rate-of-change rule | A hub, vendor app, Matter-capable controller, Zigbee/Z-Wave hub, or Home Assistant automation |
| Act | Changes the home’s response | Purifier, smart plug, exhaust fan, HVAC blower, ERV/HRV, notification, or source-control reminder |
The action should map to one of the indoor-air strategies commonly used in standard guidance: reduce the source, increase ventilation where appropriate, or clean/filter the air.[2] A purifier turning on for PM2.5 is filtration. A bathroom fan responding to shower humidity is ventilation. A cooking alert that tells someone to use the range hood before the kitchen fills with particles is source-control support. If an automation cannot be tied to one of those responses, it is probably just decoration.
The minimal loop: one monitor, one rule, one actuator
A PM2.5 monitor, a smart plug, and a fan-filter box are already a complete indoor-air automation if the rule is explicit: when measured PM2.5 rises above the chosen trigger, turn on the plug; when it stays below the recovery threshold long enough, turn it off. Viam’s box-fan-filter example is useful for exactly that reason: it strips the system down to the loop instead of pretending the magic lives in a premium appliance.[3]
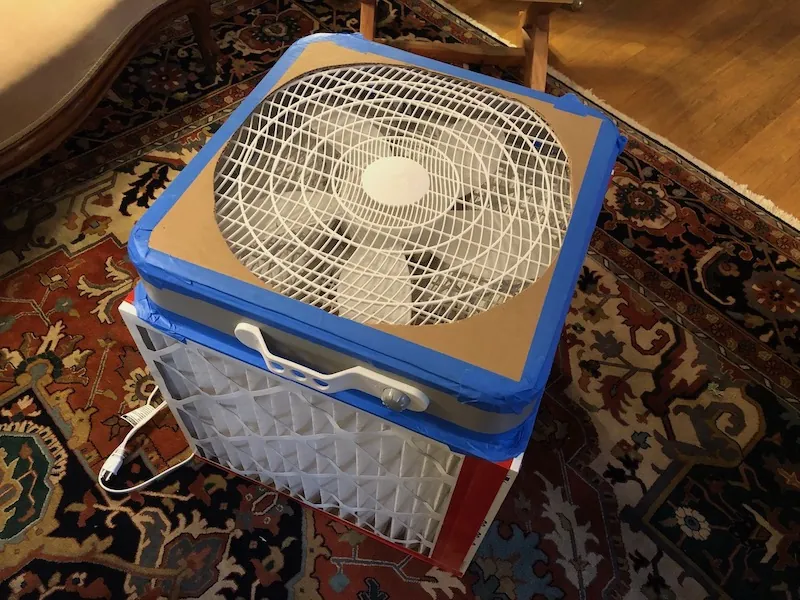
That same pattern scales up cleanly. Replace the box fan with a purifier. Replace the smart plug with a Zigbee outlet, Z-Wave relay, HVAC fan command, or Matter plug. Replace the vendor app rule with Home Assistant if you need better logic. The loop is still the same, and the first version should be simple enough that you can test it by creating smoke from cooking, watching the sensor rise, and confirming that the actuator actually changes state.
Use each signal only for the decision it can support
PM2.5, CO2, and humidity are not interchangeable “air quality” numbers. Each one answers a different control question. PM2.5 is the strongest trigger for filtration. CO2 is a practical indicator for stale indoor air and ventilation behavior, not a complete health score. Humidity is often less about one magic percentage and more about detecting a fast moisture event before the room stays wet.
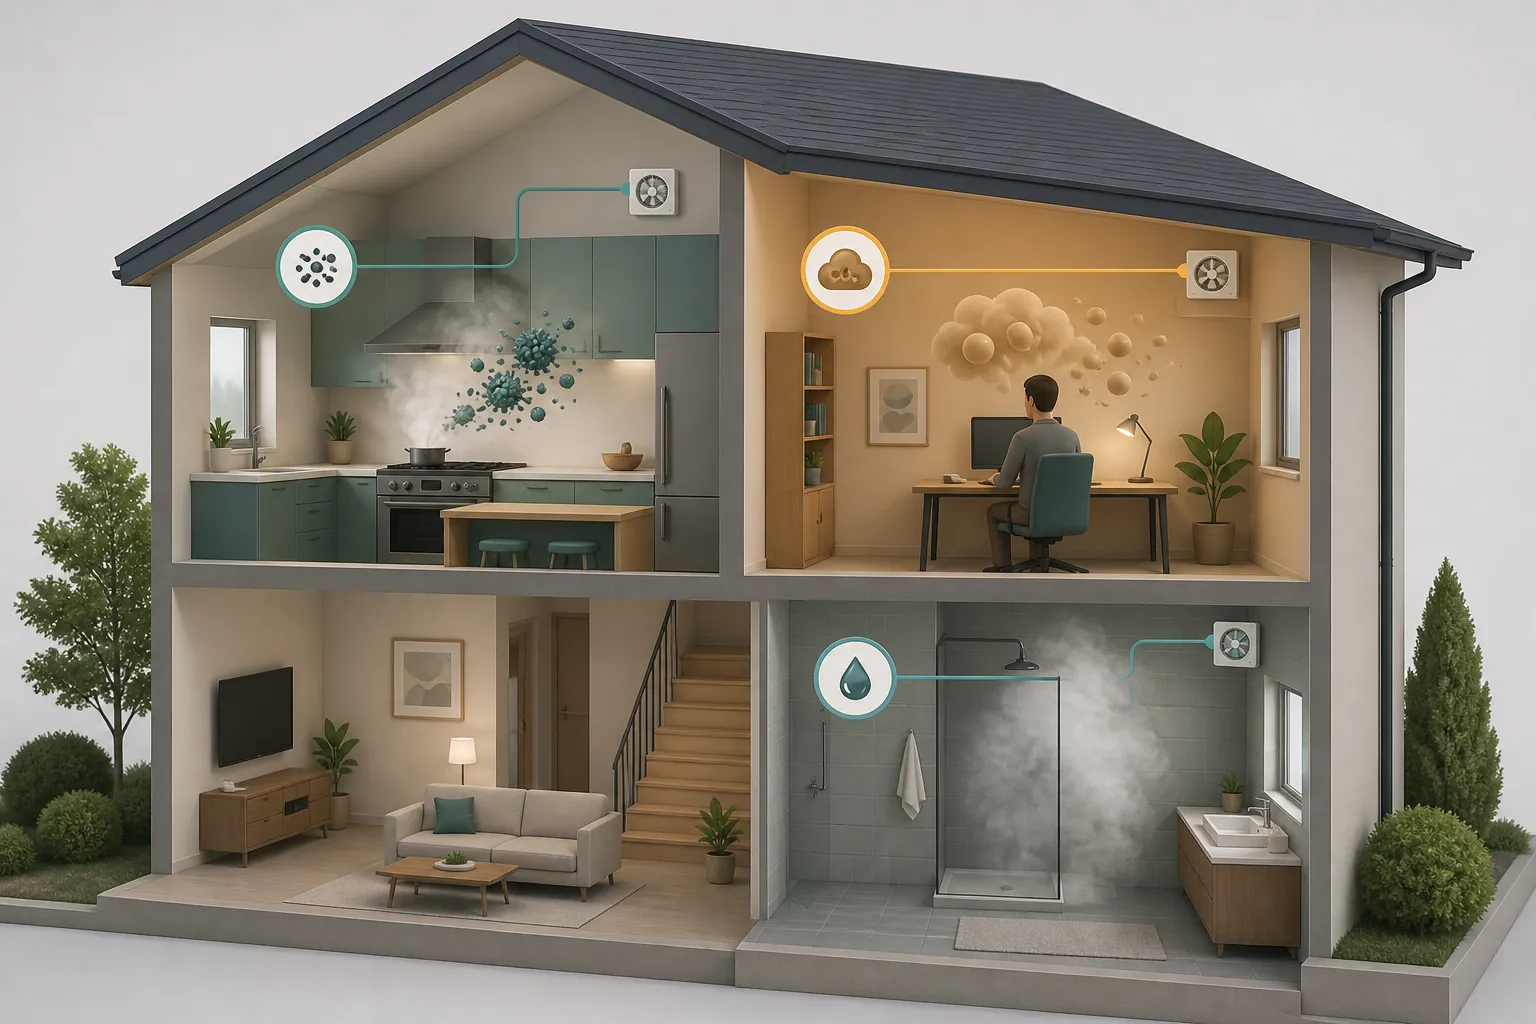
PM2.5: automate filtration first
For particulate pollution, use PM2.5 as the main automation signal. The WHO 2021 guideline sets 15 µg/m³ as the 24-hour PM2.5 guideline and 5 µg/m³ as the annual guideline.[4] For a home automation, 15 µg/m³ is a practical trigger because it is anchored to an official 24-hour health guideline and roughly lines up with the idea that very low AQI readings are the goal; Wirecutter also summarizes EPA AQI values at or below 50 as “satisfactory.”[2]
Do not make this more theatrical than it needs to be. The first PM2.5 rule should turn on filtration and tell the household why it happened.
| Trigger | Action | Recovery rule | Why this works |
|---|---|---|---|
| PM2.5 > 15 µg/m³ for 5–10 minutes | Turn purifier or fan-filter plug on; optionally send a cooking/smoke notification | Turn off after PM2.5 stays below 10–12 µg/m³ for 20–30 minutes | Uses an official PM2.5 guideline as the action point and avoids rapid on/off cycling |
| PM2.5 is rising quickly during cooking | Turn range hood or local filtration on if controllable; otherwise notify | Keep filtration running until the normal PM2.5 recovery rule clears | Responds before the kitchen haze spreads through the house |
| Outdoor smoke is present and indoor PM2.5 rises | Run indoor filtration; avoid ventilation commands that pull smoky air inside | Return to normal only after indoor PM2.5 recovers | Separates filtration from ventilation during smoke events |
If wildfire smoke is the main scenario, this indoor loop pairs naturally with an outdoor-versus-indoor smoke recipe such as checking air quality at home during wildfire smoke. The split matters: PM2.5 filtration is often the right indoor response, while extra ventilation can be the wrong response when the outdoor air is the source.
CO2: treat 1000 ppm as an action convention, not a legal limit
CO2 is useful because people generate it indoors. In a closed bedroom, office, or meeting room, a rising CO2 reading usually means ventilation is not keeping up with occupancy. Green Home Institute frames 800–1200 ppm as a practical fresh-air indicator range and warns against using VOC-derived “CO2 equivalent” values as a ventilation trigger.[5] Apollo’s AIR-1 automation guide uses 1000 ppm as a practical action threshold for a 30-minute bathroom exhaust response.[6]
That distinction is not academic. A true NDIR CO2 sensor can support a ventilation rule. A VOC sensor estimating “eCO2” from odors and chemical compounds should not be treated as if it measured human-generated CO2. If the automation opens a damper, starts an ERV/HRV, or runs an exhaust fan based on eCO2, the system is acting on the wrong signal.
| Trigger | Action | Recovery rule | Label in your automation |
|---|---|---|---|
| True CO2 > 1000 ppm for 10 minutes | Run ventilation: ERV/HRV boost, HVAC fresh-air mode, controllable exhaust fan, or notification to open a window when outdoor air is acceptable | Return to normal after CO2 stays below 800–900 ppm for 15–30 minutes | Practical ventilation threshold |
| CO2 remains in the 800–1200 ppm range while occupied | Notify or run low-speed ventilation if available | Stop notification once the room recovers | Fresh-air indicator, not a pollutant-removal claim |
| VOC-derived eCO2 rises | Do not use as the CO2 ventilation trigger | Use VOC rules separately if your platform supports them | Estimated value; not true CO2 |
Readers still choosing hardware should separate the monitor decision from the automation logic. A hub-compatible sensor guide such as CO2 monitor hub compatibility is the place to check whether the sensor exposes true CO2 to the system that will run the rule.
Humidity: use rate-of-change for showers and cooking
A fixed humidity threshold can work in a mild house, then fail in a humid week, a dry winter, or a bathroom where the shower spike has already soaked the room before the absolute number crosses the line. Rob Pickering’s Home Assistant exhaust-fan blueprint is valuable because it uses a derivative-style approach: detect the rate at which humidity is rising, not only the final relative humidity number.[7]
| Trigger style | Best use | Action | Failure it avoids |
|---|---|---|---|
| Humidity rises quickly compared with recent baseline | Bathroom shower fan | Turn exhaust fan on early | Waiting until the room is already very damp |
| Humidity stays elevated after the event | Post-shower drying | Keep fan running until humidity falls near baseline | Turning the fan off while walls and towels are still wet |
| Fixed humidity threshold | Simple vendor-app or hub rules | Turn fan on above the set point | Works acceptably only if the home’s normal humidity range is predictable |
This is where a more capable controller earns its keep. If the platform can only say “above 60%, turn on,” use that and verify it. If it can compare current humidity to a rolling baseline or derivative sensor, use the rate-of-change rule. The same pattern is useful in other home-health automations that care about rolling maximums, baselines, and trend detection, such as Legionella prevention in Home Assistant.
Three implementation tiers
Start with the least complicated controller that can run the rule correctly and expose the actuator state afterward. Protocol elegance is secondary to a rule that fires, a device that turns on, and a log that lets you check what happened.
Tier 1: Matter/Thread or platform-native automations
Use this tier when you want one monitor, one plug or purifier, and a rule inside Apple Home, Google Home, Amazon Alexa, SmartThings, Aqara Home, or another vendor app. This is the right answer for many homes. You do not need Home Assistant to turn on filtration when PM2.5 crosses a threshold if your existing platform exposes the PM2.5 value and can control the plug or purifier.
- PM2.5 recipe: if PM2.5 is greater than 15 µg/m³ for several minutes, turn on the purifier or smart plug. Send a notification that names the room and reading.
- CO2 recipe: if true CO2 is greater than 1000 ppm for 10 minutes, run available ventilation or send a “fresh air needed” notification.
- Humidity recipe: if the bathroom humidity crosses your tested fixed threshold, turn on the exhaust fan for a timed run. If the app supports only simple thresholds, do not pretend it is doing trend detection.
Matter and Thread can reduce ecosystem friction, but do not treat a path as copyable until the exact device exposes the needed air-quality attribute in your controller. Community snippets about a device working over Matter are not the same as vendor documentation or CSA-IoT certification. For this recipe, the relevant compatibility question is narrow: can the controller read the specific measurement and use it in an automation condition today?
Tier 2: Zigbee or Z-Wave sensor with hub threshold rules
This tier is for homes already using a hub such as Hubitat, SmartThings, Homey, Aqara, or another controller that can combine sensors, outlets, relays, and notifications across brands. The useful upgrade is not just radio range or local control. It is that the hub can make a threshold decision and drive an actuator that the monitor’s own app may not know exists.
| Sensor event | Hub rule | Actuator response | Verification check |
|---|---|---|---|
| Kitchen PM2.5 above trigger | If PM2.5 > 15 µg/m³, then run filtration scene | Smart plug purifier on; optional HVAC fan recirculation if safe for the equipment and filter | Confirm outlet state changed and PM2.5 begins falling |
| Office CO2 above trigger | If true CO2 > 1000 ppm while room is occupied, then run ventilation | ERV/HRV boost, exhaust fan, thermostat fan mode, or notification | Confirm CO2 trend improves after action |
| Bathroom humidity event | If humidity exceeds tested fixed threshold, then run fan timer | Exhaust fan relay on for a timed interval | Confirm fan actually runs and humidity recovers |
A useful Aqara forum story shows this pattern in one household: an air-quality monitor fed hub rules that sent notifications, controlled a purifier through a Z-Wave outlet, and changed HVAC blower behavior.[8] Treat that as a field example, not proof that the same hub-device combination will generalize to every home. The transferable part is the sequence: monitor reading, hub decision, actuator command, follow-up check.
If you are selecting the actuator side, choose by control exposure first. A purifier that cannot be turned on reliably by your hub is less useful in this recipe than a simpler filtered fan on a smart plug. Ecosystem-specific purifier notes belong in a compatibility guide such as smart air purifier options for wildfire smoke; the rule here only needs an actuator that responds when called.
Tier 3: Home Assistant, ESPHome, and derivative sensors
Home Assistant is the tier to use when the simple rule is no longer enough: different actions for indoor versus outdoor PM2.5, cooldown timers, rolling baselines, derivative humidity sensors, occupancy-aware CO2 ventilation, or fallback notifications when an actuator fails. Green Home Institute’s DIY automation discussion gives rough starting-cost examples for a stack in this territory: $50–100 for a Home Assistant host, $100–200 for a thermostat, and $200–300 for a monitor.[5] Those numbers are not a requirement; they are a reminder that the controller layer can become a real part of the system budget.
For PM2.5, Home Assistant lets you add hysteresis, minimum runtime, outdoor-air conditions, and actuator-state verification without depending on a vendor app’s automation builder.
alias: PM2.5 filtration response
mode: single
trigger:
  - platform: numeric_state
    entity_id: sensor.living_room_pm25
    above: 15
    for: "00:05:00"
action:
  - service: switch.turn_on
    target:
      entity_id: switch.air_filter_plug
  - service: notify.mobile_app
    data:
      message: "Living room PM2.5 is above 15 µg/m³. Filtration is on."
Then add a separate recovery automation instead of letting the plug chatter around the trigger line.
alias: PM2.5 filtration recovery
mode: single
trigger:
  - platform: numeric_state
    entity_id: sensor.living_room_pm25
    below: 12
    for: "00:30:00"
action:
  - service: switch.turn_off
    target:
      entity_id: switch.air_filter_plug
For CO2, label the automation honestly. This is a practical ventilation response, not a regulatory compliance system.
alias: Office CO2 ventilation boost
mode: single
trigger:
  - platform: numeric_state
    entity_id: sensor.office_co2
    above: 1000
    for: "00:10:00"
condition:
  - condition: state
    entity_id: binary_sensor.office_occupied
    state: "on"
action:
  - service: fan.turn_on
    target:
      entity_id: fan.ventilation_boost
  - delay: "00:30:00"
  - service: fan.turn_off
    target:
      entity_id: fan.ventilation_boost
For bathroom humidity, use a derivative sensor or a blueprint that detects a sharp rise from baseline. The exact entity names and slope values will be home-specific, so the important copyable idea is the decision structure: fast rise turns the fan on; return toward baseline turns it off; a maximum runtime prevents an endless fan if the sensor fails.
alias: Bathroom humidity rise fan response
mode: restart
trigger:
  - platform: numeric_state
    entity_id: sensor.bathroom_humidity_change_per_minute
    above: 1.0
action:
  - service: switch.turn_on
    target:
      entity_id: switch.bathroom_exhaust_fan
  - wait_for_trigger:
      - platform: numeric_state
        entity_id: sensor.bathroom_humidity_change_per_minute
        below: 0.1
        for: "00:10:00"
    timeout: "00:45:00"
  - service: switch.turn_off
    target:
      entity_id: switch.bathroom_exhaust_fan
If you already run Home Assistant for smoke, the Tier 3 path can share sensors and notification channels with deeper recipes such as an AirGradient ONE wildfire-smoke monitor in Home Assistant or DIY wildfire early warning. Keep the indoor rule separate from the outdoor-alert rule so a smoke warning does not accidentally trigger fresh-air ventilation.
The checks that keep the loop trustworthy
A smart-home air recipe can fail quietly. A sensor can drift. A firmware update can rename an entity. A purifier can fall off Wi-Fi. A hub can keep showing the last known value as if it were current. Verification is not a polishing step; it is part of the recipe.
- Check PM sensor plausibility. During a cooking event or outdoor smoke day, does the indoor PM2.5 sensor move in the expected direction? Does it recover when filtration runs?
- Compare readings instead of assuming price equals accuracy. South Coast AQMD field-tested 55 PM2.5 monitors; in Smart Air’s summary, price and accuracy were not correlated, with PurpleAir listed at 95% and an Aeroqual unit costing $1,125+ listed at 56%.[9]
- Name CO2 thresholds as conventions. “CO2 ventilation boost above 1000 ppm” is a clearer label than “unsafe air alarm.”
- Verify actuator state. The log should show not only that the automation fired, but that the plug, fan, purifier, relay, or thermostat command changed state.
- Revisit rules after app, hub, firmware, Matter/Thread, Zigbee, or Z-Wave updates. Air-quality automations are exactly the kind of quiet background rule people forget until they stop working.
Do one manual drill after building the rule. Create a small, safe test condition appropriate to the sensor, watch the reading cross the trigger, confirm the actuator turns on, and then confirm the reading recovers or the timed response ends. If the system cannot pass that Saturday-morning test while someone is standing there, it has no business being trusted in the background.
Better indoor air from smart-home devices comes from closing the loop, not adding devices. One monitor, one defensible threshold, one actuator response, and one verification habit will beat a shelf of unconnected dashboards.
References
- Automated central air circulation and filtration significantly reduces indoor PM2.5 exposure during wildfire smoke events, Indoor Environments, June 2025
- How to Improve Your Indoor Air Quality, Wirecutter
- Breathe Easy: Automation for Air Quality, Viam
- WHO global air quality guidelines: particulate matter (PM2.5 and PM10), ozone, nitrogen dioxide, sulfur dioxide and carbon monoxide, World Health Organization, 2021
- Home Indoor Air Quality Monitoring DIY Automation Article Q&A, Green Home Institute
- Transform Your Smart Home Health: The Complete Guide to Apollo AIR-1 Air Quality Monitoring and Automation, Apollo Automation
- Why I Built My Own Exhaust Fan Blueprint for Home Assistant, Rob Pickering
- Automating Home Air Quality: A Success Story, Aqara Forum
- The Best PM2.5 Air Quality Monitors of 2024, Smart Air