
Build a DIY Wildfire Early-Warning System in Home Assistant
Learn how to combine an outdoor PM2.5/PM10 sensor, CO detector, local weather station, and public fire alert feeds in Home Assistant to detect approaching wildfire particulate changes up to 1,000 times earlier than indoor smoke alarms, with field-tested advance notice of up to 37 minutes — and how to set up conditional multi-factor triggers to avoid false alarms.
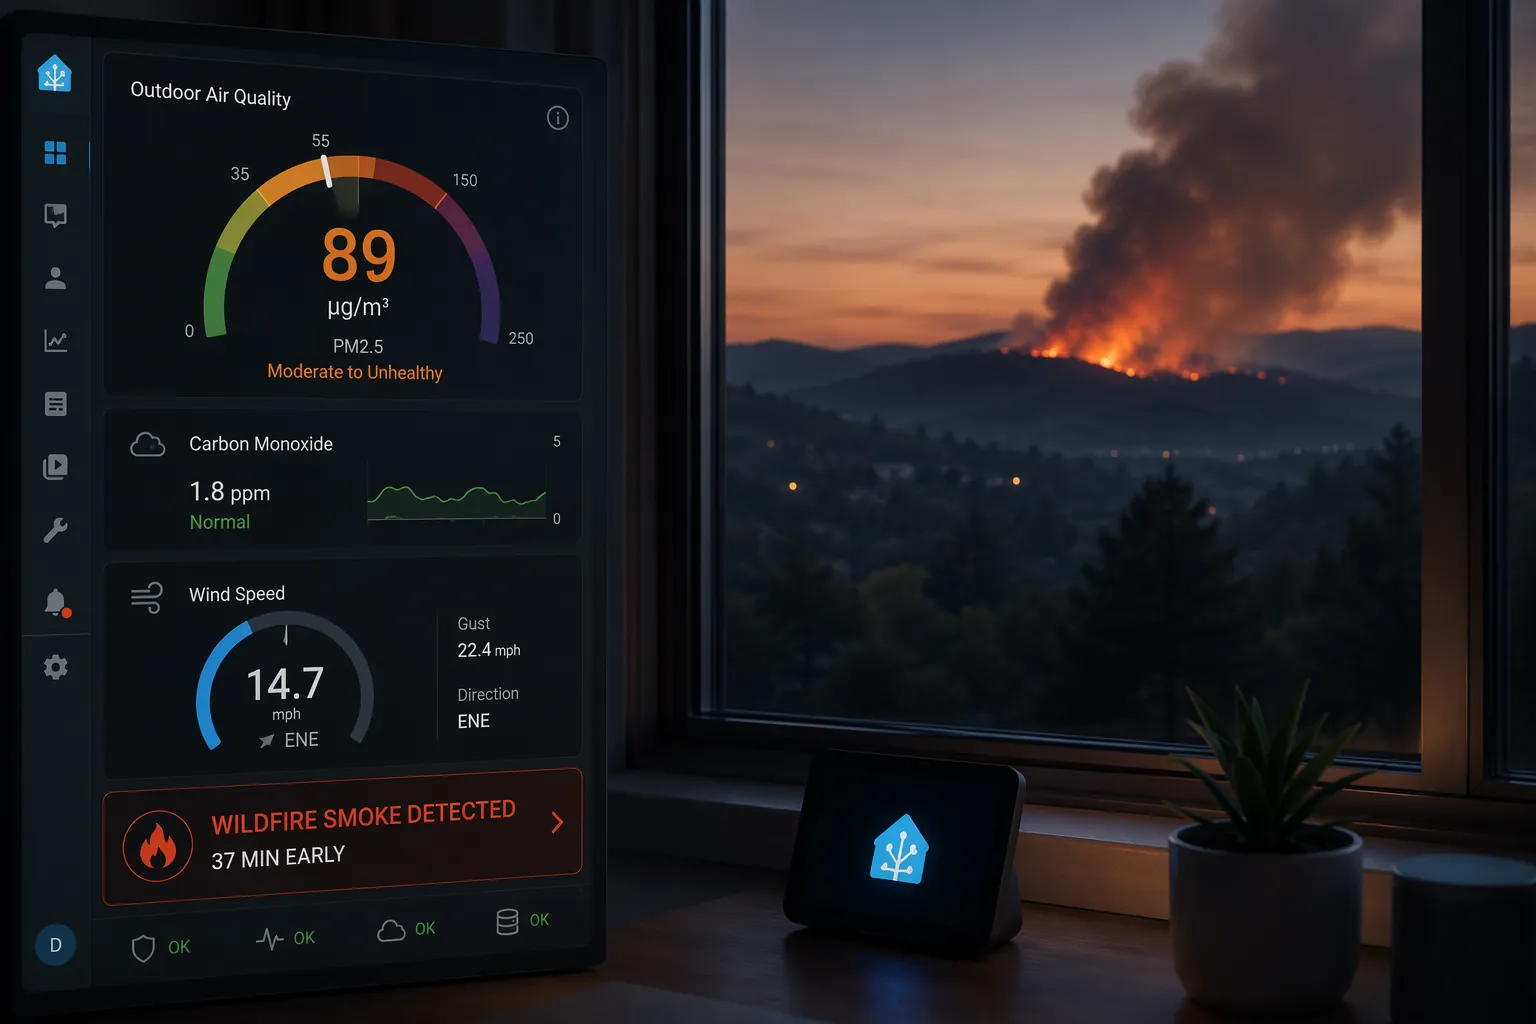
Indoor smoke alarms are the wrong first sensor for approaching wildfire smoke. They are still nonnegotiable life-safety devices, but they usually react after smoke has entered the building. The useful gap for smart home fire detection devices for wildfire safety is outside: particulate matter rising at the edge of the property, wind pushing from the known fire direction, a gas reading moving with it, and a public alert feed saying the wider threat context is real.
That is why the DHS Science and Technology Directorate wildfire sensor work is worth paying attention to. DHS describes wildfire detection sensors measuring particulate concentrations from 0 to 1000 micrograms per cubic meter, roughly 1,000 times more sensitive than a standard residential smoke alarm, and reports a Colorado field-test event where an alpha sensor provided up to 37 minutes of advance notice before 911 calls came in.[1] That is not a promise that a patio sensor will always buy 37 minutes. It is a field-tested reason to build an outdoor warning layer that is explicit about uncertainty instead of pretending an indoor alarm is the first available signal.
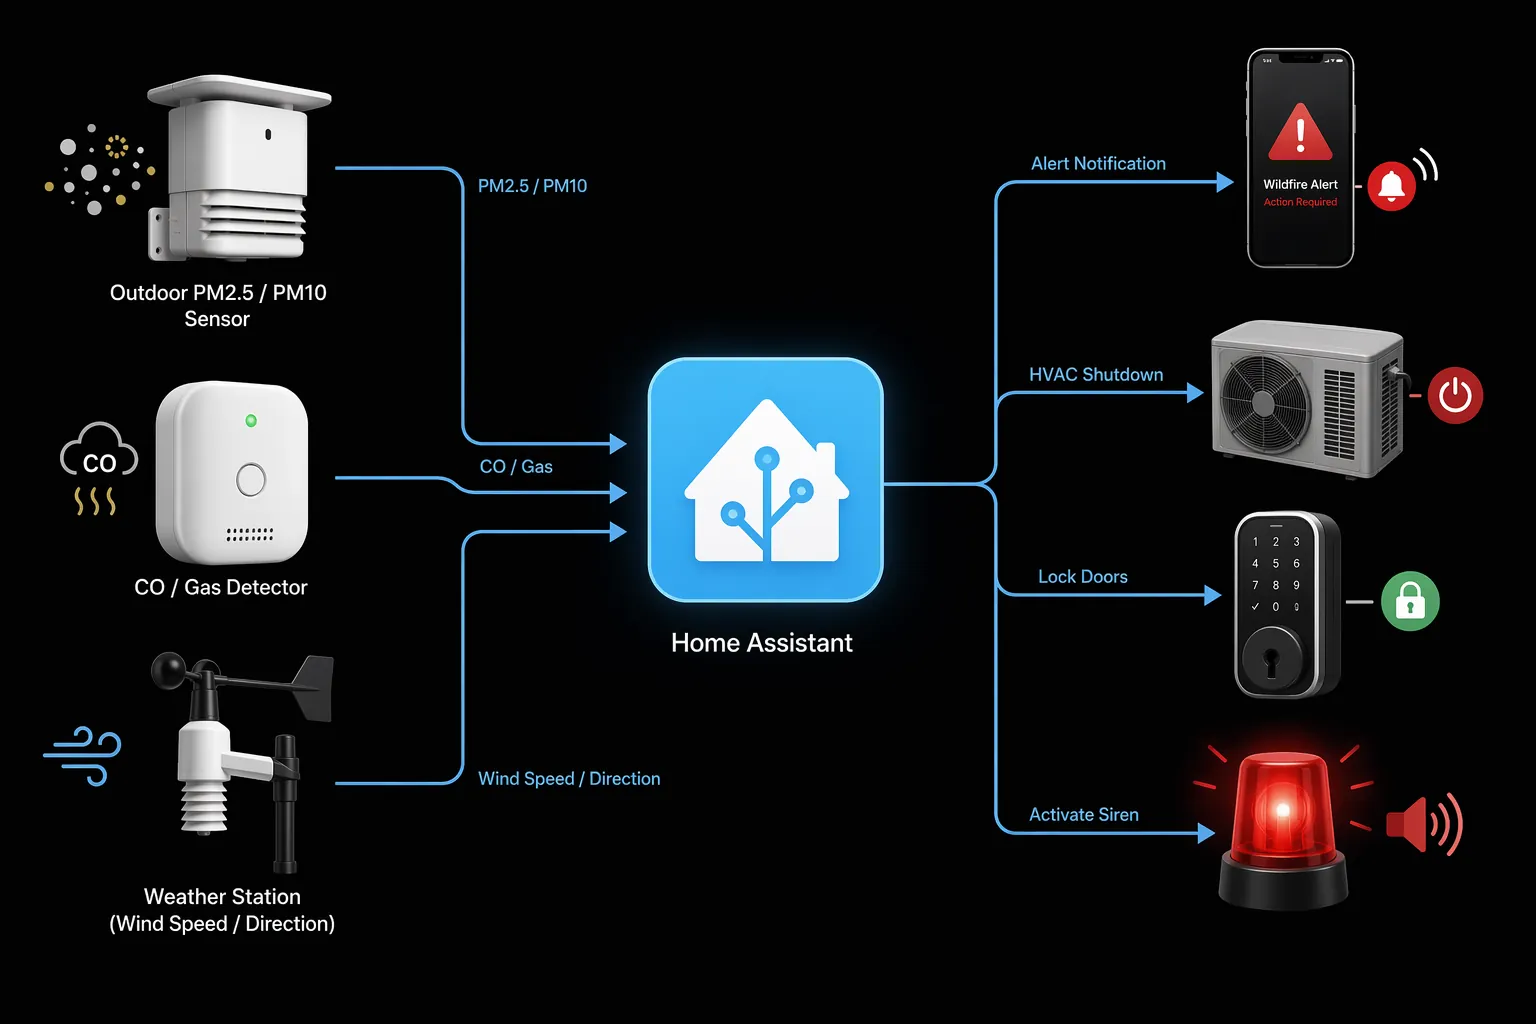
The System You Are Actually Building
The recipe is a local, multi-input warning system. Home Assistant does not decide there is a wildfire because one PM2.5 number crossed a line. It watches several different signals and escalates only when they agree: outdoor particulate matter rises, CO or gas also moves, wind makes the source direction plausible, and an official or public alert feed raises the background risk.
The Firewize Home Assistant bushfire guide uses that same kind of conditional structure: IoT PM2.5/PM10 sensors, CO readings, weather thresholds, and public alert data combined into automations rather than treated as isolated dashboard tiles.[2] This article adapts that logic for a Home Assistant wildfire setup in the U.S. context, with EPA PM2.5 breakpoints as practical anchors and NWS or CAL FIRE-style alert feeds as the public-warning layer.
| Role | Implementation path | Home Assistant route | Why it is in the system |
|---|---|---|---|
| Outdoor PM2.5/PM10 sensor | MCO Home MH10-PM2.5, AirGradient Open Air, or similar particulate sensor | Zigbee2MQTT/ZHA for Zigbee; ESPHome or local Wi-Fi API for AirGradient-style devices | Primary early smoke signal; DHS benchmarks make this category worth using before indoor alarms [1] |
| CO/gas sensor | Fibaro Smoke Sensor, Heiman Zigbee sensor, or another HA-visible gas/smoke device | Z-Wave JS, Zigbee2MQTT, ZHA, or vendor-local integration where available | Secondary confirmation so dust, pollen, or single-sensor drift does not trigger the full response |
| Local wind and weather | Ecowitt or Ambient Weather station | Local API or Home Assistant integration, preferably without cloud-only dependency | Confirms that wind direction and speed make the particulate spike plausible |
| Public alert condition | NWS Alerts integration, CAL FIRE-style incident feed, or another reliable local fire-alert source | Home Assistant integration, REST sensor, or alert entity | Raises escalation only when the wider fire-danger context supports it |
| Optional flame confirmation | IR flame sensor on ESPHome | ESPHome binary sensor | Late-stage confirmation near the property; not the core early-warning input |
The important shopping distinction is not brand loyalty. It is whether the device exposes the right entity locally and predictably. A Zigbee PM sensor that reports through your own coordinator is more useful during a fire-weather evening than a prettier device whose app cloud is the only path into the data.
Particulate Sensing Is the Load-Bearing Input
PM2.5 is the main number to watch because wildfire smoke air-monitoring programs treat fine particulate matter as the key measurement for smoke exposure. The EPA WSMART program centers PM2.5 sensors in wildfire smoke monitoring and uses AQI breakpoints that are practical enough to turn into automation thresholds: PM2.5 above 55 micrograms per cubic meter corresponds to Unhealthy for Sensitive Groups, while above 150 micrograms per cubic meter corresponds to Unhealthy for All.[3]
Those are not magic numbers for detection. A local wildfire plume may matter before the EPA AQI category changes, and a dusty afternoon can move a low-cost sensor without any nearby fire. The values are useful because they give your automation a documented severity ladder instead of a random threshold copied from someone else’s dashboard.
| PM2.5 condition | Suggested Home Assistant use | Action level |
|---|---|---|
| Above local 7-day baseline by a meaningful margin | Watch mode; log event and compare with wind and gas readings | No household interruption |
| >55 µg/m³ sustained for 5 minutes | Candidate trigger if CO/gas and wind also support it | Notify adults; prepare HVAC action |
| >150 µg/m³ sustained for 5 minutes | High-severity trigger when paired with alert feed or confirmed wind direction | Shut down HVAC intake, notify, and run emergency scene |
Dryad’s Silvanet wildfire sensor technical data is a helpful reality check for anyone expecting lab-instrument behavior from small particulate sensors. Dryad documents accuracy of ±10 micrograms per cubic meter in the 0-100 micrograms per cubic meter range and ±10% in the 101-1000 micrograms per cubic meter range.[4] Consumer devices are not identical to Dryad’s product, but the ranges are a useful reminder: the automation should care about sustained movement and agreement between signals, not one exact reading at one exact second.
Place the Sensors for Smoke Arrival, Not Dashboard Neatness
Put the outdoor particulate sensor where incoming air reaches the house before it reaches an open window, attic vent, or HVAC intake. Under an eave is usually better than fully exposed rain, but avoid trapping it in a dead-air pocket. If you live where the fire approach is usually from a known canyon, ridge, or prevailing wind corridor, place the sensor so it sees that air path early.
- Do not mount the PM sensor directly above a barbecue, dryer vent, chimney, or idling driveway.
- Keep it protected from direct water and hard sun if the enclosure was not designed for full exposure.
- Mount the weather station where wind direction is not dominated by a wall, fence, or roof eddy.
- Keep the CO/gas sensor close enough to share the air event, but not so close to the PM sensor that one local nuisance source fools both.
- If you add an IR flame sensor, aim it at a specific high-risk zone; do not treat it as a wide-area early detector.
There is field evidence behind this ground-level approach. Oregon Hazards Lab describes DHS-supported wildfire smoke sensors co-located with detection cameras across 15 Oregon sites, with PM and gas sensors detecting wildfires before visual confirmation in the 2023-2024 deployment context.[5] That does not mean a residential sensor at one home gets the same coverage as a research network. It does support the basic bet: smoke and gas at ground level can be actionable before a person sees flame or before smoke fills the house.
Bring the Inputs Into Home Assistant Locally
The cleanest setup is boring: every sensor becomes a normal Home Assistant entity, every entity has a clear unit, and the automation still runs if a vendor app is down. For Zigbee devices, use a coordinator with Zigbee2MQTT or ZHA. For Z-Wave devices, use Z-Wave JS. For ESPHome devices, keep the firmware and entity names under your control. For weather stations, prefer a local API integration over a cloud polling path when your hardware supports it.
| Device type | Coordinator or integration | Entity examples to create or rename |
|---|---|---|
| MCO Home-style Zigbee PM sensor | Zigbee2MQTT or ZHA | sensor.outdoor_pm25, sensor.outdoor_pm10 |
| AirGradient-style Wi-Fi sensor | ESPHome or local integration | sensor.outdoor_pm25, sensor.outdoor_pm10 |
| Fibaro Z-Wave smoke/CO device | Z-Wave JS | sensor.outdoor_co_ppm, binary_sensor.smoke_alarm |
| Heiman Zigbee gas/smoke sensor | Zigbee2MQTT or ZHA | sensor.outdoor_gas, binary_sensor.smoke_detected |
| Ecowitt or Ambient Weather station | Local integration where available | sensor.wind_speed, sensor.wind_bearing, sensor.outdoor_humidity |
| NWS or CAL FIRE-style public feed | NWS Alerts integration, REST sensor, or feed parser | binary_sensor.fire_alert_active, sensor.fire_danger_rating |
If you already built API-driven weather automations, the public alert layer is the same pattern. The companion recipe Automate Tropical Depression Warnings in Home Assistant is the same mental model: let the official feed change the risk state, then let local sensors decide whether the house should act.
Before writing automations, normalize the names. A readable entity map matters when you are debugging at 1 a.m. with wind noise outside.
# configuration.yaml or a packages file
# Replace these entity IDs with your real sensor entities.
template:
  - binary_sensor:
      - name: wildfire_pm25_elevated
        unique_id: wildfire_pm25_elevated
        state: >
          {{ states('sensor.outdoor_pm25') | float(0) > 55 }}
        delay_on:
          minutes: 5

      - name: wildfire_public_alert_active
        unique_id: wildfire_public_alert_active
        state: >
          {{ is_state('binary_sensor.fire_alert_active', 'on')
             or states('sensor.fire_danger_rating') in ['Extreme', 'Catastrophic'] }}

      - name: wildfire_co_elevated
        unique_id: wildfire_co_elevated
        state: >
          {{ states('sensor.outdoor_co_ppm') | float(0) >
             states('input_number.wildfire_co_baseline') | float(0) + 5 }}
        delay_on:
          minutes: 5
That first template uses the EPA 55 micrograms per cubic meter breakpoint as a candidate trigger, not as the full alarm.[3] The CO template compares against your own baseline because a fixed value will be brittle across sensor types and mounting locations.
Give the System a First Week Before You Trust It
The first seven days are not wasted time. They are the difference between a system that sees your place and a system that only knows a data sheet. During that week, log PM2.5, PM10, CO or gas, wind speed, wind bearing, humidity, temperature, and public alert state. Do not connect the automation to locks, HVAC, or sirens yet.
The goal is to identify the normal local nuisances: cooking exhaust that drifts past the side yard, a neighbor’s fire pit, road dust, pollen, sensor warm-up behavior, and the daily humidity swing. Dryad describes AI-based classification for distinguishing wildfire signatures from other smoke sources in its own system, but a Home Assistant build should use a simpler rule: no major escalation until several independent conditions agree and remain true long enough to matter.[4]
- Create helpers for PM2.5 baseline, CO baseline, and normal wind approach direction.
- Use History or Recorder data to find the normal range at the sensor location, not just the manufacturer’s expected range.
- Mark known nuisance events in a logbook so you can compare the sensor pattern later.
- Leave high-consequence actions disabled until the system has survived at least one normal week.
- Treat the first real smoke event as another calibration event unless official evacuation information says otherwise.
A simple way to handle baselines is to store them manually after the first week. If you want to get fancier, use statistics sensors, but manual helpers are easier to audit during an emergency.
input_number:
  wildfire_pm25_baseline:
    name: Wildfire PM2.5 baseline
    min: 0
    max: 200
    step: 1
    unit_of_measurement: "µg/m³"

  wildfire_co_baseline:
    name: Wildfire CO baseline
    min: 0
    max: 100
    step: 1
    unit_of_measurement: "ppm"

  wildfire_wind_from_min:
    name: Wildfire wind bearing min
    min: 0
    max: 359
    step: 1
    unit_of_measurement: "°"

  wildfire_wind_from_max:
    name: Wildfire wind bearing max
    min: 0
    max: 359
    step: 1
    unit_of_measurement: "°"
The Trigger Should Be Conditional, Not Dramatic
The tempting automation is one line: if PM2.5 is high, sound the alarm. That is how you build a nuisance machine. The better version is a cascade. PM2.5 has to rise and stay elevated. CO or gas has to move with it. Wind has to be strong enough and coming from a plausible direction. A public alert or fire-danger condition has to be active before the automation touches anything disruptive.
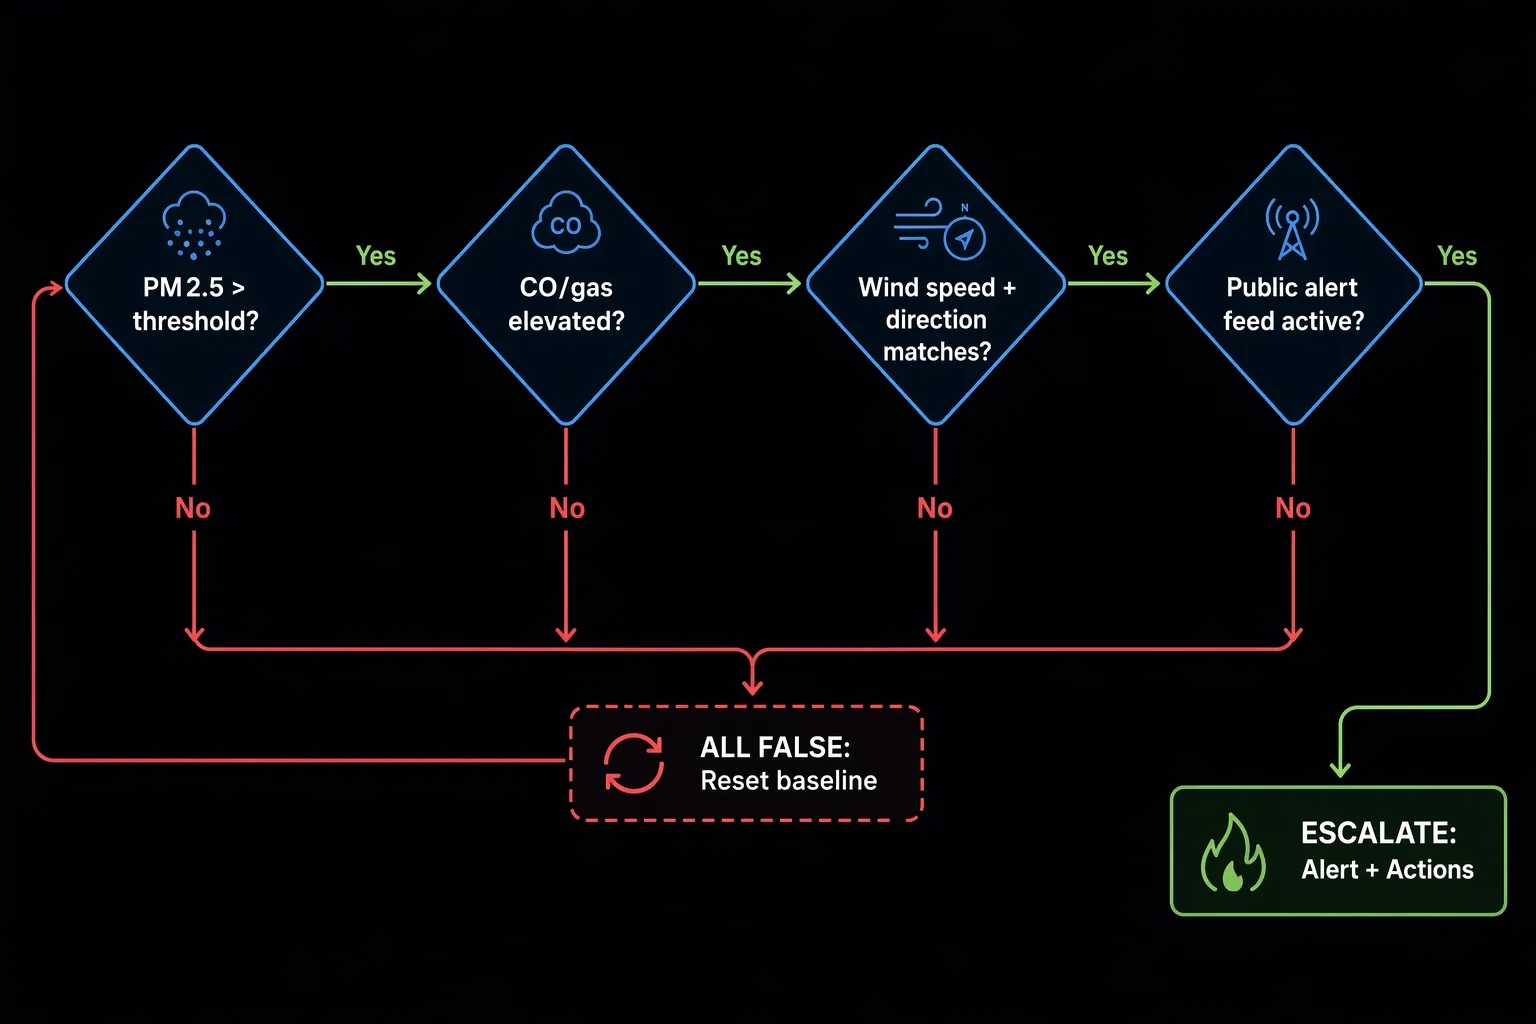
Firewize’s guide uses weather thresholds including temperature at or above 35°C, humidity at or below 40%, and wind at or above 35 km/h as part of bushfire automation logic.[2] In a U.S. Home Assistant setup, you can keep those as an imported default or adjust them to local fire-weather guidance. The point is not that every climate must use the same values. It is that wind and humidity are part of the decision, not decorative dashboard cards.
template:
  - binary_sensor:
      - name: wildfire_wind_matches_risk_direction
        unique_id: wildfire_wind_matches_risk_direction
        state: >
          {% set bearing = states('sensor.wind_bearing') | float(999) %}
          {% set speed_mph = states('sensor.wind_speed') | float(0) %}
          {% set min_b = states('input_number.wildfire_wind_from_min') | float(0) %}
          {% set max_b = states('input_number.wildfire_wind_from_max') | float(359) %}
          {% set fast_enough = speed_mph >= 22 %}
          {% if min_b <= max_b %}
            {{ fast_enough and min_b <= bearing <= max_b }}
          {% else %}
            {{ fast_enough and (bearing >= min_b or bearing <= max_b) }}
          {% endif %}

      - name: wildfire_weather_supports_spread
        unique_id: wildfire_weather_supports_spread
        state: >
          {{ states('sensor.outdoor_humidity') | float(100) <= 40
             and is_state('binary_sensor.wildfire_wind_matches_risk_direction', 'on') }}
        delay_on:
          minutes: 5
The wind-speed conversion in that example is approximate: 35 km/h is about 22 mph. If your station reports meters per second, convert before comparing. If your terrain creates dangerous downslope winds below that threshold, tune the helper after watching real weather data rather than trusting the imported value.
A Copyable Escalation Automation
This automation has two outputs: a warning path and a high-severity path. The warning path notifies people and records context. The high-severity path can shut down HVAC intake, unlock doors, flash exterior lights, and announce over speakers. Start with notifications only. Add the physical actions after you have tested entity names, household expectations, and failure modes.
automation:
  - alias: Wildfire Early Warning - Multi Sensor Escalation
    id: wildfire_early_warning_multi_sensor_escalation
    mode: single

    trigger:
      - platform: state
        entity_id:
          - binary_sensor.wildfire_pm25_elevated
          - binary_sensor.wildfire_co_elevated
          - binary_sensor.wildfire_weather_supports_spread
          - binary_sensor.wildfire_public_alert_active
        to: "on"
        for:
          minutes: 2

    condition:
      - condition: state
        entity_id: binary_sensor.wildfire_pm25_elevated
        state: "on"
      - condition: state
        entity_id: binary_sensor.wildfire_co_elevated
        state: "on"
      - condition: state
        entity_id: binary_sensor.wildfire_weather_supports_spread
        state: "on"

    action:
      - choose:
          - conditions:
              - condition: state
                entity_id: binary_sensor.wildfire_public_alert_active
                state: "on"
              - condition: numeric_state
                entity_id: sensor.outdoor_pm25
                above: 150
            sequence:
              - service: notify.mobile_app_your_phone
                data:
                  title: "Wildfire smoke escalation"
                  message: >
                    PM2.5 is {{ states('sensor.outdoor_pm25') }} µg/m³,
                    CO is {{ states('sensor.outdoor_co_ppm') }} ppm,
                    wind is {{ states('sensor.wind_speed') }} mph from
                    {{ states('sensor.wind_bearing') }} degrees, and a public
                    fire alert condition is active.
              - service: climate.turn_off
                target:
                  entity_id: climate.main_hvac
              - service: lock.unlock
                target:
                  entity_id:
                    - lock.front_door
                    - lock.garage_entry
              - service: light.turn_on
                target:
                  entity_id: light.exterior_lights
                data:
                  flash: long
              - service: media_player.volume_set
                target:
                  entity_id: media_player.house_speakers
                data:
                  volume_level: 0.8
              - service: tts.speak
                target:
                  entity_id: tts.home_assistant_cloud
                data:
                  media_player_entity_id: media_player.house_speakers
                  message: >
                    Wildfire smoke conditions are detected outside. Check official alerts now.

        default:
          - service: notify.mobile_app_your_phone
            data:
              title: "Wildfire smoke watch"
              message: >
                Outdoor PM2.5, CO, and wind conditions are elevated, but the
                public fire alert condition is not active or PM2.5 is below the
                high-severity threshold. Check the dashboard before taking action.
The public alert condition is deliberately required only for the high-severity branch in this version. That keeps the system useful when smoke arrives before a feed updates, while preventing a single local sensor event from unlocking doors or interrupting HVAC. If your household would rather never run physical actions without an official alert, move the public-alert condition into the main condition block.
For emergency-stack builders, this pairs naturally with load-shedding logic from Automate Power Outage Load Shedding with Home Assistant. A wildfire warning and a grid instability warning should not fight over the same HVAC, battery, or door-lock actions.
False Alarms Are a Design Problem, Not an Afterthought
A false push notification is annoying. A false HVAC shutdown during bad heat, a false siren, or an unnecessary unlocked door is a real household consequence. That is why the automation should escalate in stages and leave a visible audit trail.
| Signal pattern | Likely interpretation | Automation response |
|---|---|---|
| PM2.5 spike only; no CO movement; no wind match | Dust, sensor settling, pollen, or local nuisance source | Log only or low-priority dashboard badge |
| PM2.5 and CO rise; wind does not match risk direction | Nearby smoke source, barbecue, fire pit, or drifting neighborhood smoke | Notify as watch; no physical actions |
| PM2.5 and CO rise; wind matches; no public alert | Possible early local smoke arrival before public feed updates | Notify adults with context; require manual confirmation for HVAC and locks |
| PM2.5 and CO rise; wind matches; public alert active | High-confidence wildfire smoke condition | Run escalation scene according to household plan |
The automation should also reset gracefully. Once PM2.5 and CO drop below your chosen thresholds for a sustained period, clear the watch state, leave a logbook entry, and return HVAC control to normal only if that is safe for your system. Avoid rapid cycling. Smoke plumes can pulse.
automation:
  - alias: Wildfire Watch Clear
    id: wildfire_watch_clear
    mode: single

    trigger:
      - platform: template
        value_template: >
          {{ states('sensor.outdoor_pm25') | float(0) < 35
             and is_state('binary_sensor.wildfire_co_elevated', 'off') }}
        for:
          minutes: 30

    action:
      - service: logbook.log
        data:
          name: Wildfire watch
          message: >
            Conditions cleared. PM2.5 is {{ states('sensor.outdoor_pm25') }} µg/m³
            and CO elevated state is {{ states('binary_sensor.wildfire_co_elevated') }}.
      - service: notify.mobile_app_your_phone
        data:
          title: "Wildfire smoke watch cleared"
          message: "Outdoor particulate and CO conditions have remained below watch levels for 30 minutes."
What to Automate, and What to Leave Manual
Notifications are easy. Physical actions deserve more restraint. A useful wildfire automation tells you exactly why it fired, then takes the low-regret actions first: close motorized vents if you have them, turn off whole-house fans, stop fresh-air intake, flash exterior lights for visibility, and wake the adults who are responsible for decisions.
- Good automatic actions: push notification, dashboard alarm card, logbook entry, exterior light flashing, HVAC fan or fresh-air intake shutdown where your equipment supports it safely.
- Actions to confirm manually first: unlocking all doors, opening garage doors, sounding sirens, notifying neighbors, or waking children with speaker announcements.
- Actions to avoid: anything that contradicts an official evacuation order, disables required life-safety alarms, or assumes a single sensor is more reliable than public emergency information.
If you use smart locks, decide the lock behavior before fire season. Some households want doors unlocked during a high-confidence warning so evacuation is simpler. Others prefer a notification that puts the lock buttons in front of the adults but leaves the doors secured. Home Assistant can do either; the hard part is choosing the consequence you can live with when the system is right and when it is wrong.
Optional Flame Confirmation
An IR flame sensor on ESPHome can be useful near a detached shed, a vulnerable fence line, or a known vegetation edge. It is not the early-warning core. Flame confirmation is late compared with particulate and gas movement. Use it as an additional high-severity confirmation for a specific area, not as a substitute for the PM2.5, CO, wind, and alert-feed logic.
# Example ESPHome-style binary sensor name after adoption into Home Assistant:
# binary_sensor.north_fence_ir_flame

template:
  - binary_sensor:
      - name: wildfire_flame_confirmation
        unique_id: wildfire_flame_confirmation
        state: >
          {{ is_state('binary_sensor.north_fence_ir_flame', 'on')
             and is_state('binary_sensor.wildfire_pm25_elevated', 'on') }}
        delay_on:
          seconds: 10
Testing Before Fire Weather
Test the recipe with helper overrides, not real smoke. Temporarily lower the PM threshold, set a test fire-alert helper to on, and confirm the notification text includes PM2.5, CO, wind speed, wind bearing, and alert state. Then test every physical action separately. HVAC entities, lock entities, and speaker services fail in different ways.
- Verify each sensor updates in Home Assistant without opening a vendor app.
- Confirm units: PM2.5 in µg/m³, CO in ppm, wind in the unit your template expects, and bearing in degrees.
- Run the first week in notify-only mode and collect baseline data.
- Trigger the warning branch with test helpers and confirm no physical action runs.
- Trigger the high-severity branch with test helpers and watch every action complete.
- Restore real thresholds and leave a dashboard card showing current sensor values and the four decision states.
If YAML is the slow part, the recipe Build a Gemini Gem as Your Home Assistant Automation Coach is useful for turning your real entity names into draft automations. Still read the generated YAML before pasting it. This is not a lighting scene.
The Careful Claim
A Home Assistant wildfire early-warning system can give a household earlier local information than indoor smoke alarms when it combines outdoor PM2.5/PM10 sensing, CO or gas movement, wind context, and a public alert condition. DHS field results make the sensor category credible, including a reported Colorado event with up to 37 minutes of advance notice before 911 calls, and EPA PM2.5 thresholds give practical trigger anchors.[1][3]
It is still not a certified life-safety replacement for smoke alarms, evacuation orders, public alerts, or human judgment. The useful version is calibrated, conditional, local, and honest about what each signal proves. That is enough to make it worth building.
References
- Technology to Reduce the Impacts of Wildfires, DHS Science and Technology Directorate
- Home Assistant Bushfire Detection Guide, Firewize, 2025
- Wildfire Smoke Air Monitoring Response Technology (WSMART), EPA
- Silvanet Wildfire Sensor Technical Data, Dryad Networks
- Wildfire Smoke Sensors, Oregon Hazards Lab