
How to Set Up Smart Flood Sensors for Orlando Flooding
A copyable tiered setup for Orlando flood sensors: where to place them given rain-driven flooding, how to link alerts to a smart shutoff valve for plumbing leaks, and when no sensor-side fix can stop external flood damage.
Smart home flood sensors to protect against Orlando flooding have to be set up around one uncomfortable split: an internal plumbing leak is something a sensor can help stop, while rainwater entering from outside is something a sensor can only report. Orlando typically receives more than 53 inches of rain each year, a summer thunderstorm can drop 1 to 3 inches within a few hours, and the city lists excessive rainfall, tropical storms and hurricanes, and overloaded drainage as flood causes; Moen also states that its Flo shutoff cannot protect against external environmental flooding such as heavy rains, an overflowing sump pump, or a leaky roof.[1][2]
That boundary decides the whole design. A leak sensor by a washing machine can trigger an alert and, with the right valve, close the home’s water supply. A sensor by a sliding door during a wind-driven storm can wake someone up, start an escalation, or prove where water entered, but it cannot make the rain stop or close the street drainage system.

A good first purchase can be simple. Aqara’s Water Leak Sensor is a small Zigbee sensor that requires an Aqara hub, is rated IP67, can trigger at water depth as low as 0.5 mm, uses a CR2032 battery rated for more than two years, and can be paired with Aqara’s Valve Controller T1 for automatic shutoff.[3] Those details matter more than whether the package says “flood protection.” The useful question is where the sensor sits, who receives the alert, and what action follows.
Place sensors by water paths, not by product categories
For Orlando homes, the placement map should include two kinds of water paths. The first is plumbing water: pressurized supply lines, fixtures, appliances, and tanks. The second is storm water: rain pushed toward exterior doors, garage thresholds, low exterior walls, roof leak paths, patios, and any place runoff has entered before. Standard leak-sensor guidance commonly points to water heaters, washing machines, dishwashers, sinks, dehumidifiers, sump pumps where present, and toilets; Orlando’s rainfall pattern adds more attention to exterior entry points and utility or garage areas.[1][4]
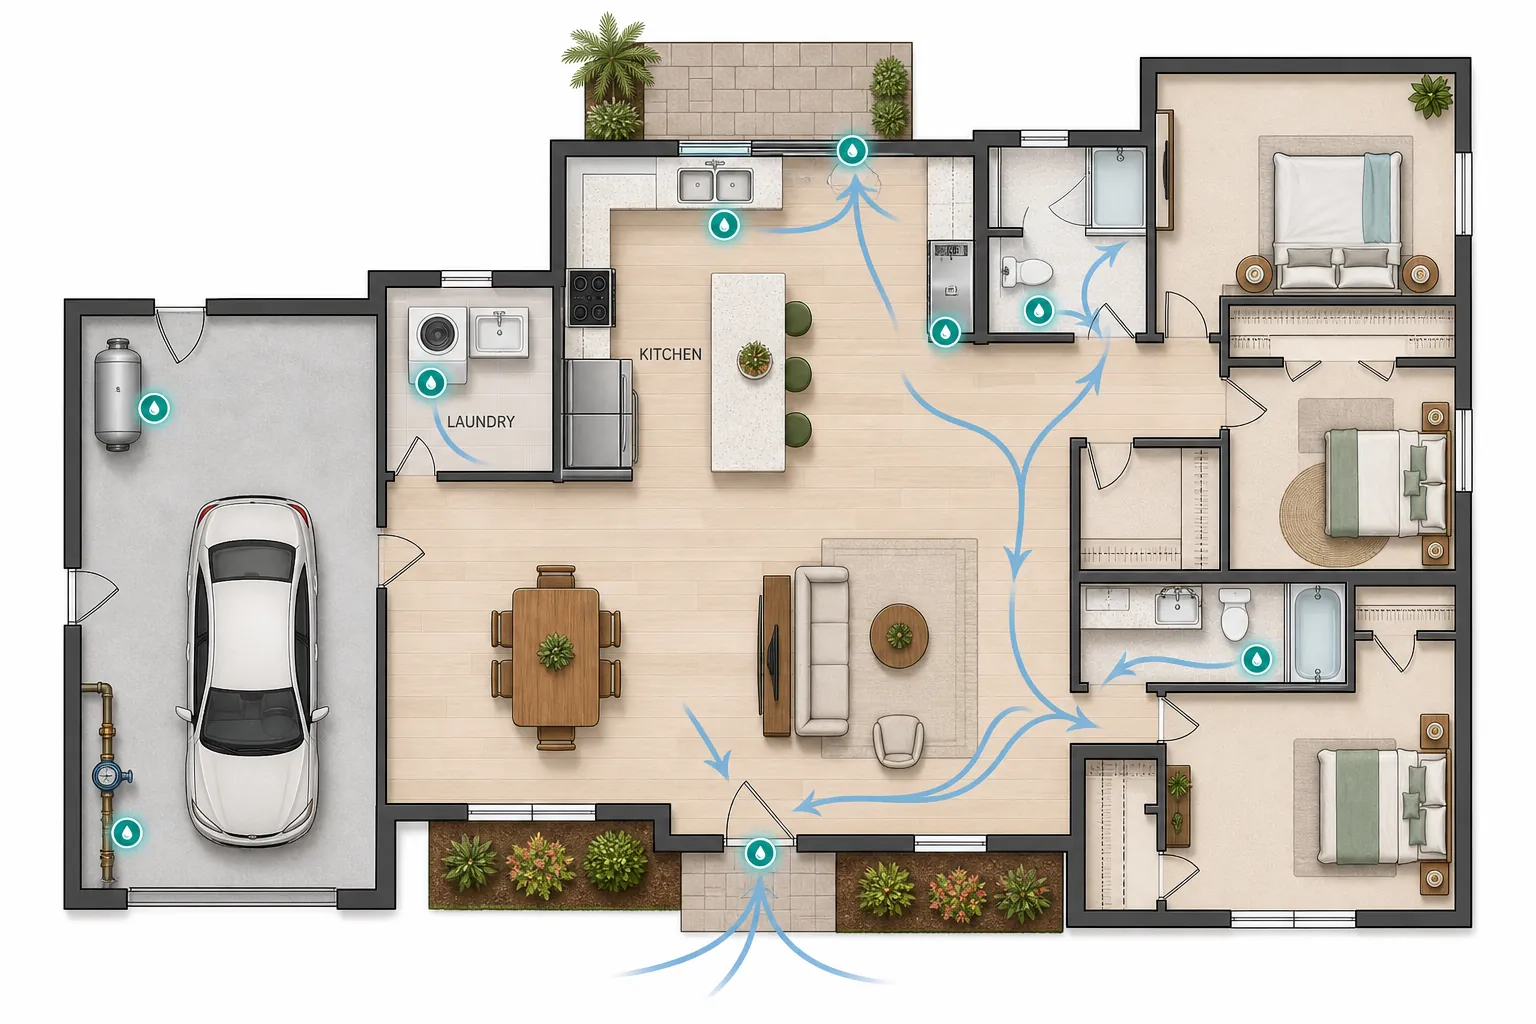
| Placement zone | What the sensor is watching for | Best response |
|---|---|---|
| Garage or utility area near the main line, water heater, softener, or filtration equipment | Internal plumbing leak or tank failure; in many Central Florida homes this is a practical first inspection area, but verify your own main-line path | Alert immediately; close a compatible shutoff valve if the leak is on the supplied plumbing side |
| Laundry room floor, especially behind or beside the washing machine | Burst hose, valve leak, drain overflow, or appliance leak | Alert; shut off water supply if the valve controls that branch or the whole home |
| Kitchen sink cabinet and dishwasher toe-kick area | Supply-line leak, drain leak, dishwasher leak that reaches the floor | Alert; shut off supply for active plumbing leaks |
| Bathroom toilets, vanity cabinets, and nearby floor edges | Toilet supply leak, wax-ring seepage, vanity supply or drain leak | Alert; shut off water if the leak is from supply plumbing |
| Front door, sliding glass door, patio door, and garage threshold | Rainwater entering from outside during heavy rain or wind-driven storms | Critical alert and escalation; physical mitigation is still required |
| Air-handler closet, dehumidifier, condensate pump, or sump pump where present | Condensate overflow, pump failure, or localized equipment leak | Alert; shutoff may not help unless the water source is the home’s supply plumbing |
| Known past problem spot | Whatever has already happened once: seepage, backed-up drain, roof leak drip path, threshold entry | Alert early; pair with the specific repair or mitigation that actually addresses that water source |
The garage row needs special care. Moen’s installation material says the main water line typically enters through a garage, basement, or exterior wall, but that is not a promise about every Orlando house.[2] Walk the home first. Find the main shutoff, water heater, irrigation tie-ins, filtration equipment, and any exterior wall penetrations before deciding where the first sensor goes.
Exterior thresholds deserve sensors only if the alert will change behavior. If water is already under the sliding door, a phone alert can get towels, barriers, a wet vac, photos, or a neighbor moving; it cannot close a pipe to stop that water. That still makes the sensor useful, but it is a warning device in that location, not a cure.
Choose the tier you can actually maintain
Do not buy ten sensors and create one silent failure. Pick the highest tier you can test after installation, after a router reboot, and before a stormy week.
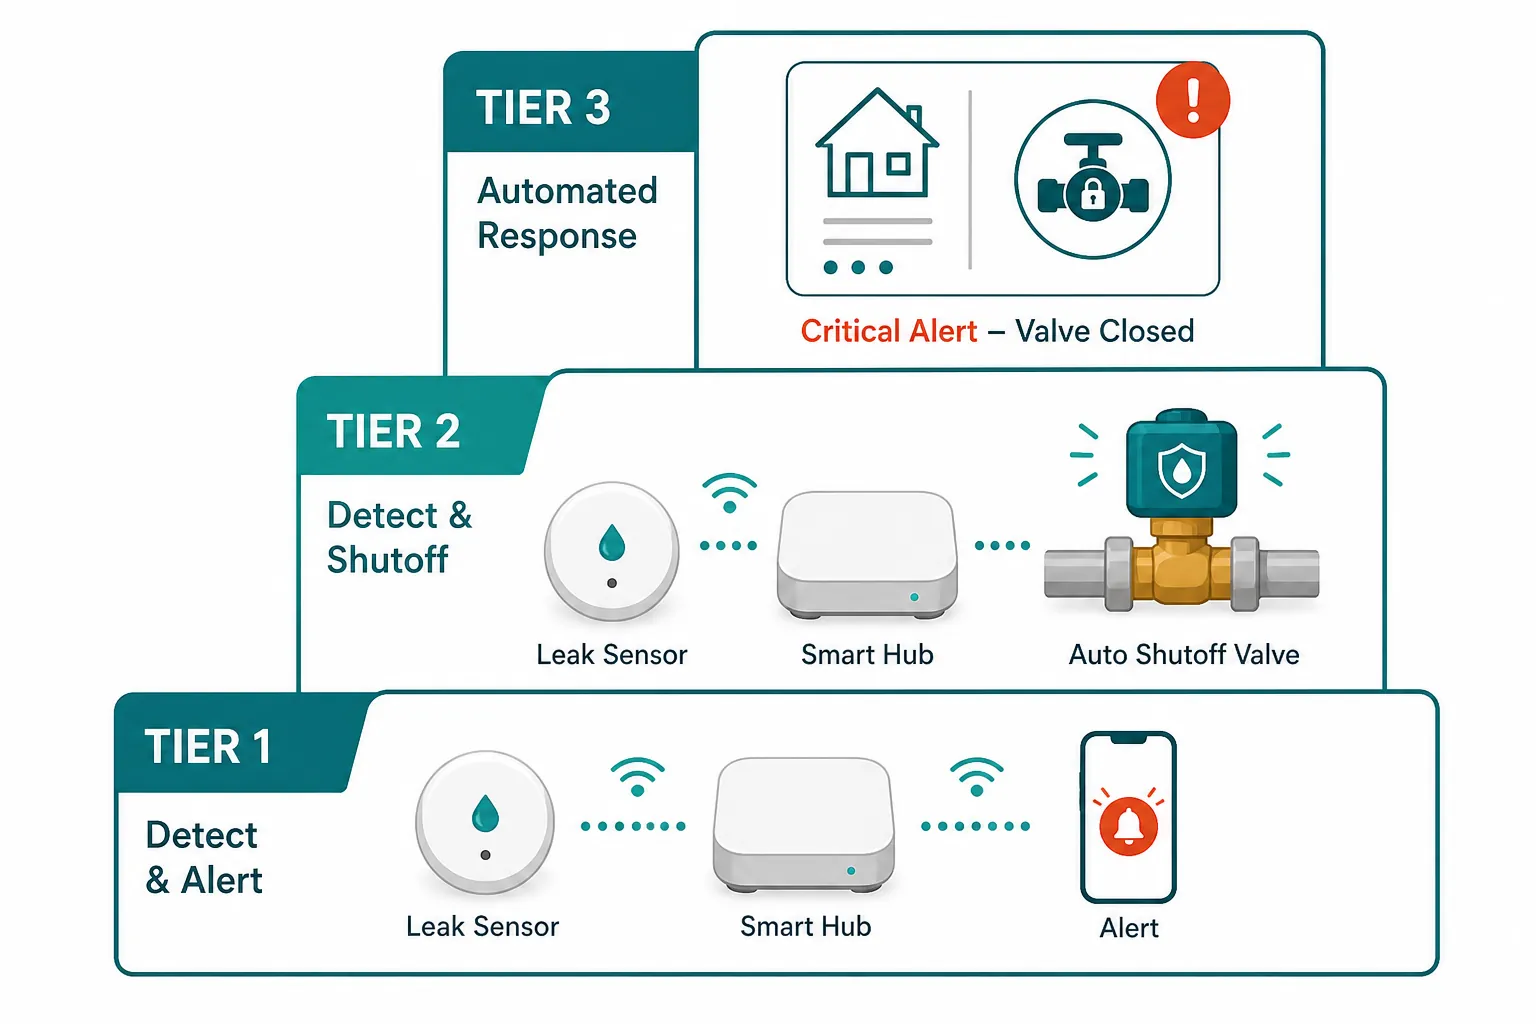
| Tier | Best for | Core setup | What it can change |
|---|---|---|---|
| Tier 1: Sensor plus app alert | Beginners, renters who cannot modify plumbing, or homeowners who need a working first layer quickly | Aqara Water Leak Sensor plus Aqara Hub, placed at the highest-risk leak and entry points | Gets a person moving sooner; does not stop water by itself |
| Tier 2: Sensor plus shutoff | Homeowners ready to add a controllable valve or smart water shutoff | Leak sensors connected to Moen Flo, Aqara Valve Controller T1, or another compatible valve path | Can stop internal supply-plumbing water; still cannot stop rainwater entering from outside |
| Tier 3: Home Assistant incident automation | Enthusiasts who already maintain Home Assistant and want logging, critical alerts, and safer automation rules | Moisture detection group, valve.close_valve action, critical notifications, maintenance bypass, logs, and cleanup rules | Turns a leak into an incident workflow instead of a single push notification |
Tier 1: Aqara sensor and hub alerts
Start with the places where a few minutes matter: water heater area, washing machine, kitchen sink or dishwasher, and the exterior threshold most likely to see storm water. Pair each Aqara sensor to the Aqara Hub, name it by location rather than by room decoration, and send notifications to the person who can act. “Laundry leak” is better than “Sensor 4.”
Approximate price planning should stay humble. SafeWise’s water-leak-sensor guide describes a broad $30 to $100 range, with most around $50, but prices and bundles change by retailer and date.[4] Spend less time hunting the lowest price and more time buying enough sensors for the actual water paths.
- Name sensors by consequence: “Water heater floor,” “Washer pan,” “Front door threshold,” “Kitchen sink cabinet.”
- Enable push notifications for more than one person if the home is often empty.
- Test each sensor with a damp paper towel or shallow water contact, then dry it and confirm the alert clears.
- Put exterior-threshold sensors where water will touch them early, not where water will arrive after the room is already soaked.
Tier 2: Add a valve only where a valve can help
A smart shutoff changes the outcome for a burst supply line, a failed appliance hose, or another leak fed by the home’s water supply. Moen’s Flo is built for monitoring and shutoff, and Aqara’s own Water Leak Sensor page describes pairing with the Aqara Valve Controller T1 for automatic shutoff.[2][3]
That same valve does not solve a roof leak, water coming through a door, an overflowing exterior drainage problem, or street flooding. If the sensor is watching rainwater, the automation should escalate the alert, turn on lights, start a camera recording if you use one, or notify a neighbor. Closing the domestic water supply may be harmless in some cases, but it is not the fix for the event the sensor found.
If you want a broader water-leak auto-shutoff example, the site’s storm damage protection recipes cover that pattern as part of a larger severe-weather setup. Keep the same boundary there too: shutoffs are for supplied water, not for rain.
Tier 3: Home Assistant as an incident system
Home Assistant is where leak detection can become more than a phone buzz. The official moisture-detected trigger documentation shows an automation pattern that reacts to sensors labeled for leaks, closes a smart water valve with the valve.close_valve action, and sends a critical notification.[5] Use that as a pattern, not as permission to invent entity IDs.
alias: Leak incident - close supply and alert
mode: single
triggers:
  - trigger: moisture.detected
    label: leak_sensors
conditions:
  - condition: state
    entity_id: input_boolean.leak_test_mode
    state: "off"
actions:
  - action: valve.close_valve
    target:
      entity_id: valve.YOUR_REAL_WATER_SHUTOFF_ENTITY
  - action: notify.YOUR_REAL_CRITICAL_NOTIFY_TARGET
    data:
      title: "Water detected"
      message: "Check the triggered leak sensor and confirm whether this is plumbing water or external storm water."
      data:
        push:
          sound:
            name: default
            critical: 1
            volume: 1.0
Treat that YAML as a skeleton. Replace placeholders with entities from your own Home Assistant instance, and do not copy entity IDs from a release note or someone else’s blog. vCloudInfo’s leak-detection pattern adds the parts that keep this from becoming a nuisance automation: a maintenance guard for leak testing, Activity Feed logging, Home Assistant Repair integration, state-based alert cleanup, and an explicit warning against making up entity IDs.[6]
The maintenance guard matters. Without it, every monthly sensor test can close the water valve, send critical alerts, and train the household to ignore the next real notification. With it, the test still proves the sensor works, but the emergency action stays off while you are intentionally wetting contacts.
Compatibility checks before you buy
Aqara’s sensor is Zigbee and needs an Aqara hub.[3] That is fine for a beginner Tier 1 setup, but it is not the same as buying a random Wi-Fi leak puck and expecting it to appear everywhere. Zigbee can be excellent for battery sensors, yet the mesh still has to reach the garage, laundry area, or far side of the house; Home Assistant-focused sensor guides repeatedly flag Zigbee network stability and repeater placement as practical concerns.[7]
Wi-Fi sensors avoid a dedicated Zigbee hub but usually make different battery and network tradeoffs. SmartHomeCompared’s protocol comparison frames water-leak sensors across Wi-Fi, Zigbee, Z-Wave, and other ecosystems with battery-life and reliability differences, which is the right shopping lens here.[8] Buy into the system you will maintain, not the one with the most dramatic product page.
- If the sensor is in the garage, test it with the garage door closed and the router in its normal location.
- If the shutoff valve depends on Wi-Fi or a hub, test what happens after the router and hub restart.
- If the automation closes the whole-home water supply, make sure everyone knows how to reopen it safely.
- If you use exterior-threshold sensors, separate those alerts from plumbing-leak alerts so the response is not misleading.
Verify the setup before the next heavy-rain week
Pairing is not proof. A useful Orlando flood-sensor setup passes a wet test, an alert test, a sleep-mode test, and a response test. Do it while the floor is dry and nobody is trying to decide whether water is coming from a pipe, a door, or the ceiling.
| Test | How to run it | Pass condition |
|---|---|---|
| Wet contact | Wet the sensor contacts or place the sensor in shallow water according to the product instructions | The named sensor changes state and reports water quickly |
| Phone asleep | Lock the phone, enable the normal nighttime or focus mode, then trigger a test | The right person still receives the alert |
| Valve action | Use test mode if available, then trigger the plumbing-leak automation | The valve closes only for the intended plumbing-leak path |
| External-water alert | Trigger the threshold sensor separately | The alert describes rain or exterior water and does not imply that a shutoff fixed it |
| Power and network recovery | Restart the hub, router, or Home Assistant host during a planned test window | Sensors, alerts, and automations return without silent failures |
| Household handoff | Ask the person most likely to receive the alert what they would do first | They can identify the location, shutoff status, and next action |
For external flooding, the next actions are not more leak sensors. They are physical mitigation, seasonal prep, backup power, and documentation. The hurricane prep checklist is the better place to organize phase-by-phase storm work, and the hurricane preparedness device guide is where backup power and fallback-device decisions belong.
There is also a separate life-safety problem during flash flooding: getting advance warning before people are trapped or asleep through official alerts. That is what the smart home flash-flood alarm setup is for. This setup is narrower: property-protection placement, local leak detection, and response wiring inside the home.
Smart flood sensors are worth installing in Orlando when they sit where water will actually appear, alert someone who can act, and connect to a response that matches the source. For plumbing leaks, that response can be an automatic shutoff. For rain-driven external flooding, the sensor’s job is detection and escalation; damage control has to come from barriers, drainage work, preparation, documentation, and insurance rather than from the sensor itself.
References
- Floodplain Information, City of Orlando
- Flo Smart Water Monitor and Shutoff, Moen
- Water Leak Sensor, Aqara
- Water Leak Sensors, SafeWise, July 2025
- Moisture detected trigger, Home Assistant
- Home Assistant Leak Detection Automations, vCloudInfo, June 2026
- Best Water Leak & Flood Sensors for Home Assistant, MakeItWork Tech
- Water Leak Sensors, SmartHomeCompared