If you've already read a full feature comparison of these two thermostats and you're ready to buy, the next question is whether your home can actually support the one you're leaning toward. That's a different question — and a more urgent one.
Why Check Installation Compatibility Before You Buy
Most buyers research features first and installation second. For smart thermostats, that order creates problems. The Ecobee SmartThermostat Premium and the Nest Learning Thermostat 4th gen have meaningfully different wiring requirements, and discovering an incompatibility after opening the box wastes time and can leave you without heat or cooling while you troubleshoot.
This guide covers only the installation and HVAC compatibility dimension of this decision. If you still need to compare features, ecosystem fit, occupancy sensing, or energy savings, the full Ecobee Premium vs. Nest Learning Thermostat comparison for 2026 covers all of that. Come back here once you've narrowed your choice and need to confirm your home is ready.
The single most practical pre-purchase differentiator between these two devices is C-wire availability. Everything else in this guide flows from that one question.
How to Check Your Home's Wiring in Five Minutes
Before reading any further, take five minutes to check your existing thermostat wiring. This single step tells you everything you need to know about which installation path applies to you.
- Turn off power to your HVAC system at the breaker or furnace power switch.
- Pull the thermostat faceplate straight off the wall — most snap off without tools.
- Look at the wiring base plate attached to the wall. You'll see a terminal block with labeled slots.
- Find the terminal labeled C. If there is a wire seated in that slot, you have a C-wire.
- If the C terminal is empty, note how many total wires are present and what colors they are.
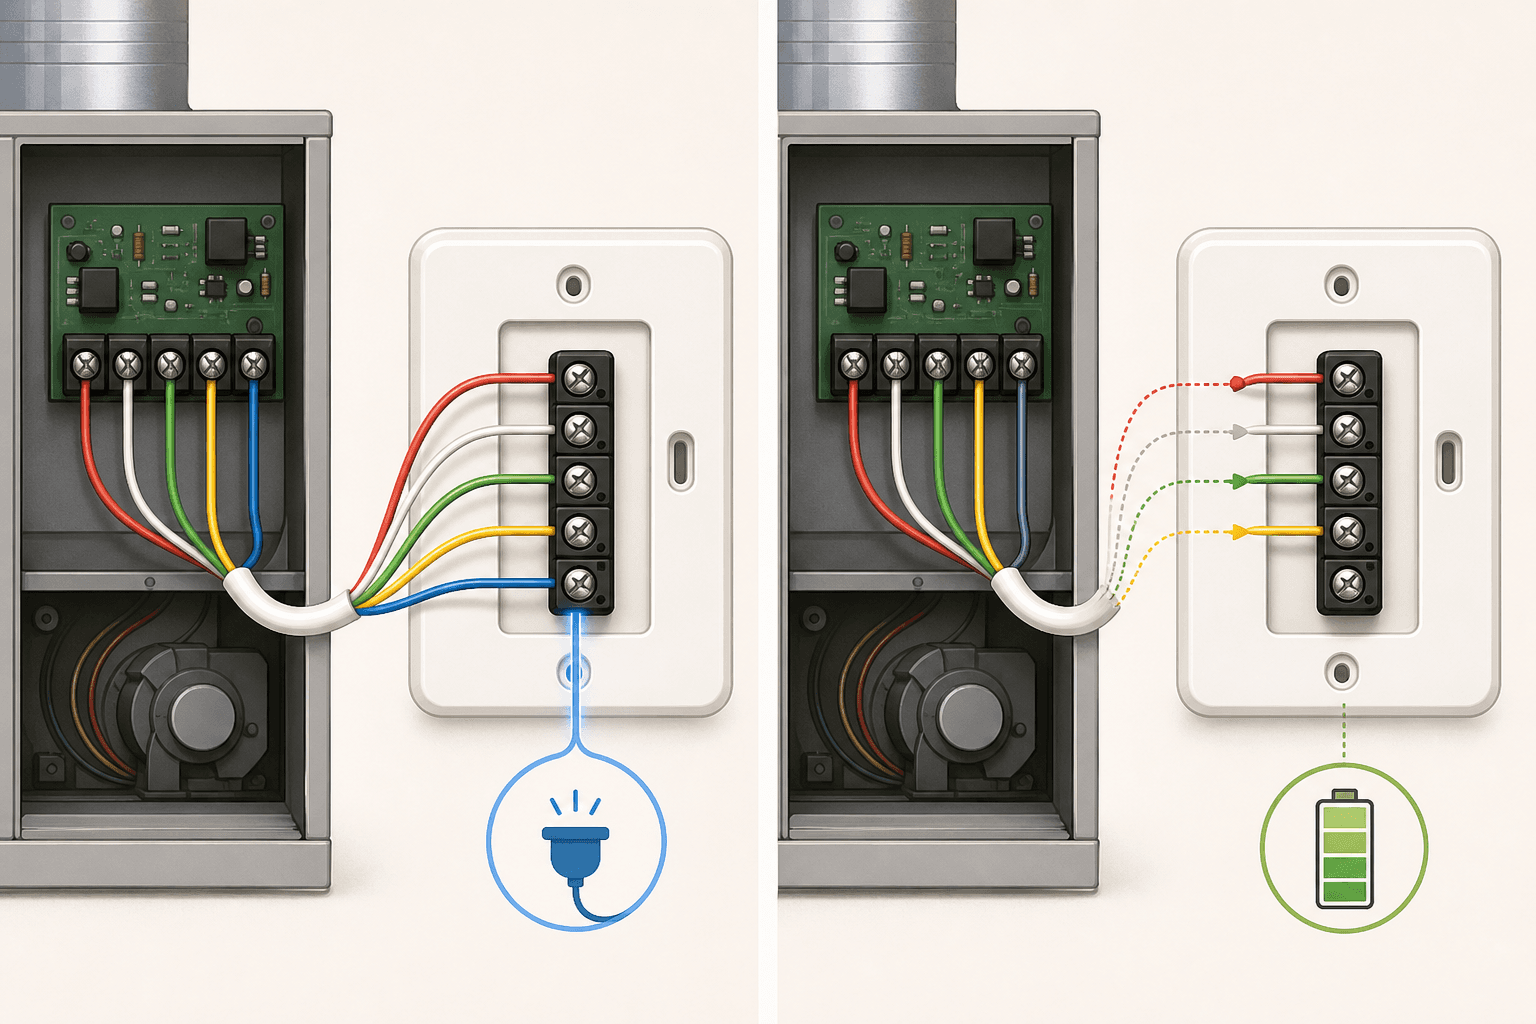
The C-wire — short for "common" — closes the 24-volt circuit between your thermostat and HVAC equipment. Older thermostats needed only two to four wires to signal heating and cooling. Modern smart thermostats run Wi-Fi radios, color displays, sensors, and processors continuously, and the signal wires alone cannot supply that load. The C-wire provides constant 24VAC to keep everything powered between HVAC cycles.
The C-wire is typically blue, but wire colors are not standardized — previous installers may have used any color. The terminal label is what matters, not the wire color. If you see a wire in the C terminal, you have one regardless of its color.

Nest Learning Thermostat 4th Gen: Installing Without a C-Wire
The Nest Learning Thermostat 4th gen is designed to work in most 24V homes without a C-wire. It draws power from the heating and cooling signal wires while the HVAC system is running, then stores that energy in a built-in rechargeable battery to power itself between cycles. Google states this approach works in over 99% of homes.
In practice, this makes Nest the simpler wall-only installation for older homes that were never wired with a C-wire. You remove the old thermostat, attach the Nest base plate, connect the existing wires, and mount the display — no furnace cabinet required.
If you don't have a C-wire and your system has any of these sensitive components, Google sells a Nest Power Connector for approximately $25. Like the Ecobee PEK, it installs at the furnace or air handler and creates a proper C-wire connection — but it is sold separately and is not included with the Nest.
If you do have a C-wire available, connect it. There is no reason to rely on power scavenging when a proper power source is present.
Ecobee SmartThermostat Premium: C-Wire Requirement and Power Extender Kit Walkthrough
Ecobee requires either a C-wire or the Power Extender Kit (PEK) to operate. The PEK is included in the box at no extra cost — confirmed on Ecobee's official product page and Amazon listing. You do not need to purchase it separately. The box contains: the thermostat, mounting plate, SmartSensor, wire labels, screws and drywall anchors, the PEK, a trim plate, and a quick-start guide.
If your home has a C-wire, installation is straightforward: connect it to the C terminal on the Ecobee base plate, connect the remaining wires, and you're done at the wall. The PEK stays in the box.
If you don't have a C-wire, the PEK path adds a second location to the installation: your furnace or air handler cabinet.
PEK Installation Steps
- Turn off power to the HVAC system at the breaker or furnace switch.
- Locate your furnace or air handler. Open the access panel — usually a removable metal door held by clips or a single screw.
- Find the terminal strip on the control board. This is where your thermostat wires currently connect.
- Follow the wiring diagram in the PEK instructions to connect the module between the control board terminals and the thermostat wire bundle.
- Attach the PEK module to the inside of the cabinet using its built-in magnetic mount.
- Run the wires back to the wall and complete the thermostat installation as normal.
The PEK installation adds roughly 20–30 minutes compared to a wall-only install, and requires comfort opening an HVAC cabinet and working near a control board. The instructions are clear and the process is manageable for a confident DIYer, but it is a meaningfully different task than Nest's wall-only approach in no-C-wire homes.
Supported HVAC Systems: What Each Thermostat Works With
Both thermostats support a wide range of 24VAC HVAC systems. Ecobee officially claims compatibility with up to 95% of HVAC systems. The table below covers the system types both devices support, based on official product specifications.
| HVAC System Type | Ecobee SmartThermostat Premium | Nest Learning Thermostat 4th Gen |
|---|---|---|
| Gas furnace (1–2 stage) | Yes | Yes (up to 3 stage) |
| Electric furnace / resistance heat | Yes | Yes |
| Oil furnace | Yes | Yes |
| Central air conditioning (1–2 stage) | Yes (2H/2C) | Yes (1–2 stage) |
| Heat pump with AUX heat (2H/2C + 2-stage AUX) | Yes | Yes |
| Heat pump with emergency heat | Yes | Yes |
| Boiler (hot water radiant) | Yes | Yes |
| PTAC / fan coil unit (up to 3 fan speeds) | Yes | Yes |
| Humidifier (1-wire or 2-wire accessory) | Yes | Yes |
| Dehumidifier | Yes | Yes |
| Ventilation (HRV/ERV) | Yes | Yes |
| Millivolt systems | No | No |
| High-voltage systems (120V/240V) | No | No |
Step-by-Step Installation: App Guidance, Wiring Blocks, and Verification
Both thermostats use app-guided installation that walks you through wiring identification, connection, and verification. The experience differs in a few meaningful ways.
App Requirements
- Nest Learning Thermostat 4th gen requires the Google Home app for setup. There is no standalone Nest app for initial configuration. If you don't already have a Google account, you'll need to create one.
- Ecobee SmartThermostat Premium uses the Ecobee app for setup. An Ecobee account is required. The app is available on iOS and Android.
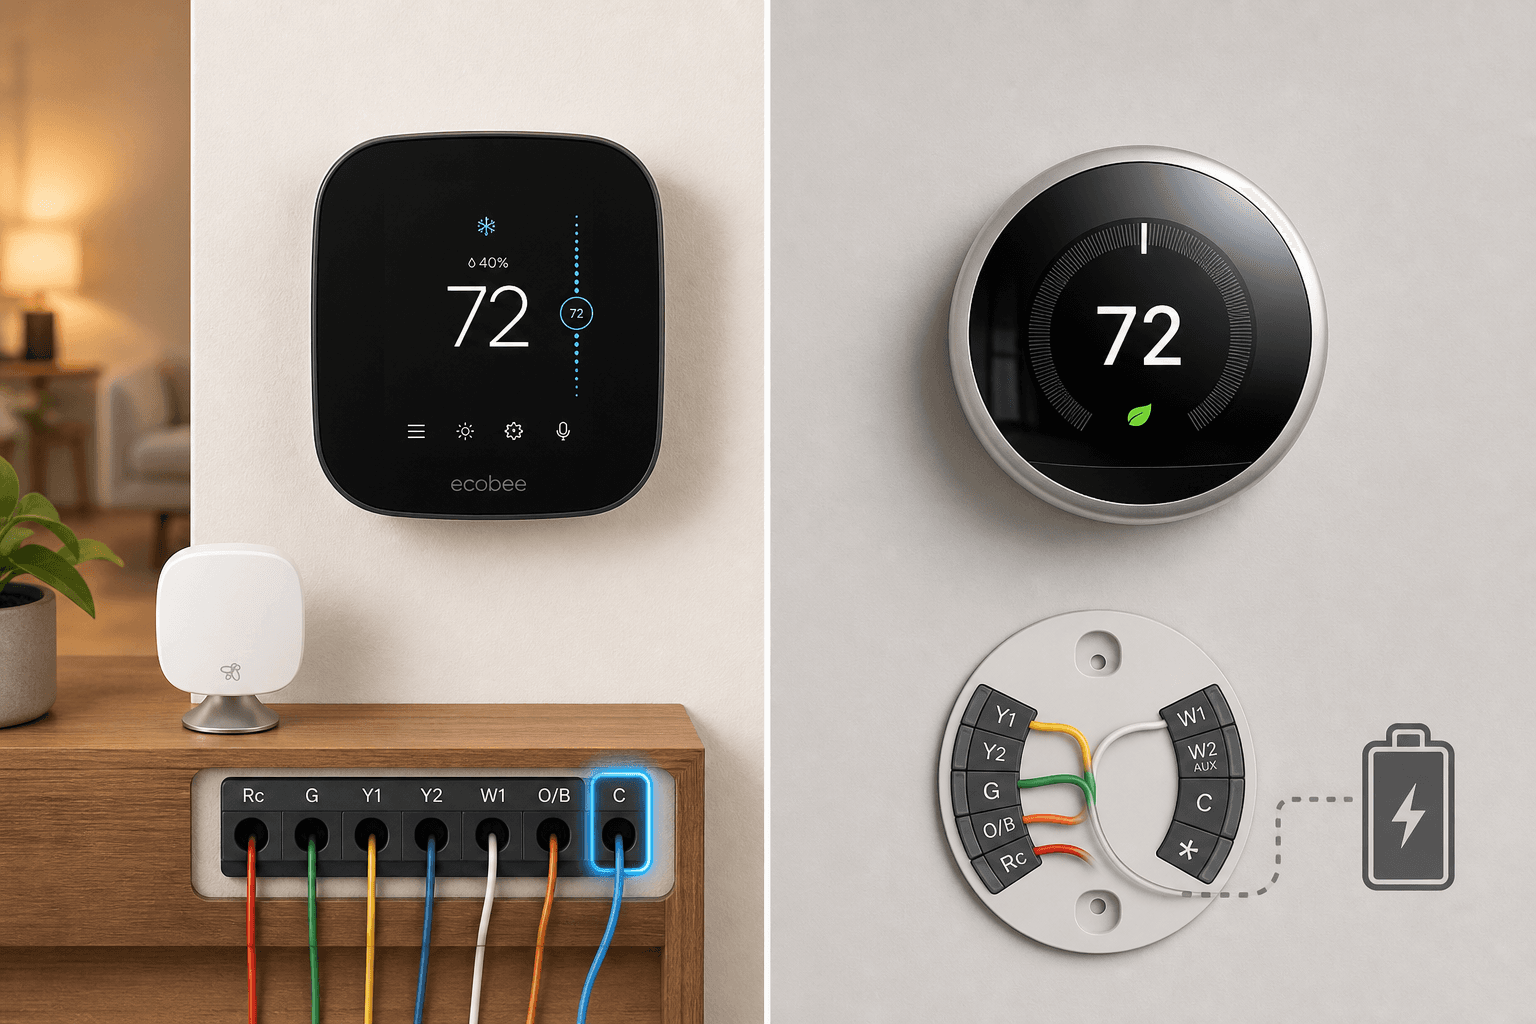
Wiring Block Design
The Nest 4th gen wiring block includes an integrated bubble level — a useful feature that helps you mount the base plate straight without a separate tool. However, the wire socket labels use gray text on a gray background, which is very difficult to read even in good lighting. Reviewers have noted that a headlamp is practically necessary to read them accurately during installation.
Ecobee's wiring block uses clearly printed, high-contrast labels. The terminal identifiers are legible at a glance, which reduces the chance of a miswire. If you're installing in a dimly lit hallway or utility closet — the typical thermostat location — this difference is practical, not cosmetic.
App Guidance and Wiring Verification
Both apps walk you through identifying each wire by its current terminal label, then guide you through connecting each wire to the new thermostat. Both perform a verification step after wiring to confirm the system is communicating correctly before you mount the display.
One specific quirk in the Nest Google Home app setup: after you initiate the device search, the app immediately displays an animation suggesting the thermostat should already be powered and visible. Since the thermostat is not yet connected at this stage, this can be confusing. You don't need to do anything — just wait for the animation to pass and the app will move to the next step.
Common Installation Pitfalls for Each Device
Nest Learning Thermostat 4th Gen
- Gray-on-gray wire labels: Bring a headlamp or a bright flashlight. Misreading a label and connecting a wire to the wrong terminal is the most common installation error and can cause system faults.
- Upgrading from a 3rd gen Nest: The 4th gen base plate is not compatible with the 3rd gen wiring backplate. If you're replacing a previous Nest, you must remove the old base plate entirely and install the new one from scratch — you cannot reuse the existing mounting.
- R wire voltage issues: Some users have reported that the 4th gen has different R wire voltage requirements than the 3rd gen, causing the setup app to report no power on the R wire even when wiring appears correct. This is documented in community reports. If you encounter this, verify the R wire connection and check Google's current support documentation before assuming a defective unit.
- No C-wire with sensitive HVAC: As noted above, operating without a C-wire on a system with variable-speed motors or modulating valves is a documented risk. Add the Nest Power Connector if you're in this situation.
Ecobee SmartThermostat Premium
- PEK terminal difficulty: The PEK terminal holes are small and designed for solid copper wire, not the twisted copper strands common in residential thermostat bundles. If you're struggling to insert the wires, pick up crimp connectors at a hardware store before starting — they make this step straightforward.
- Furnace cabinet access: First-time installers are sometimes surprised by the PEK requirement to open the HVAC cabinet. This is a normal part of the process, but if your furnace or air handler is in a tight space or you're not comfortable working near the control board, plan extra time or consider professional installation.
- Outdoor temperature accuracy for heat pump aux heat: If you live in a rural area and your heat pump relies on outdoor temperature thresholds to switch between heat pump and aux heat, verify that the nearest weather station data is accurate for your location before relying on Ecobee's default behavior.
When to Call an HVAC Professional
Both thermostats are designed for DIY installation, and the majority of standard residential HVAC systems are genuinely straightforward to wire. But some situations call for a professional.
- Your existing thermostat wiring has more than five wires and you can't identify what each one does.
- The terminal labels on your current thermostat don't match standard labels (Rc, Rh, Y, G, W, C, O/B) and you don't know your system type.
- You have a dual-fuel heat pump (gas backup) or a multi-stage system with more than two heating or cooling stages.
- You have a zone control system with a separate zone controller — thermostat wiring in these setups often connects to the zone board, not directly to the air handler.
- Your HVAC system is under warranty and you're concerned that a DIY thermostat swap could affect coverage.
- After installation, the system doesn't respond correctly — heating when it should cool, short-cycling, or not turning on at all.
Both Ecobee and Nest offer professional installation options through their respective partner networks. Ecobee's 3-year limited warranty and Nest's 2-year retail warranty (5 years when installed by a certified HVAC professional) remain valid with professional installation.
Verdict: Which Thermostat to Choose Based on Your Home's Wiring
The right choice depends on your wiring situation, not your lifestyle. Here's the decision organized by home type.
| Your Home's Wiring Situation | Recommended Device | Reason |
|---|---|---|
| C-wire present at the thermostat | Either — slight edge to Ecobee | Both work cleanly. Ecobee's clearer wiring labels reduce installation error risk. Feature preference drives the final call. |
| No C-wire, standard HVAC (single-speed furnace or AC, no variable-speed components) | Nest Learning Thermostat 4th gen | Wall-only installation, no furnace cabinet access needed. Power scavenging is reliable on standard systems. |
| No C-wire, modern high-efficiency HVAC with variable-speed blower or modulating valve | Ecobee with PEK — or Nest with Power Connector added | Nest's power scavenging carries documented risk on these systems. Ecobee PEK (included) or Nest Power Connector ($25 extra) both solve this cleanly. Professional verification recommended. |
| Heat pump with auxiliary heat, rural location | Nest Learning Thermostat 4th gen | Avoids Ecobee's internet-based outdoor temperature limitation for aux heat crossover decisions. |
| Upgrading from a 3rd gen Nest | Either — but plan for full base plate replacement if staying with Nest | Nest 4th gen base plate is incompatible with 3rd gen. Full removal of old base plate required. Ecobee installation is the same as any new install. |
Once you've confirmed installation feasibility and made your choice, both thermostats support geofencing-based automation that can meaningfully reduce energy use. The Away Mode automation recipe for geofencing your thermostat, lock, and lights is a practical first automation to set up after installation. The Bedtime routine for coordinating your thermostat and lights is another easy starting point. For potential energy savings and ENERGY STAR rebate eligibility for either device, see the smart thermostat energy savings and rebate guide for 2026.
Discussion
Share your experience with the compared products, flag outdated pricing or specs, or ask clarifying questions about the comparison verdict.
Comments
Join the discussion with an anonymous comment.