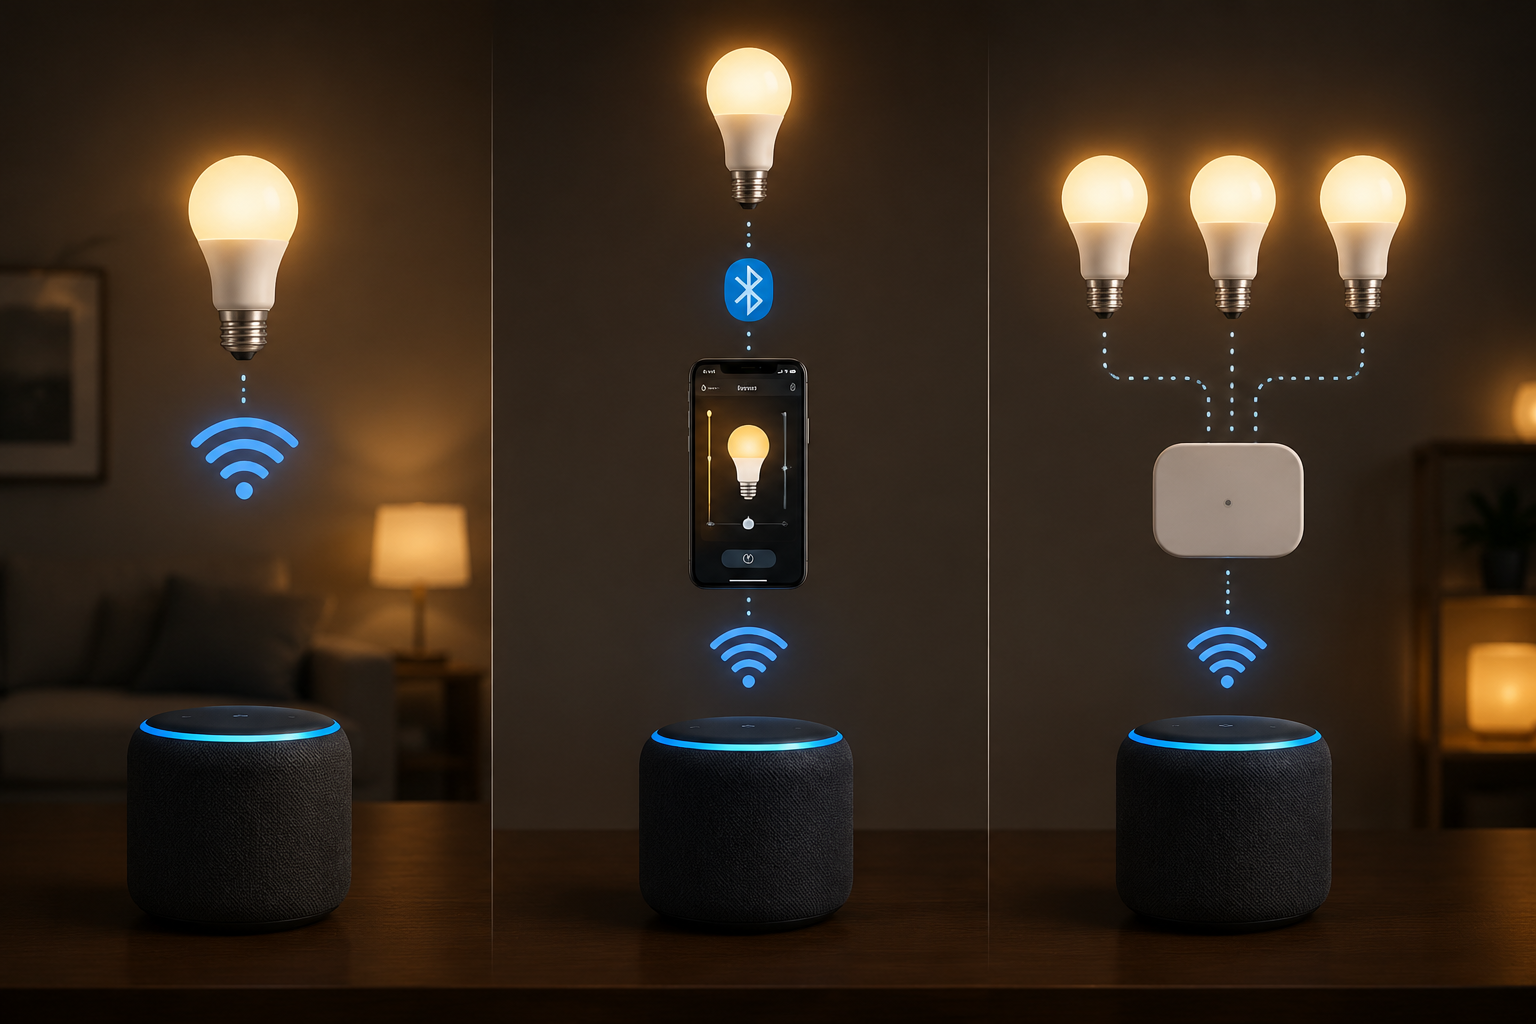
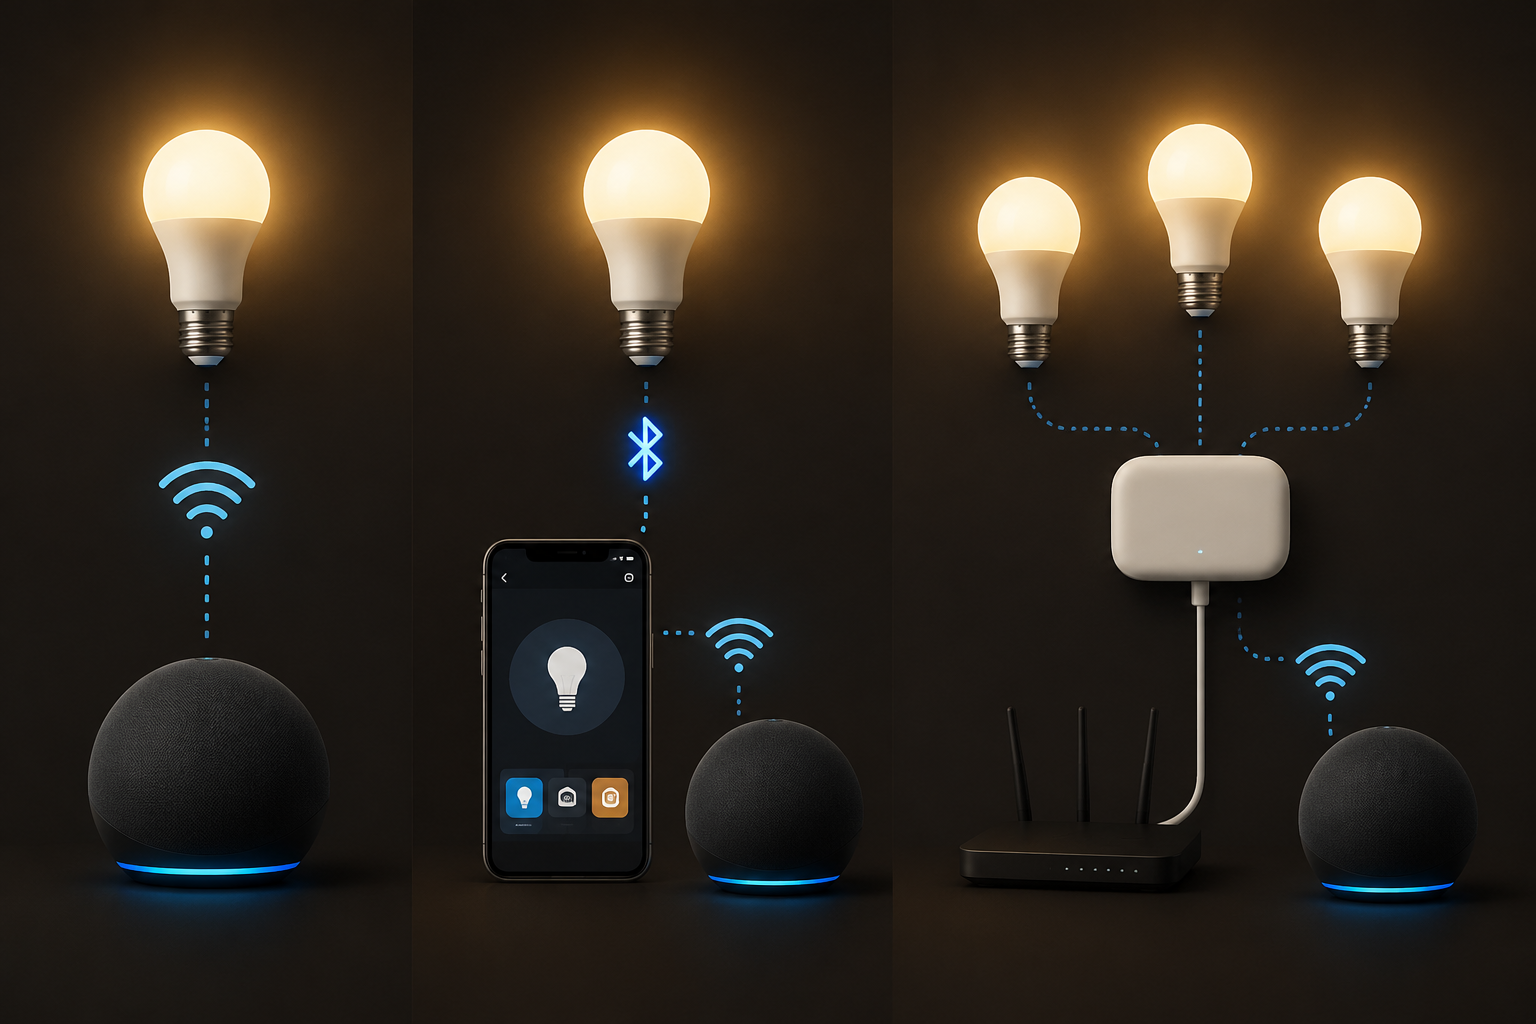
Your bulb can say “works with Alexa” and still need one of three different setup paths. Some smart lights connect straight to Wi-Fi. Some pair first by Bluetooth in the brand’s app, then link to Alexa with a Skill. Others need a hub or bridge before Alexa can see them. The trick is not to keep tapping “Discover Devices” harder; it is to identify which kind of bulb you are holding before you start.
Amazon’s own setup route starts in the Alexa app: Devices, the plus sign, Add Device, then Light. From there, the app asks for the brand and changes the pairing instructions to match that device. Amazon says the flow covers more than 40 smart light brands, which is helpful, but it also explains why two Alexa-compatible bulbs on the same shelf can behave differently once you screw them in.[1]
Before you do the full manual setup, give Frustration-Free Setup a chance if your bulb advertises it. With compatible bulbs, Amazon says you can power on the bulb and let Alexa discover it automatically within about one minute.[1] That is the good version of setup: no pairing code, no brand app tour, no guessing. It is also not universal. Availability depends on the bulb, manufacturer support, and account setup, so treat it as a fast lane to check first, not as proof that something is broken if it does not happen.
First, identify the connection path
Look at the box, the quick-start card, or the product listing. You are looking for the connection words, not the marketing badge.
| What the bulb or app says | What it usually means | Setup path |
|---|---|---|
| “Wi-Fi,” “no hub required,” “2.4GHz Wi-Fi” | The bulb joins your home Wi-Fi directly | Use Alexa Add Device or the brand app, then discover in Alexa |
| “Bluetooth,” “pair in app,” “enable Skill” | The phone talks to the bulb first, then Alexa links through the brand account | Pair in the companion app, enable the Alexa Skill, then discover |
| “Bridge required,” “Hub required,” “Hue Bridge,” “Ring Bridge” | A separate box connects to the router and manages the bulbs | Set up the hub, add bulbs there, enable the Skill, then discover |
| “Matter,” “Frustration-Free Setup,” or “Certified for Humans” | Some models may auto-add or use a newer pairing flow | Power on near your Echo or use the Alexa app’s guided setup |
For most first-time bulbs from Amazon Basics, WiZ, Govee, TP-Link Kasa, and similar brands, the answer is usually Wi-Fi direct. Philips Hue can be either Bluetooth direct or Bridge-based, depending on what you bought. GE Cync commonly uses the Bluetooth-plus-Skill route, where the Cync app gets the bulb ready before Alexa takes over.[3][4]
If you are still shopping or trying to understand where your bulb fits, a broader smart lighting system comparison can help. For this setup, though, do not drift into brand research yet. The bulb in your hand only needs one working path.
Get the boring prerequisites right
Most failed Alexa smart-light setup attempts are not dramatic. The phone is on the wrong Wi-Fi band. Bluetooth is off. The bulb was not actually in pairing mode. The hub is plugged into power but not the router. Fix those before opening six tabs.
- Install or update the Alexa app and sign in to the Amazon account you use with your Echo devices.
- Connect your phone to the same home network you want the bulb to use.
- Use a 2.4GHz Wi-Fi network for most Wi-Fi bulbs; Amazon’s setup requirements call out 2.4GHz Wi-Fi, and 5GHz-only networks commonly fail at pairing.[1]
- Turn on Bluetooth during setup, even for many Wi-Fi bulbs, because the phone may use Bluetooth to pass Wi-Fi details to the bulb.[1]
- Screw the bulb into a standard fixture, turn the wall switch on, and keep it on while pairing.
- If your bulb uses a hub or bridge, connect that hub to your router and finish its app setup before asking Alexa to discover bulbs.
A note on 2.4GHz, because this is where many people get ambushed: a router can have both 2.4GHz and 5GHz bands under one network name, and that may work fine. If pairing repeatedly fails, temporarily separating the bands, disabling 5GHz during setup, or creating a 2.4GHz guest network can remove the guesswork. After the bulb is connected, you can usually put the router settings back.
Try Frustration-Free Setup before manual pairing
If the bulb supports Amazon Frustration-Free Setup, put it in the fixture, turn it on, and wait near your Echo or with the Alexa app open. Amazon describes the compatible-device path as automatic discovery after power-on, with setup completing in about a minute.[1]
When it works, the Alexa app should show a new light and prompt you to add it to a room or group. Rename it immediately to something you can say out loud: “Desk Lamp,” “Kitchen Sink,” “Bedroom Left.” Names like “A19 RGBW 2” are how people end up yelling at the wrong fixture.
If nothing appears after a minute or two, move on. That does not mean the bulb is incompatible with Alexa. It usually means this particular model needs the normal Add Device flow, the brand app, or a hub.
Path 1: Set up a Wi-Fi Direct bulb
Use this path for many no-hub bulbs: Amazon Basics, WiZ, Govee, TP-Link Kasa, and similar models. The bulb joins your 2.4GHz Wi-Fi network, then Alexa controls it over your home network.
- Open the Alexa app.
- Tap Devices.
- Tap the plus sign.
- Choose Add Device.
- Choose Light.
- Select the bulb brand, then follow the brand-specific instructions Alexa shows.
That brand selection matters. It is not a decorative step. Amazon’s Add Device flow changes after you select the brand, because different makers put bulbs into pairing mode differently and some require a companion account before Alexa can finish discovery.[1]
For an Amazon Basics smart bulb, the practical sequence is usually: power the bulb on, wait for it to enter pairing mode, then let Alexa discover it. SlashGear’s walkthrough adds a recovery detail that is easy to miss: if the bulb does not enter pairing mode cleanly, leave it powered on for 5 to 10 seconds before doing the rapid on-off reset sequence.[2] That short wait sounds silly until you have reset the same bulb four times too fast.
For WiZ, Kasa, Govee, and other Wi-Fi bulbs, the companion app may ask you to create or sign in to a brand account, choose the 2.4GHz network, and let the bulb blink while it joins. Once the bulb works in the brand app, return to Alexa, enable the matching Skill if prompted, and run Discover Devices.
Do not judge the setup until the bulb appears in Alexa, not merely in the brand app. A light that works in its own app but not in Alexa has completed only half the job.
What success looks like
In the Alexa app, the bulb should appear under Devices. Tap it once and test on/off control. Then say, “Alexa, turn on Desk Lamp.” If Alexa answers but the wrong light changes, rename or regroup the device before adding any routines.
Path 2: Pair by Bluetooth first, then link the Skill
Bluetooth setup is where the “works with Alexa” label can feel misleading. Alexa compatibility may not mean Alexa finds the bulb first. It may mean the brand app finds the bulb by Bluetooth, registers it to your brand account, and then Alexa controls it after you enable the brand’s Skill.
GE Lighting’s Cync instructions follow that shape: set up the light bulbs in the Cync app first, then connect Cync to Alexa so the devices can be discovered and controlled there.[4] Philips Hue also offers a Bluetooth setup path for some bulbs without using the Hue Bridge, though Hue separates that from its Bridge-enabled setup path.[3]
- Turn on Bluetooth on your phone.
- Install the bulb maker’s app, such as Cync or Philips Hue.
- Add the bulb in that app while standing reasonably close to the fixture.
- Confirm the bulb turns on and off inside the brand app.
- Open the Alexa app and enable the matching brand Skill if Alexa asks for it.
- Run Discover Devices, then assign the bulb to a room or group.
Keep your phone, the bulb, and the Echo device close during Bluetooth setup. Bluetooth-paired bulbs have roughly a 30-foot practical range during setup; walls, metal fixtures, and distance can make that feel shorter. If pairing fails from the couch, stand under the lamp and try again.
The Skill step is the one people skip because the bulb already works in the brand app. Alexa still needs permission to talk to that account. After enabling the Skill, the useful test is not “does the brand app work?” It is “does Alexa list the light as a device?”
Path 3: Set up the hub or bridge first
Hub-based lighting adds a box, but it can make the system steadier once it is set up. The order is strict: router, hub app, bulbs, Alexa Skill, discovery. If you ask Alexa to find a Bridge bulb before the bridge knows about it, Alexa has nothing useful to discover.
Philips Hue is the cleanest example. Hue documents two Alexa setup options: Bluetooth direct for compatible bulbs, or Hue Bridge setup for broader features. Hue says the Bridge path supports remote control, presence sensing, and Matter compatibility, while Bluetooth setup is the simpler no-bridge route with more limited features.[3]
- Plug the hub or bridge into power.
- Connect it to your router if the system requires Ethernet.
- Open the brand app and add the hub.
- Add the bulbs to that hub inside the brand app.
- Enable the brand’s Alexa Skill.
- Use Alexa Discover Devices and place the lights into rooms or groups.
A hub is not a failure or an outdated idea. It is just a different architecture. If you are planning a larger installation with multiple rooms, switches, and scenes, the whole-home smart lighting installation path may make more sense than adding one Wi-Fi bulb at a time.
If Alexa does not find the bulb
Stop repeating discovery for a moment. Work backward from the last place the bulb was definitely visible.
| Where it fails | Likely cause | What to try |
|---|---|---|
| Bulb never blinks or enters pairing mode | It is not reset or the wall switch interrupted setup | Keep the fixture powered, then use the brand reset sequence |
| Bulb appears in brand app but not Alexa | Skill is missing, account link failed, or discovery has not run | Enable or relink the Skill, then Discover Devices |
| Alexa finds the bulb but cannot control it | Weak Wi-Fi, hub offline, or duplicate device name | Move closer to router, check hub status, rename the bulb |
| Pairing fails at Wi-Fi password step | Phone is on 5GHz or password was passed to the wrong network | Use 2.4GHz Wi-Fi and retry pairing |
| Bluetooth setup times out | Phone is too far away or Bluetooth permission is blocked | Stand near the bulb and allow Bluetooth access in phone settings |
For Amazon Basics bulbs, SlashGear describes a reset recovery that depends on timing: power the bulb on for 5 to 10 seconds, then rapidly cycle it off and on until it indicates reset or pairing mode.[2] Follow the exact on/off count shown for your model in the Alexa app or product instructions, because different bulbs use different blink patterns.
For Philips Hue bulbs, Hue’s official Alexa setup page gives a more extreme-looking power-cycle reset method: turn the bulb off and on 12 times to reset it if needed.[3] It feels absurd the first time. It is also the kind of brand-specific detail that generic “restart it” advice misses.
If the bulb has been used before, reset it before pairing. A returned bulb, a bulb moved from another home, or a bulb previously added to a different account may still be trying to talk to its old setup. Alexa cannot reliably claim it until the bulb is back in pairing mode.
Name it, group it, and test one voice command
Once Alexa finds the bulb, finish the job while you are still standing there. Give the light a spoken name, assign it to a room, and test the command from the Echo device you plan to use most.
- Use natural names: “Entry Lamp,” “Kitchen Ceiling,” “Sofa Light.”
- Avoid names that sound like rooms if they are individual bulbs; “Kitchen” should usually be the group, not one bulb.
- Put multiple bulbs in the same room group if you want “Alexa, turn off the living room” to control all of them.
- Test from voice and from the Alexa app so you know whether the problem is naming, voice recognition, or device control.
Start with plain commands:
- “Alexa, turn on Desk Lamp.”
- “Alexa, dim Desk Lamp to 40 percent.”
- “Alexa, turn off the bedroom lights.”
- “Alexa, set Living Room to warm white.”
If the bulb supports color, then try color commands. Tom’s Guide documented 133 Alexa color commands in its 2022 reference, though Alexa’s available color handling may have changed since then through software updates.[7] For a first test, keep it simple: “Alexa, set Desk Lamp to blue,” or “Alexa, set Desk Lamp to soft white.”
A quick word on bulb specs, only where they affect setup
Brightness and price do not change the Alexa pairing path, but they can explain what kind of product you bought. CNET’s 2026 smart light roundup describes 800 lumens as the standard smart-bulb brightness, roughly comparable to a 60-watt incandescent, and notes that some models from Tapo and LIFX reach 1,100 lumens for brighter spaces.[5] If a bulb pairs perfectly but feels dim in a kitchen or garage, that is a bulb-selection problem, not an Alexa setup problem.
The same goes for cost. CNET places typical smart bulb pricing around $10 to $50, and Wirecutter’s 2026 review also points to WiZ as a low-friction entry point for many buyers.[5][6] A cheaper bulb is not automatically harder to pair, and a premium bulb is not automatically simpler. What matters during setup is the connection method printed on the box.
Energy savings are real enough to matter over time, but they are not a setup step. CNET cites ENERGY STAR data that smart LED bulbs can save households up to $100 per year compared with older incandescent bulbs.[5] That is useful context after the light works. It will not help Alexa find a bulb stuck on the wrong Wi-Fi band.
After the first bulb works
Once one bulb responds reliably, adding the second bulb is usually faster because you already know the path. Stay consistent: same Wi-Fi band, same brand account, same naming pattern, same room logic. That is how “one smart lamp” becomes “Alexa, turn off downstairs” without becoming a device-name junk drawer.
Routines can wait until control is boring. When you are ready, use a beginner smart home automation cookbook for practical examples like sunset lighting, motion-triggered lamps, and bedtime scenes. If you are connecting lights as part of a larger project, the broader home automation setup guide is a better next stop than another bulb manual.
If you are seeing Matter on newer bulb packaging, it is worth reading a current Matter smart home status guide before buying a houseful of devices. Matter can change parts of the setup story, especially for newer ecosystems, but most Alexa bulb setups in regular homes still fall into the Wi-Fi, Bluetooth-plus-Skill, or hub pattern.
And if you are deciding whether bulbs are the right layer at all, the smart home lighting tiers guide can help separate plug-in lamps, bulbs, switches, hubs, and whole-home lighting control. For now, the test is simple: the bulb appears in Alexa, sits in the right room, and obeys a basic voice command.
References
- Connect Smart Light Bulb to Alexa, Amazon, https://www.amazon.com/gp/help/customer/display.html?nodeId=GAY8LZWCZ8ZH7Z87
- How To Set Up An Amazon Basics Smart Light Bulb, SlashGear, https://www.slashgear.com/1946383/how-to-set-up-amazon-basics-smart-light-bulb/
- Set up Philips Hue with Amazon Alexa, Philips Hue, https://www.philips-hue.com/en-us/explore-hue/works-with/amazon-alexa/set-up
- How to Connect Light Bulbs to Google Home and Alexa, GE Lighting, https://www.gelighting.com/inform/connect-light-bulbs-google-alexa
- Best Smart Lights for 2026, CNET, June 30, 2026, https://www.cnet.com/home/kitchen-and-household/best-smart-lights/
- The Best Smart LED Light Bulbs, Wirecutter, 2026, https://www.nytimes.com/wirecutter/reviews/best-smart-led-light-bulbs/
- 133 Alexa color commands for Philips Hue, Lifx, TP-Link Kasa and more, Tom's Guide, 2022, https://www.tomsguide.com/us/alexa-color-commands-list,review-4988.html
Community Tips
Share platform-specific variations, steps that have changed after app updates, or tips that helped your installation succeed.
Comments
Join the discussion with an anonymous comment.