
How to Automate Smart Home Recovery After Power Outages
Reclaim control when the power comes back: this copyable automation recipe for Home Assistant and Hubitat prevents smart home chaos by restoring devices to their exact pre-outage state after a staged network-stability delay.
The power comes back, and the house does not return to normal. The modem is still negotiating, the router is half awake, the hub is rebuilding its view of the mesh, and a few bulbs have already decided that restored power means full brightness. By the time Zigbee and Z-Wave devices finish reporting in, someone is standing in a hallway at 2 a.m. turning off lights that were off before the outage.
That is not an edge case. In the AHS Smart Home Trends Survey 2024, 33% of smart home users reported power-outage disruptions; the survey was based on 1,006 U.S. homeowners and renters, so it is useful evidence of a common pain point, not an industry-wide law of physics. [1]
Useful protection tips for smart home devices after a power outage start with a blunt distinction: the outage is often less disruptive than the uncontrolled recovery. A UPS can keep the network stack alive, but it does not automatically tell your automations what the house looked like before the lights went out. For that, the UPS has to become a trigger.

The recovery sequence
The automation should behave like a small recovery procedure, not like a panic button. The complete flow is short:
| Moment | Automation action | Why it matters |
|---|---|---|
| UPS reports that it is on battery | Record the current state of selected devices | The house still has a known-good state before devices start rebooting or dropping offline |
| Utility power returns | Mark recovery as pending, but do not restore devices yet | The network stack is awake unevenly; commands sent now are easy to miss |
| Wait 15 minutes | Let modem, router, hub, integrations, and mesh devices settle | This avoids racing device firmware defaults and incomplete hub discovery |
| After the delay | Restore only the captured states for selected devices | The goal is not to turn everything on or off; it is to put known devices back where they were |
| After restoration | Verify results and leave a manual recovery path | A failed test should be recoverable without rewriting the whole automation |
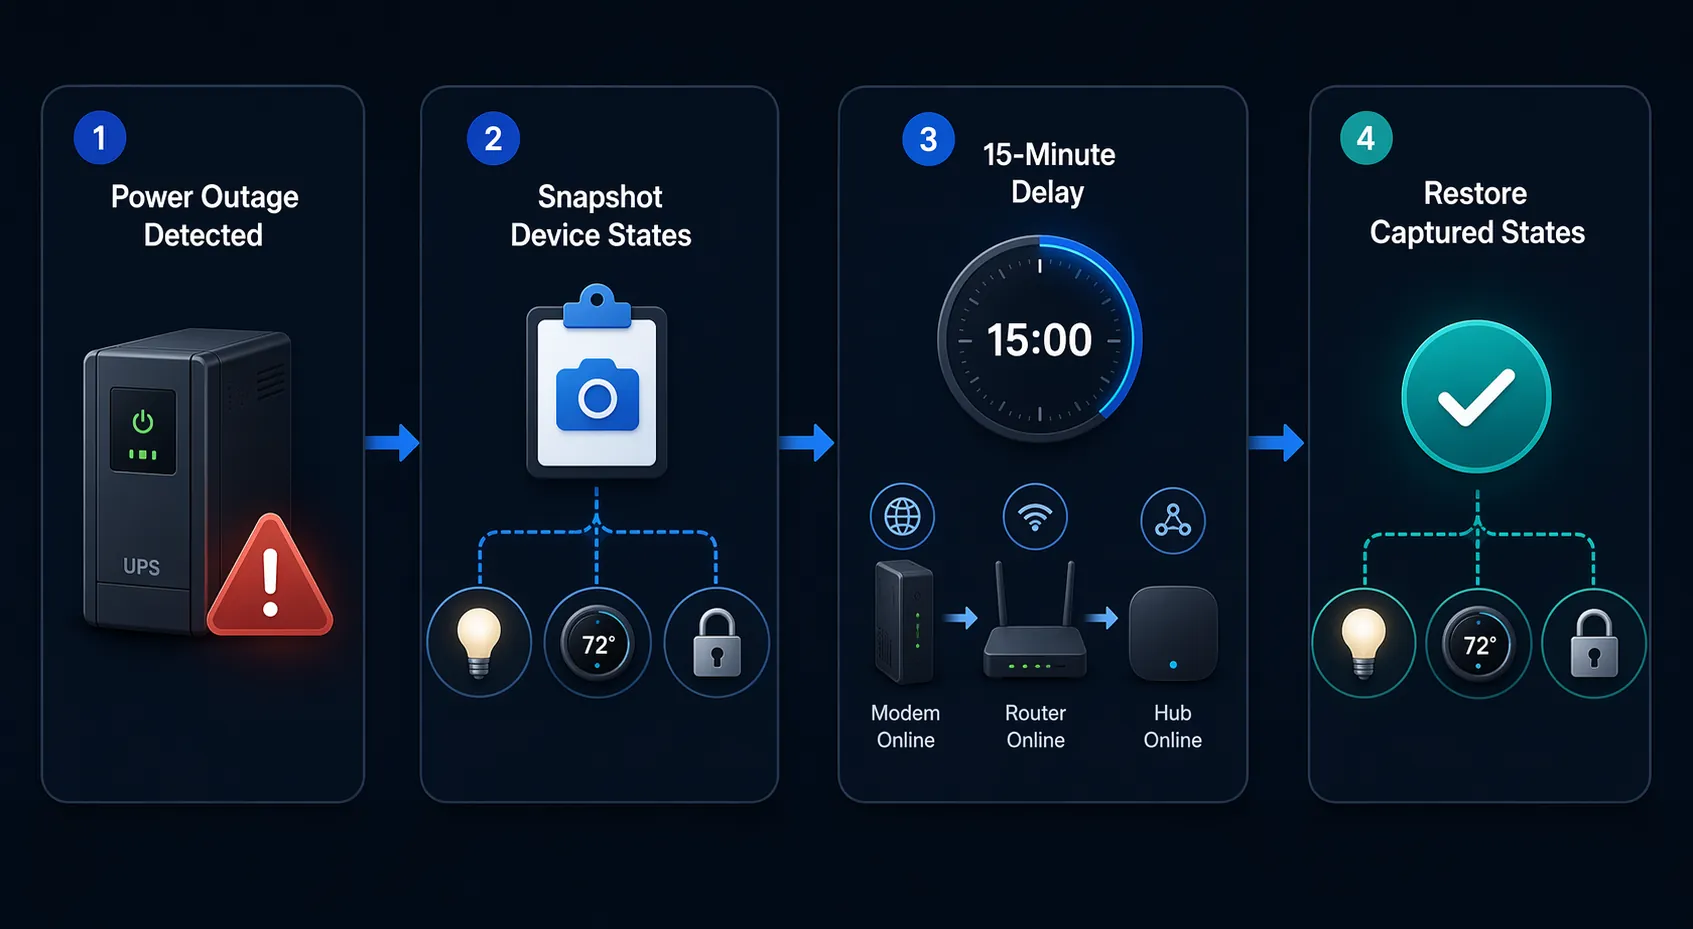
That 15-minute delay is the hinge. It is long enough to stop treating “power restored” as the same thing as “the smart home is ready,” while still being short enough that the house does not sit in a bad state for the rest of the night. Start there, then adjust after observing your own modem, router, hub, and device mesh.
What has to be in place before this works
The minimum setup is not a giant battery system. You need the devices that make decisions — modem, router, smart home hub or Home Assistant host, and any required network gear — to stay alive long enough to observe the outage and store the pre-outage state. General outage-prep guidance from HomeTechHacker and WRAL both put the UPS-backed network stack near the center of smart-home outage planning, but the important detail here is status visibility: the hub has to know when the UPS switches to battery and when utility power returns. [2][3]
- A UPS connected to your smart home platform through an integration, driver, network card, USB connection, or other reliable status sensor.
- A local controller that remains online during the outage window: Home Assistant, Hubitat, or a similar hub that can run automations without waiting on a cloud service.
- A short list of devices worth restoring. Start with lights, plugs, fans, and noncritical switches. Leave locks, sirens, garage doors, and safety equipment out until you have tested the recovery behavior carefully.
- A way to see logs or event history after a test. If the restore fails, you need to know whether the snapshot was missing, the delay never ran, or the device was unavailable when the command fired.
A UPS that only provides runtime is useful for keeping hardware alive. A UPS that exposes status becomes part of the recovery logic. That is the difference between buying time and controlling what happens when the time ends.
Why immediate restoration causes bad restores
Right after power returns, the house lies. Some devices are physically powered but not yet reachable. Some Wi-Fi devices have joined the access point, but their cloud integration has not reported a fresh state. Zigbee and Z-Wave devices may reappear in waves. A hub can show old states for a moment, then replace them with unavailable, then update them again.
If an automation fires immediately, it can issue perfectly reasonable commands into a partially awake system. A bulb that should be restored to off may still be unavailable. A plug may have already applied its own power-on default. A scene can run before the integration has rebuilt enough context to apply it cleanly. The result looks random, but the cause is usually timing.
Staged restoration is different from “turn everything back on.” The automation should restore selected devices to the state captured before the outage, and it should do that only after the hub has had time to rediscover the devices it is about to command. If your system consistently stabilizes in less time, shorten the delay after testing. If your mesh is large or slow, lengthen it. The first version should be boring and conservative.
Home Assistant: use the GitHub pattern as a foundation, not a finished integration
The published danielrosehill/Home-Assistant-Power-Outage-Automation repository is useful because it frames the right pattern: detect the outage from UPS status, store device states, then restore them after power returns. It should not be treated as a certified add-on or a battle-tested package; the repository shows 0 stars and 2 commits, so the safe way to use it is as an inspectable starting template. [4]
The YAML below follows that pattern with placeholders. Replace the UPS sensor and every device entity with your own. Do not paste this into a production system at midnight and hope the entity names match.
# Example Home Assistant pattern. Adapt entity IDs before use.

input_boolean:
  outage_recovery_pending:
    name: Outage recovery pending

automation:
  - alias: "Power outage: snapshot selected smart home states"
    id: power_outage_snapshot_selected_states
    mode: single
    trigger:
      - platform: state
        entity_id: binary_sensor.ups_on_battery
        to: "on"
    action:
      - service: scene.create
        data:
          scene_id: pre_outage_state
          snapshot_entities:
            - light.hallway
            - light.living_room_lamp
            - switch.media_cabinet
            - switch.office_fan
      - service: input_boolean.turn_on
        target:
          entity_id: input_boolean.outage_recovery_pending

  - alias: "Power restored: restore selected states after network settles"
    id: power_restored_restore_selected_states_after_delay
    mode: restart
    trigger:
      - platform: state
        entity_id: binary_sensor.ups_on_battery
        to: "off"
    condition:
      - condition: state
        entity_id: input_boolean.outage_recovery_pending
        state: "on"
    action:
      - delay: "00:15:00"
      - condition: template
        value_template: >
          {{ states('light.hallway') not in ['unknown', 'unavailable']
             and states('light.living_room_lamp') not in ['unknown', 'unavailable']
             and states('switch.media_cabinet') not in ['unknown', 'unavailable']
             and states('switch.office_fan') not in ['unknown', 'unavailable'] }}
      - service: scene.turn_on
        target:
          entity_id: scene.pre_outage_state
      - service: input_boolean.turn_off
        target:
          entity_id: input_boolean.outage_recovery_pending
There are three places to slow down and check your work.
- Confirm the UPS entity. Your integration may expose a binary sensor, a text sensor, or a status attribute instead of binary_sensor.ups_on_battery. Watch the entity change during a safe UPS test before building the automation around it.
- Limit the snapshot list. The first pass should include devices where restoring a prior state is harmless: lamps, ordinary switches, decorative lighting, and similar loads. Add more categories after successful tests.
- Keep the availability condition strict at first. If the condition fails, the automation stops before turning off the recovery-pending helper, which gives you a manual way to inspect the system and run the scene later.
The most common Home Assistant mistake is assuming that a copied automation knows your house. It does not. It knows the entity IDs you give it, the states available at the snapshot moment, and the UPS status transition you tell it to trust. The recovery becomes reliable only after those three pieces are verified on your installation.
If your UPS status is not a binary sensor
Some setups expose UPS state as text rather than on/off. In that case, keep the same structure but change the trigger to match the actual values you observe. For example, one system might report “on battery” and “online,” while another might use short status codes. Do not guess from someone else’s YAML; pull the plug on the UPS input during a controlled test, watch the state change, then write the trigger.
When to split the restore
For a small setup, one snapshot and one delayed restore may be enough. For a larger home, split the restore into groups. Restore hallway and bedroom lamps first, wait a little longer, then restore decorative lighting or media plugs. The point is not to dramatize the automation. It is to avoid throwing dozens of commands at a hub the moment it becomes reachable.
Hubitat: use Power Outage Manager for staged queues
Hubitat users have a more packaged community option. thebearmay’s Power Outage Manager is a Hubitat Community app available through Hubitat Package Manager, and the thread describes configurable delays plus three staggered action queues for staged recovery. It has stronger community validation than the small Home Assistant GitHub template — including 34 likes and multiple user confirmations — but it is still a community app, not a reason to skip configuration review. [5]
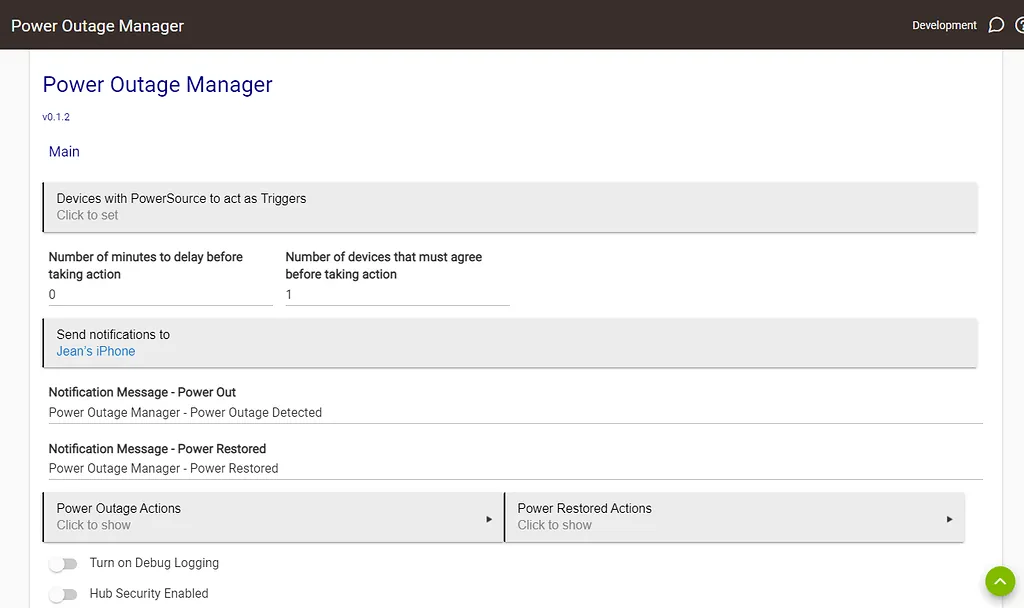
The app’s queue structure maps well to how recovery actually happens. Put the safest, most annoying devices in the first queue: lights and plugs that tend to wake people up or leave rooms lit. Put lower-priority devices in later queues. Leave anything with safety consequences out of the first rollout unless you have a specific reason and a tested rollback plan.
- Set the initial post-restoration delay to 15 minutes. This gives the hub and device mesh time to settle before Queue 1 starts.
- Use Queue 1 for visible nuisance devices: lamps, ordinary switches, and plugs that should return to their prior state.
- Use later queues for devices that can wait or that tend to respond more slowly after a hub restart.
- Test with a small device set before selecting every switch in the house.
The attraction of the Hubitat approach is not just that the app exists. It is that configurable delays and staggered queues match the failure mode. Recovery is not a single instant. It is a sequence of devices becoming trustworthy again.
Device firmware can help or fight the automation
Some devices apply their own power-on behavior before your hub gets a vote. A community-documented SmartThings FAQ lists brand-level differences: GE, Linear, and Schlage outlets or smart plugs are described as returning off after an outage, while Leviton and Neo Coolcam examples are described as returning on. That reference is useful as a warning, but it is not a substitute for checking the exact model and firmware in your own house. [6]
Model-level parameters matter even more than brand reputation. Zooz’s ZEN31 RGBW Dimmer is an example: its documented advanced settings include a power-recovery behavior parameter where one value forces off and another restores the prior state. In the research for this article, the manufacturer support page itself was behind an authentication wall at crawl time, so treat this as a reminder to verify the same setting through your hub driver, device manual, or Z-Wave parameter documentation before relying on it. [7]
This is why a static brand table is less useful than it looks. A plug that defaults to on can still be controlled after the delay. A dimmer that restores its own prior state may reduce how much work your automation has to do. A device with the wrong parameter can make the recovery look broken even when the hub automation fired correctly.
Test the recovery without creating a worse night
Do the first test during the day, with a small set of devices, and with someone watching the hub logs. The goal is not to prove that the whole house can recover on the first try. The goal is to prove that each stage happens in the right order.
- Put two or three harmless devices into known mixed states. For example, one lamp on, one lamp off, and one plug off.
- Simulate or observe the UPS switching to battery. Confirm that the outage trigger fires and that the pre-outage snapshot or app state capture occurs.
- Restore utility power to the UPS input. Confirm that the automation marks recovery as pending instead of restoring devices immediately.
- Wait through the 15-minute delay. Watch whether the hub reports the selected devices as available before the restore command or queue runs.
- Compare the final device states with the pre-outage states. The pass condition is not “everything is off.” The pass condition is “each selected device returned to what it was before the outage.”
- Check the failure path. If one device is unavailable, confirm that you can rerun the restore manually, remove that device from the list, or move it to a later queue.
Once that small test passes, expand slowly. Add a room, not the whole house. Add another device type only after you understand its power-on default. Keep the UPS trigger visible in your logs. The automation is doing its job when power restoration becomes uneventful: the house waits long enough to know what it is restoring, then restores only what it actually knew.
References
- Smart Home Trends Survey 2024 — AHS, May 2025
- Preparing Your Smarthome for Outages — HomeTechHacker
- Prepare for outages: Essential tips to keep your smart home running during power failures — WRAL, Jan 2026
- danielrosehill/Home-Assistant-Power-Outage-Automation — GitHub
- [BETA] Power Outage Manager — Hubitat Community
- FAQ: How Outlets/SmartPlugs behave after a Power Outage (Brand differences) — SmartThings Community
- ZEN31 RGBW Dimmer Advanced Settings — Zooz Support Portal