
The box is open. The old switch is out. And you're staring at a tangle of wires that doesn't include the white one you expected. This is the moment most DIY installations die — not because you can't twist a wire nut, but because you bought the wrong switch for the wiring that's actually in your wall.
I've watched it happen too many times. The package is open, the return window is gone, and the homeowner calls an electrician at $75–$200 a visit. The fix is simple: check your walls before you open your wallet. Most failures come from a mismatch between the switch and the house, not from difficult wiring.
Here's the number that should stop you before you even browse a product page: 40–50% of residential wall boxes lack a neutral wire. That's according to Jolt Electric, and it's the single most common reason a smart switch won't work out of the box. The same source puts professional installers at 98% success, DIYers at 72%. That 26-point gap isn't about shaky wiring skills — it's about buying the wrong switch for the wiring you actually have.
Stop. Open the Box Before You Buy.
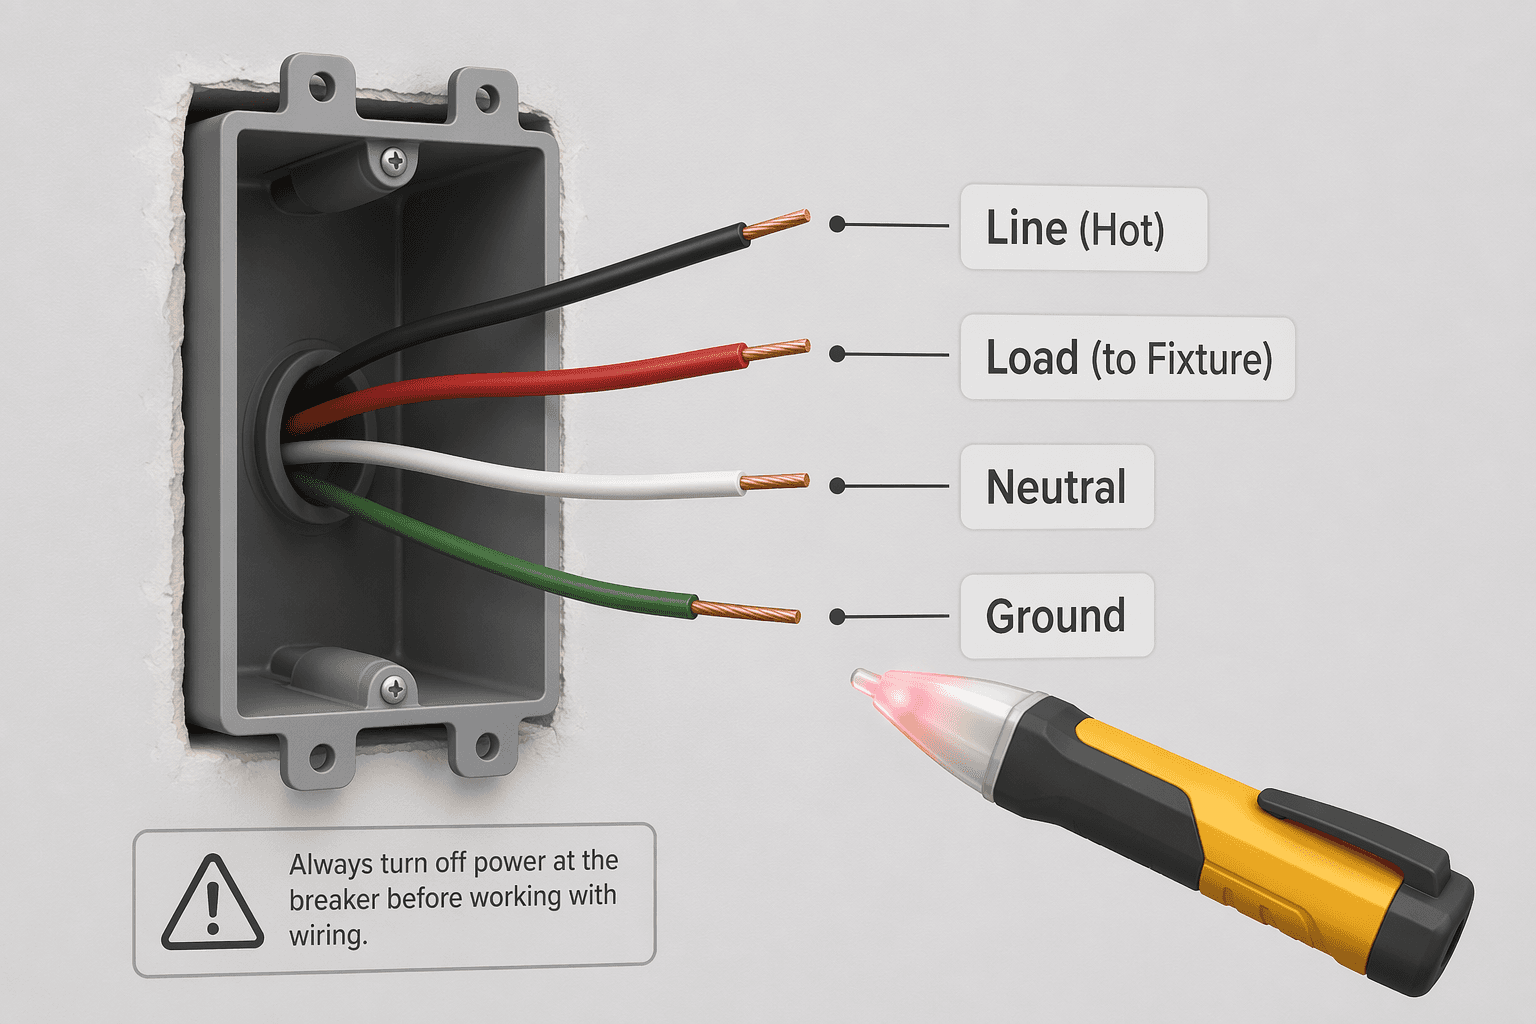
Turn off the breaker for that circuit, remove the switch plate, and look inside. You are looking for a bundle of white wires capped together with a wire nut — that is the neutral. If you see it, you are golden. Most smart switches will work. If you don't, you need a no-neutral switch or a plan B.
Here is the exact sequence:
- Turn off the breaker at the panel. Confirm with a non-contact voltage tester on the old switch terminals — it should be silent.
- Remove the switch plate screw and pull the old switch out gently. You don't need to disconnect anything yet.
- Look for a bundle of white wires joined under a wire nut. If you see it — you have neutral. If you see only two black wires (or one black and one red) and a bare copper ground — you don't.
That single check determines everything. It decides whether you buy a standard smart switch for $20 or a no-neutral model for $40 or ask an electrician to pull a neutral for you. The neutral wire became standard in the 1980s and required by code since 2011 (Wirecutter). Homes built before the mid-80s often pulled only line and load — no neutral at the switch.
One Switch or Two? That Changes Everything
Neutral isn't the only thing to check. How many switches control the light? If only one, it's single-pole. Two or more — that's 3-way (or multi-way). They require different hardware, and mixing them up is a common purchase error.
A single-pole smart switch has two brass screws (line in, load out) plus neutral and ground. A 3-way switch has three brass screws — you need a wired companion switch from the same manufacturer or a wireless remote like the Lutron Caseta Pico. Both AJ Long Electric and SONOFF confirm that 3-way setups require a compatible accessory kit or a smart module at the fixture.
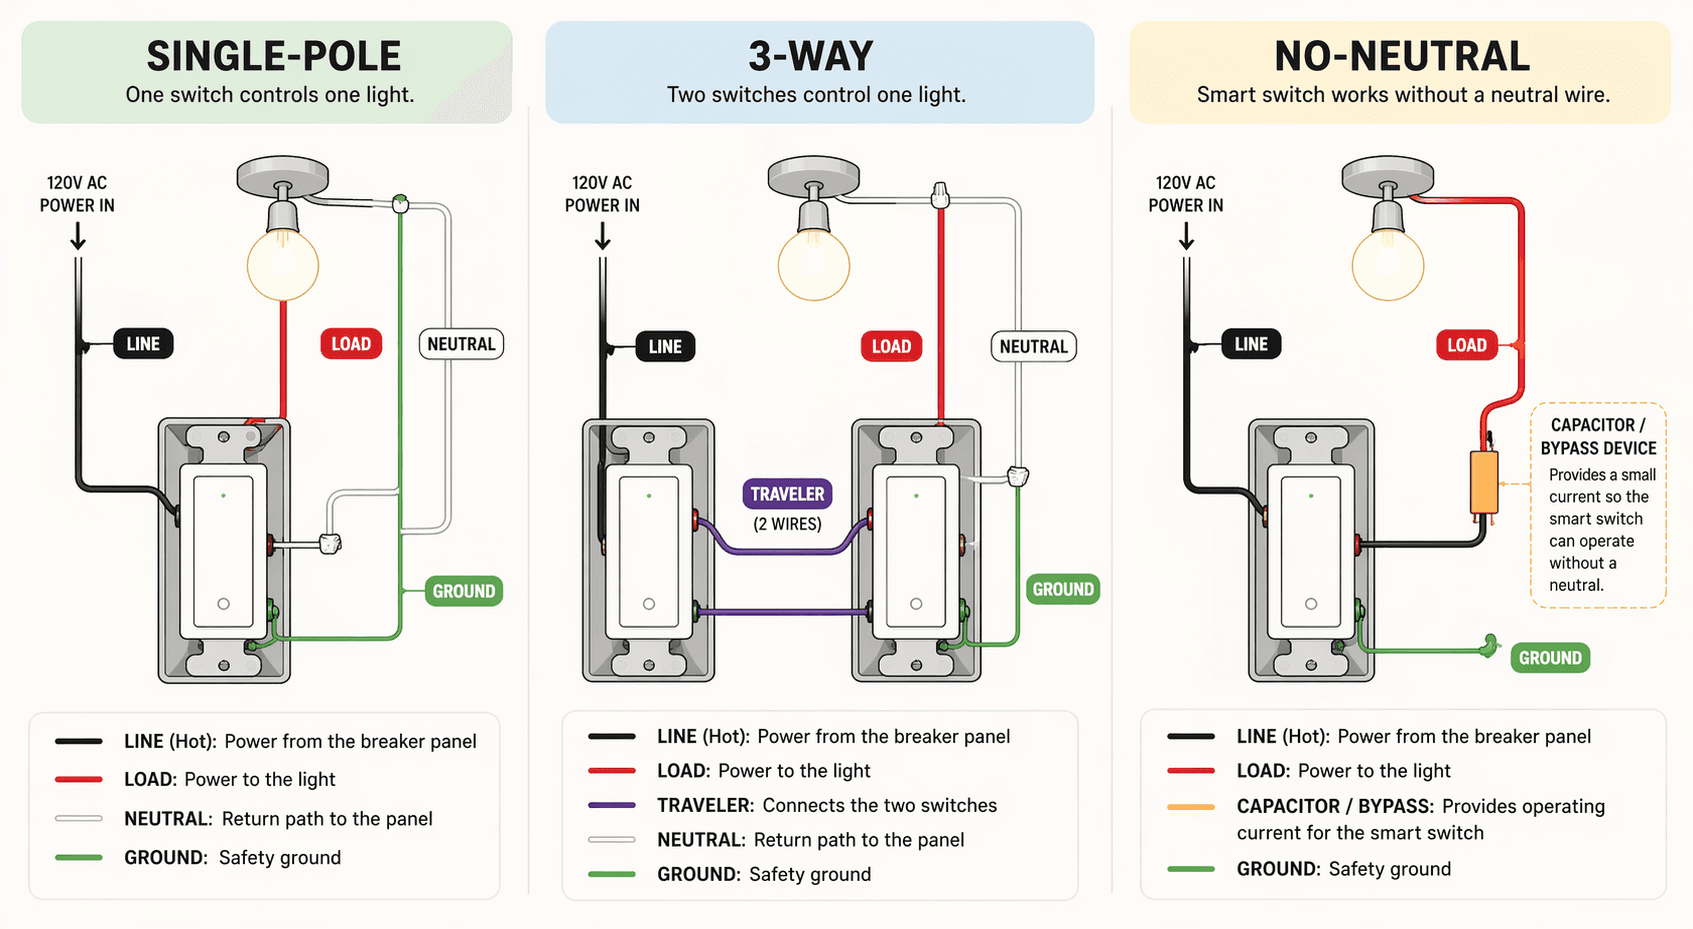
If you see two brass screws on the old switch, you have single-pole. Three brass or bronze screws means 3-way. That distinction decides which product you buy.
No Neutral: The Compromises You Can't Ignore
If your box lacks a neutral, you can buy a no-neutral smart switch. But I want to be direct about what you're getting into. These switches work by drawing a trickle current through the bulb to stay powered. That creates real trade-offs:
- LED flickering or ghost glow — the bulb may stay dimly lit even when 'off'. Many manufacturers include a bypass capacitor (sold separately) to fix it.
- Minimum load requirement — typically 5 watts. Dimmer mode may not work with low-wattage LEDs.
- No true 'off' — the switch maintains constant low-power draw (0.1–0.5 watts) to keep its radio alive.
- Lower relay capacity — e.g., the SONOFF ZBMINIL2 is limited to 6 amps, which restricts the load it can control.
- End device in mesh networks — no-neutral Zigbee/Z-Wave switches cannot route traffic, so they don't extend the mesh.
| Requirement | Neutral Switch | No-Neutral Switch |
|---|---|---|
| Price range | $20–$30 | $35–$50 + hub if needed |
| Flickering risk | Low | Higher (bypass cap may be needed) |
| True off state | Yes | No (trickle current) |
| Load flexibility | Up to 15A | Usually 6A or less |
| Mesh routing | Yes (if Zigbee/Z-Wave) | No (end device only) |
| Example | TP-Link Kasa KS225 ($20, Matter) | Inovelli Blue ($40, Thread, no-neutral dimmer) |
The Lutron Caseta dimmer is widely considered the best no-neutral option because it uses a separate bridge and doesn't rely on trickle current through the bulb. But it costs more and needs a hub. If you can afford the trade-offs, a no-neutral switch works. If you can't, call an electrician to run a neutral wire — it often costs less than replacing bulbs and bypass caps over the long term.
The Box That Won't Fit
Smart switches are physically larger than standard switches. The rear electronics take up space. Jolt Electric warns that a 20+ cubic inch box is typically required, and forcing a switch into a shallow box can damage wire connections and create a fire hazard. AJ Long Electric says the same.
Check the box volume by looking for a stamped number inside the box (e.g., "20 cu in"). If it's under 20 or you can't find it, you have two options: use a box extender or have an electrician replace the box. Never force the switch in.
The Wiring Is the Easy Part
If you've checked for neutral, identified single-pole vs 3-way, verified box size, and bought the right switch, the actual installation is straightforward. Follow these steps:
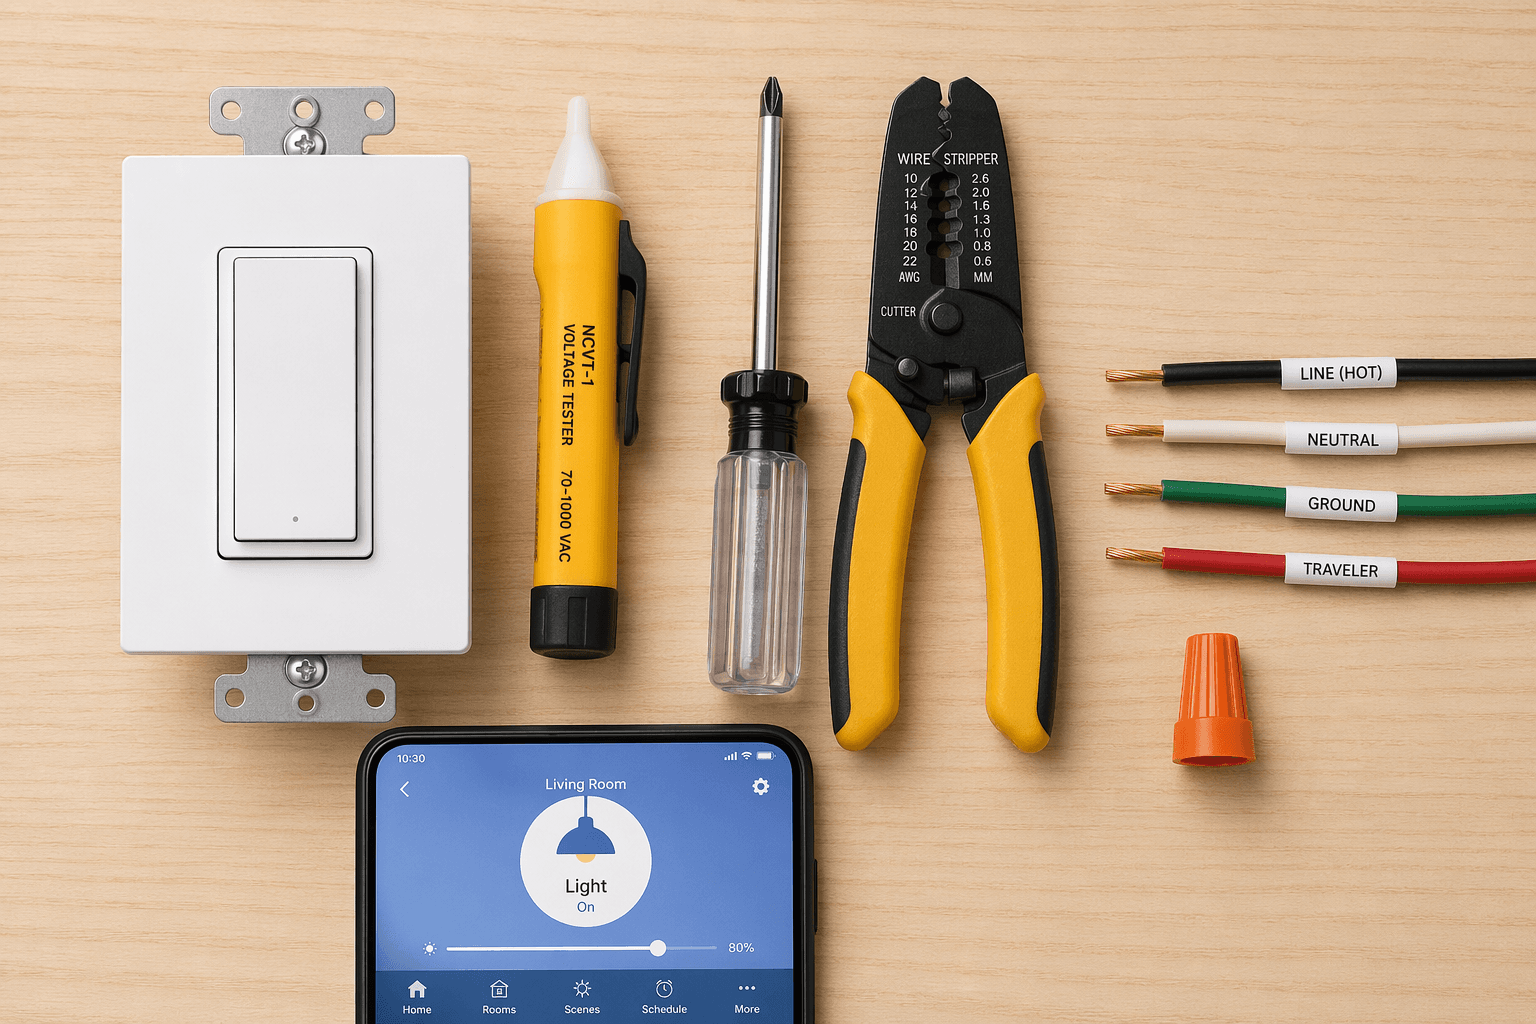
- Turn off the breaker. Double-check with a non-contact voltage tester.
- Remove the old switch plate and unscrew the switch. Gently pull it out.
- Label the wires: black wire connected to the lower screw is line (hot), black wire to the upper screw is load (to fixture). White is neutral (if present). Bare copper is ground.
- Disconnect the wires from the old switch and connect them to the new smart switch: line to line, load to load, neutral to neutral, ground to ground. Use wire nuts for each connection.
- Fold the wires neatly into the box — don't jam. Screw the switch to the box.
- Attach the wall plate, restore power, and test the physical toggle.
If the switch has a label for line/load, follow it carefully. The SONOFF wiring guide shows that reversing line and load can cause the switch to behave oddly or not power on at all.
Wiring Variations: Single-Pole, 3-Way, No-Neutral
The steps above assume single-pole with neutral. For 3-way, you'll need a companion switch or wireless remote. For no-neutral, you may need to install a bypass capacitor across the load wires or use a fixture-module approach. The specific instructions vary by brand — always follow the manufacturer's wiring diagram.
Test It Like You Mean It
After wiring, you'll pair the switch with your app. Most smart switches use 2.4 GHz Wi-Fi and will not connect to a 5 GHz band. If your router broadcasts both bands under the same SSID, the switch may never find the network. The fix: either enable a separate 2.4 GHz SSID in your router settings, or temporarily disable the 5 GHz band during setup. Wirecutter confirms this is a common stumbling block.
When the switch is installed and paired, run through this sequence:
- Physical toggle — press the paddle. The light should turn on and off.
- App control — open the manufacturer's app. Toggle the switch from your phone.
- Voice assistant — ask Alexa, Google Assistant, or Siri to turn the light on and off.
- Schedule — set a simple schedule (e.g., on at sunset) and verify it triggers.
If any step fails, check Wi-Fi signal strength near the switch. A mesh network can help with stability (Smartify). A factory reset (hold button 5–10 seconds until light flashes) resolves most configuration issues but erases all schedules — treat it as a last resort.
Once everything works, consider setting up automations like turning the light on at sunset or adding it to a bedtime routine. Our automation recipes library has ready-made ideas for schedules and scenes.
When to Admit You Need a Pro (And Why That's Not a Failure)
Some situations genuinely require a pro. You can self-triage with these red flags:
- Aluminum wiring — common in homes built 1965–1973. It needs special connectors and handling. Jolt Electric says an electrician should handle it.
- No neutral and you cannot accept the trade-offs of a no-neutral switch — or the no-neutral option doesn't exist for your desired load.
- Box is under 20 cubic inches and cannot be replaced easily.
- You are unsure about any step or the switch feels hot after installation. Turn off the breaker immediately and call a pro.
An electrician charges $75–$200 per switch (Security.org). If you have to call one, it's not because DIY is impossible — it's because the specific wiring in your wall requires expertise that no guide can cover in advance.
But for the vast majority of homes with neutral wire and a standard single-pole switch, the hardest part is the 30 minutes you spend looking at your walls before you click 'buy'. The wiring itself is the easier half.
For broader buying guidance, see our Buyer's Guide to Smart Home Devices 2026. If you're comparing smart bulbs vs. switches, the Philips Hue setup guide covers bulb-specific setup. For ROI numbers, visit the smart lighting energy savings article.
Community Tips
Share platform-specific variations, steps that have changed after app updates, or tips that helped your installation succeed.
Comments
Join the discussion with an anonymous comment.