
Introduction: Why Your Installation Path Depends on Your Living Situation
Installing a smart lock isn't a one-size-fits-all project. If you rent, you cannot drill into the door, replace the deadbolt, or do anything that modifies the existing hardware without risking your security deposit. If you own your home, you have the freedom to swap out the entire deadbolt for a fully integrated smart lock. These two realities demand completely different installation methods.
This guide covers both paths equally. We'll start with the critical measurements you need to take before buying anything — these apply regardless of which path you choose. Then we'll walk through the renter-friendly retrofit installation (no tools, no modifications) and the full deadbolt replacement for homeowners (standard tools, about an hour). Finally, we'll cover the app setup, calibration, and common troubleshooting steps that everyone shares.
Before you begin, make sure you already own a lock that fits your situation. If you're still deciding which lock to buy, read our Best Smart Locks 2026: DIY-Friendly Picks for Renters and Homeowners first — it covers the purchase criteria for both audiences and will save you from buying a lock that doesn't fit your door or your lease.
Before You Start: Measure Your Door
Three door measurements determine whether a lock will physically fit: door thickness, backset, and the type of deadbolt cylinder. A quick check now prevents the frustration of opening a box and finding the hardware doesn't align.
Door Thickness
Most standard interior and exterior doors are 1⅜ inches (35 mm) or 1¾ inches (44 mm) thick. Some solid-core doors may be thicker. Measure at the edge of the door, near the latch. Most smart locks — including the Lockin Veno series — accommodate a range of 1⅜ to 2⅛ inches, but always check the product specs. If your door is outside that range, you'll need an adapter kit or a different lock.
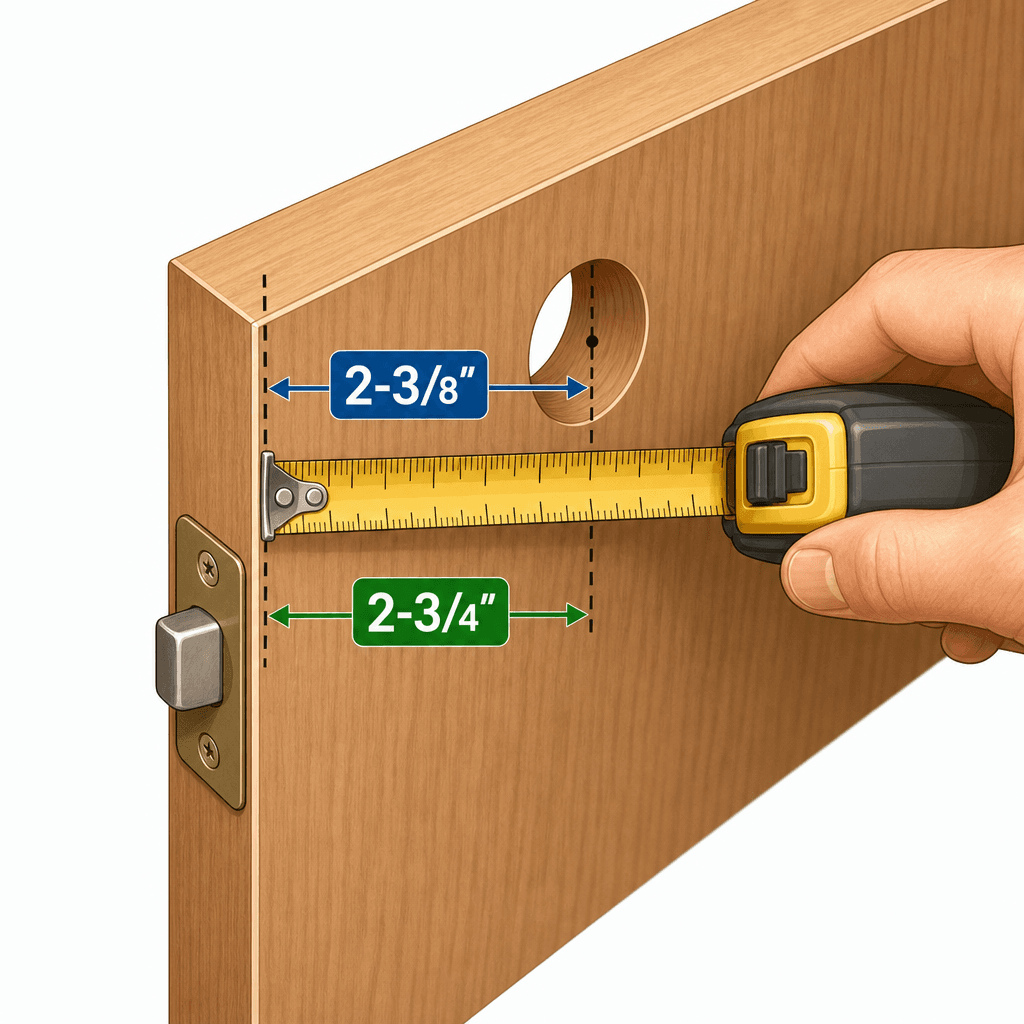
Backset: 2⅜" vs 2¾"
The backset is the distance from the edge of the door to the center of the deadbolt bore hole. There are two common standards in the U.S.: 2⅜ inches (60 mm) and 2¾ inches (70 mm). Almost all residential doors use one of these two. Measure by placing a tape measure flat against the door edge and reading the distance to the center of the hole.
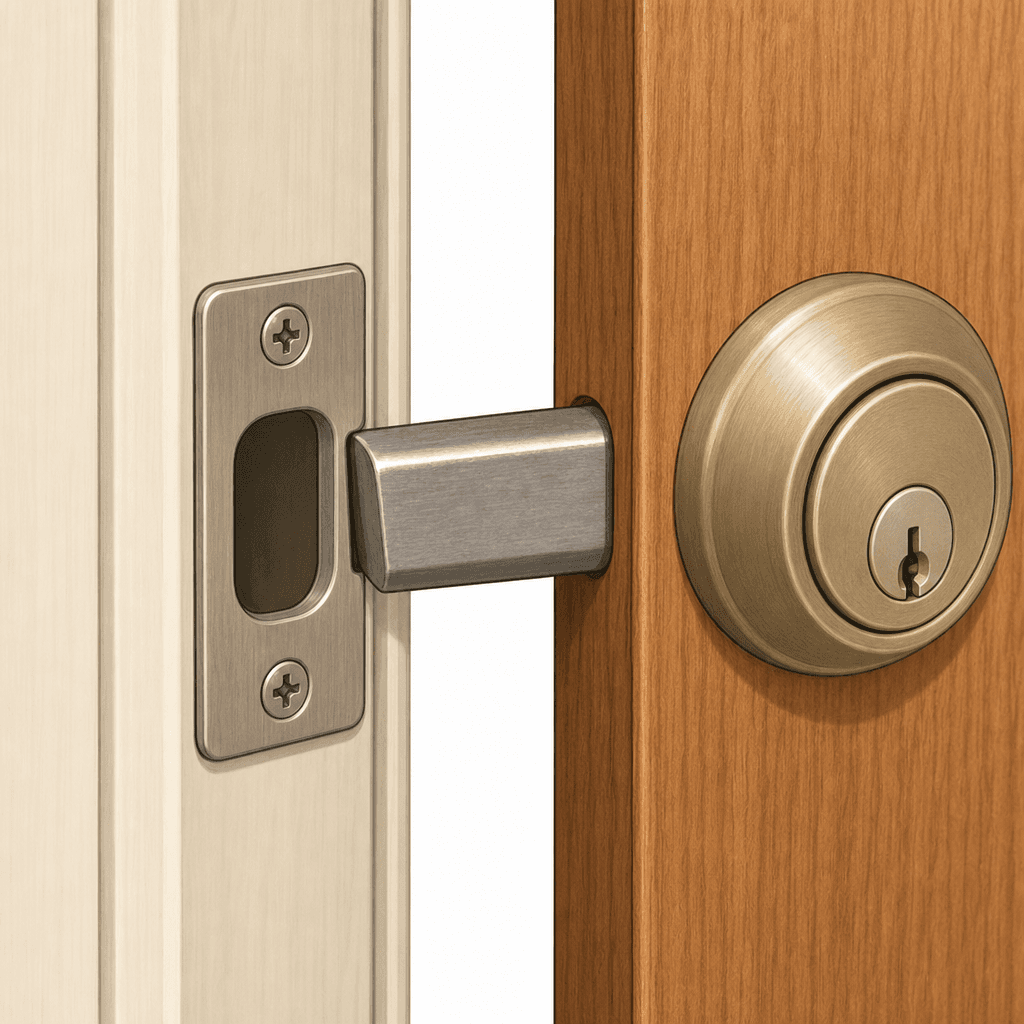
Single-Cylinder vs. Double-Cylinder Deadbolts
A single-cylinder deadbolt has a key slot on the outside and a thumb turn on the inside. A double-cylinder deadbolt requires a key on both sides. Retrofit adapters (like the August Wi-Fi Smart Lock or SwitchBot Lock Pro) are designed to fit over the interior thumb turn of a single-cylinder deadbolt. If you have a double-cylinder bolt, a retrofit won't work without modification — you'll need to replace the entire deadbolt or find a lock that specifically supports that configuration.
| Measurement | Standard | How to Measure |
|---|---|---|
| Door thickness | 1⅜" or 1¾" | Measure at the door edge near the latch, from front to back |
| Backset | 2⅜" (60 mm) or 2¾" (70 mm) | From door edge to center of deadbolt bore |
| Crossbore diameter | 2⅛" (54 mm) | Diameter of the hole through the door face for the deadbolt |
| Cylinder type | Single or double | Check if interior has a thumb turn (single) or key slot (double) |
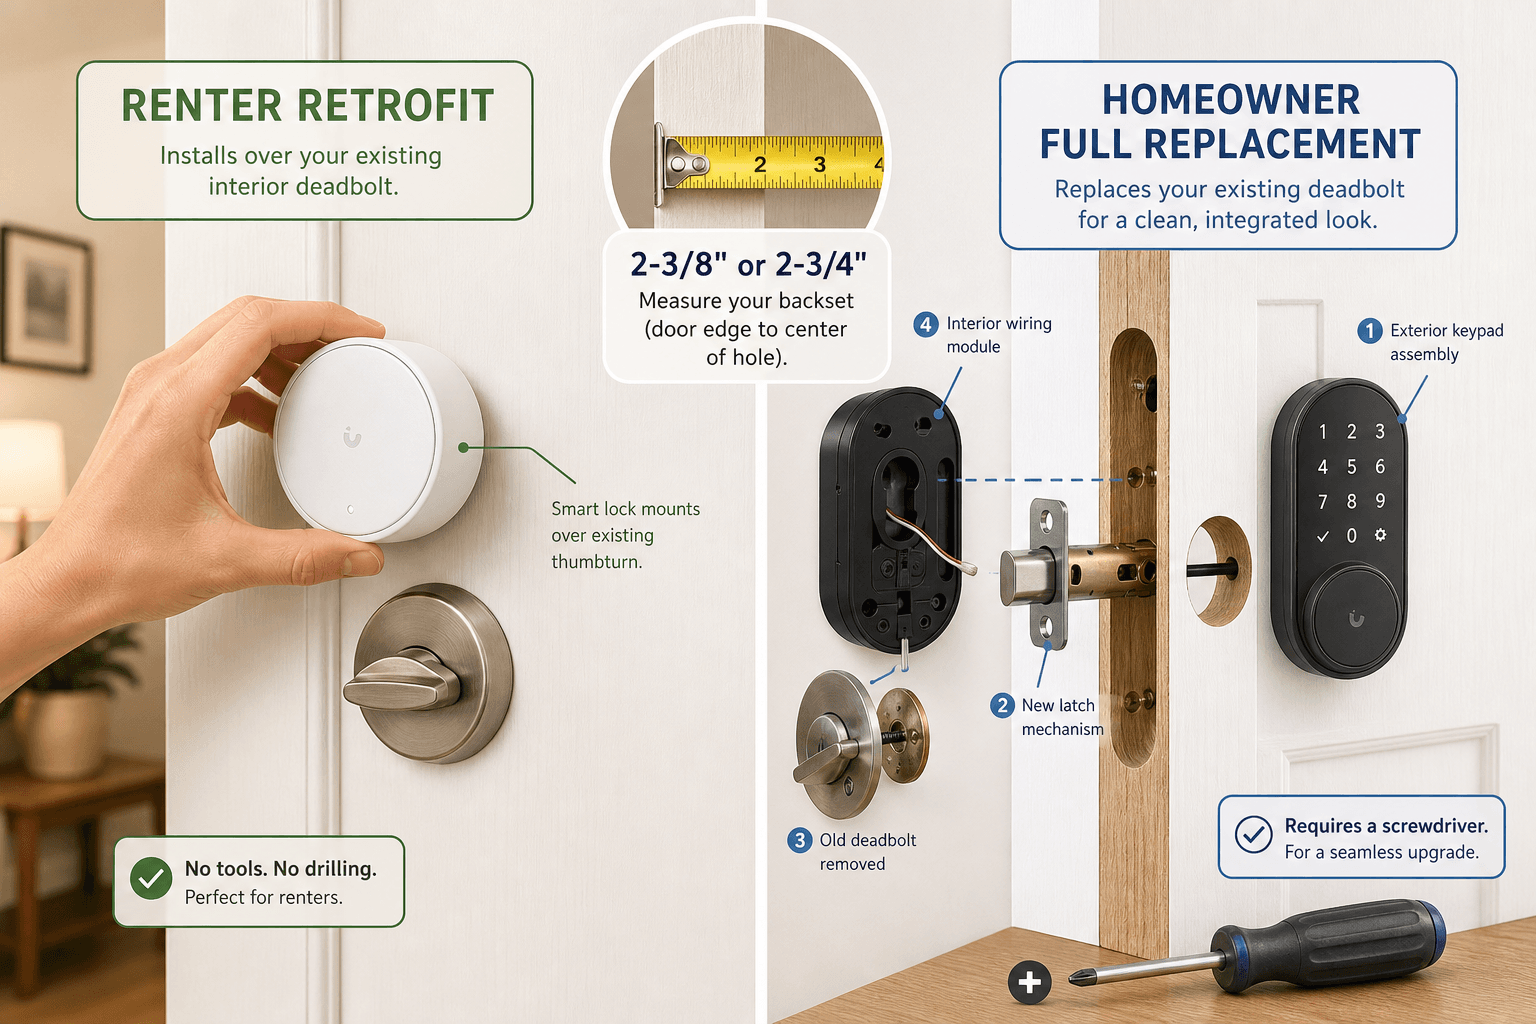
Path A: Renter Retrofit — No Drilling, No Tools
Retrofit adapters mount over the interior side of your existing deadbolt, leaving the exterior lock and key completely unchanged. Your landlord's master key still works, the door hardware remains untouched, and you can remove the adapter in seconds with zero damage when you move out.
According to a 2024 survey of 3,200 U.S. apartment renters by smart lock manufacturer Feocey, 67% said they would install a smart lock if it required no modifications — but only 12% of rental properties currently allow smart lock installation. Retrofit adapters directly address this gap: they don't break lease terms and don't put your deposit at risk.
What You'll Need
- Retrofit smart lock (e.g., August Wi-Fi Smart Lock, SwitchBot Lock Pro, Yale Approach Lock with Wi-Fi + Keypad)
- Phillips screwdriver (only needed for some models to remove the existing thumb turn — most use adhesive or a bracket that doesn't require removing it)
- Smartphone with the lock's app installed
- Physical key backup (always keep the original keys accessible)
Installation Steps (5–15 minutes)
The exact steps vary slightly by model, but the general process is consistent. We'll use the August Wi-Fi Smart Lock as the primary example because it's one of the most popular retrofit options. The August Wi-Fi Smart Lock installs in under 10 minutes according to the manufacturer, and a CNET walkthrough confirmed the same — requiring only a screwdriver.
- Download the lock's app (e.g., August Home app) and create an account. Do this before handling the hardware — some models require the app to be open during pairing.
- Remove the interior thumb turn. Most retrofits still work with the thumb turn in place, but some (like August) may require you to unscrew it to attach the mounting plate. Tape the front hardware (key cylinder on the outside) to prevent it from falling off.
- Select the correct adapter plate. The box includes multiple adapters that fit different deadbolt tailpiece shapes. Match the one that fits your existing bolt mechanism. For Square or D-shaped tailpieces, slide the adapter over the exposed tailpiece.
- Attach the mounting plate to the door using the included screws. This plate holds the lock mechanism on the interior side.
- Snap or screw the lock mechanism onto the mounting plate. For August, this involves aligning a circular mechanism and twisting it into place.
- Insert batteries. Most retrofit locks use either 4 AA batteries (August) or 2 CR123 batteries (some models). Check the manual for polarity direction.
- Complete the in-app setup: connect to 2.4 GHz Wi-Fi, run the calibration routine (often called DoorSense or Door Open/Close detection), and create your first user code.
SwitchBot Lock Pro takes this a step further: Lifehacker's review noted it can be installed in about 7 minutes with no tools at all, using 3M adhesive to attach the device over the thumb turn. The adhesive holds firmly but may leave residue or peel paint when removed — a consideration if the door has a factory finish.
Path B: Full Deadbolt Replacement for Homeowners
If you own your home, you can replace the entire deadbolt with a smart lock that integrates the keypad, fingerprint reader, or Wi-Fi module directly into the lock body. This path delivers a cleaner look, tighter security (higher ANSI grades available), and often better battery life because the motor isn't retrofitted onto an existing mechanism.
Popular full-replacement models include the Schlage Arrive Smart WiFi Deadbolt (Wirecutter's top pick), Yale Assure Lock 2, and Aqara U100. These typically require a standard set of tools and about 30–60 minutes for the first installation.
What You'll Need
- Full deadbolt replacement smart lock
- Phillips screwdriver
- Tape measure
- Level (optional but recommended)
- Hammer and chisel (only if the strike plate needs adjusting)
- Safety glasses (when chiseling)
Installation Steps (30–60 minutes)
The process follows the same pattern regardless of brand, though specific wiring and mounting bracket designs differ. The steps below are based on Lowe's comprehensive installation guide and verified against the Wirecutter recommended models.
- Remove the existing deadbolt. Unscrew the interior and exterior plates, pull them off, and remove the latch mechanism from the door edge. Keep the old screws and plates if you plan to reinstall the original lock later.
- Install the new latch. Slide the smart lock's latch into the edge bore, making sure the angled side faces the direction the door closes. Secure it with the screws provided.
- Attach the exterior assembly. Feed the cable (if present) through the door's crossbore (the large hole through the door face). Align the exterior keypad or touchscreen assembly over the latch and secure it with the mounting plate on the interior side.
- Connect the interior wiring. If the lock has a wired interior module (common on Schlage and Yale models), connect the cable from the exterior assembly to the interior module. Be gentle — these connectors are small and can bend pins.
- Secure the interior module. Snap or screw the interior piece onto the mounting plate. Verify the latch extends and retracts freely when you manually turn the interior knob.
- Install batteries. Most full-replacement smart locks use 4 AA batteries. Battery life varies by usage; manufacturers typically claim 6–12 months, but stiff deadbolts can drain them much faster.
- Test the strike plate alignment. Close the door and test the lock. If the bolt doesn't slide smoothly into the strike plate or makes a grinding sound, the strike plate needs adjustment (see troubleshooting below).
- Set up the lock in the app. Download the lock's app, create an account, connect to 2.4 GHz Wi-Fi, and calibrate the door sensor if available.
Common Setup: App, Wi-Fi, and Calibration
Both paths converge at this point: the lock is physically installed, and now you need to configure it digitally. The specifics vary by brand, but the following steps are universal.
- Download the lock's app from the Apple App Store or Google Play. Popular apps include August Home, Yale Access, Schlage Home, SwitchBot, and Aqara Home.
- Create an account using your email address. You'll usually need to verify the email before proceeding.
- Put the lock into pairing mode. This is often done by pressing a button on the interior assembly or inserting and removing the batteries. The lock's LED will flash to indicate it's ready to pair.
- Connect to a 2.4 GHz Wi-Fi network. Most smart locks only support 2.4 GHz — they won't connect to 5 GHz or 6 GHz networks. If your router broadcasts both bands separately, make sure your phone is on the 2.4 GHz SSID during setup.
- Calibrate the door position sensor. Many locks include a magnetic sensor (DoorSense on August, or similar) that detects whether the door is open or closed. Attach the sensor to the door frame, then run the calibration routine in the app. This is essential for auto-lock and auto-unlock features to work correctly.
- Create user codes. Most apps let you assign unique codes for family members, guests, and service providers. You can set schedules and expiration for temporary codes.
Note on hubs: Some smart locks require a separate hub or bridge for remote access. For example, the August Smart Lock Pro needs the Connect bridge to enable remote unlocking via Wi-Fi. The SwitchBot Lock Pro requires the SwitchBot Hub for remote control and app notifications. Check your lock's documentation — if it says 'Bluetooth only', you must be within 30 feet to lock or unlock through the app unless you add a hub.
If you're using a lock that relies on Zigbee for connectivity (like some Yale locks integrated with SmartThings), you'll need a compatible hub. The same applies to Apple HomeKit locks — an Apple TV or HomePod mini is required as a home hub for remote access and automation.
Troubleshooting: Binding Bolt, Low Battery, and Wi-Fi Dropouts
Even with careful installation, things can go wrong. Here are the most common problems and how to fix them.
Binding Deadbolt (Strike Plate Misalignment)
If the lock makes a loud grinding noise or fails to retract smoothly, the bolt is likely rubbing against the strike plate. As mentioned earlier, this is the #1 installation mistake. The fix: remove the strike plate, widen the opening slightly with a metal file or a chisel, then reattach. Test the bolt — it should slide in and out without resistance.
Battery Drain from Stiff Deadbolts
A deadbolt that's hard to turn by hand will also be hard for the motor to turn. The same misalignment or lack of lubrication can drain batteries in weeks instead of months. Apply a dry graphite lubricant (never oil) to the latch bolt and the strike plate opening. Graphite doesn't attract dust and is safe for the lock mechanism.
Battery life expectations from manufacturer data and reviews: the August Wi-Fi Smart Lock lasts 3–6 months with typical use; the SwitchBot Lock Pro lasts 6–9 months; the Wyze Lock lasts about 6 months. These figures assume a well-aligned lock and moderate daily usage.
Wi-Fi Range Issues
Smart locks that rely on Wi-Fi for remote control need a strong signal near the door. If you have connectivity drops, try these in order: move your Wi-Fi router closer to the door (if possible), add a Wi-Fi extender or mesh node near the lock, or consider a lock that uses Bluetooth plus a hub (like August + Connect) for more reliable connectivity. Note that the lock must be on a 2.4 GHz network; 5 GHz won't work.
Dead Batteries — Preventing Lockout
Moving Out: How to Reverse the Installation
For renters, the ability to remove the smart lock cleanly is a major advantage. Retrofit adapters are designed for zero-damage removal.
- Open the lock's app and factory reset the device. This removes your user codes and unpairs the lock from your account.
- Remove the batteries from the interior module.
- Unscrew or unclip the lock mechanism from the mounting plate. For adhesive-mounted units (like SwitchBot Lock Pro), carefully pry the device off. Use a plastic spudger or a credit card to avoid gouging the door finish. If there is adhesive residue, clean it with isopropyl alcohol or a citrus-based adhesive remover — test on a hidden area first.
- Reinstall the original thumb turn that came with the deadbolt. Most retrofits do not require removing the thumb turn permanently, but if you did, just screw it back on.
- Test the original lock to confirm it works normally. Then take a photo of the door — if your landlord questions anything, you have evidence the door is in its original state.
Homeowners who sell their home have two options: reinstall the original deadbolt to leave with the home, or leave the smart lock installed as a selling point. The Feocey survey found that 78% of renters would pay more for a rental that included a smart lock — the same logic likely applies to buyers. If you leave the lock, make sure to transfer the admin account to the new owner and provide them with the reset instructions.
For a broader look at securing your home with smart devices, check our DIY Home Security System Buyer Guide 2026, which covers locks in the context of a full security system.
Community Tips
Share platform-specific variations, steps that have changed after app updates, or tips that helped your installation succeed.
Comments
Join the discussion with an anonymous comment.