
Recipes
Automate Your Home's Heat-Advisory Response with Home Assistant
This recipe provides a copyable Home Assistant automation blueprint for a heat advisory: a heatwave mode binary sensor, azimuth-based shutter control, free-cooling triggers, and presence-aware fan/AC management.
- Before you start
- Skill level
- intermediate
A heat advisory is the wrong time to discover that your “summer comfort” automation is really three disconnected routines fighting over the same windows and AC. The clean Home Assistant pattern is to create one `binary_sensor.heatwave_mode`, then let that single state coordinate the house: shutters close by sun position before the glass heats up, free-cooling notifications fire only when outdoor air is meaningfully cooler, and fans or AC units run only when the room is occupied and safe to cool.
The thresholds used here are deliberately plain: heatwave mode turns on when outdoor temperature reaches 30°C or indoor temperature reaches 26°C; shutter timing uses Home Assistant’s built-in `sun.sun` azimuth and elevation attributes; free cooling triggers when outside air is at least 1.5°C cooler than inside.[1] That is enough logic to act early without pretending the automation can repeal the weather.
| Item | Home Assistant entity class | Examples | Notes |
|---|---|---|---|
| Outdoor temperature | `sensor` | Aqara Zigbee temperature sensor, Sonoff Zigbee temperature sensor, Wi-Fi or Z-Wave weather/temperature sensor | Place it where it does not read direct sun. If you are still building this layer, start with the NestGrid walkthrough: How to Add a Temperature Sensor to Home Assistant. |
| Indoor temperature by room | `sensor` | Aqara, Sonoff, Z-Wave, Wi-Fi room sensors | Use the room that should decide heatwave mode, then add other rooms for alerts or occupied-room cooling. |
| Motorized shutters, blinds, or covers | `cover` | Shelly-controlled roller shutters, Fibaro modules, Somfy integrations | Zigbee, Z-Wave, and Wi-Fi variants can work. The recipe assumes Home Assistant can call `cover.close_cover`. |
| Sun position | `sun.sun` | Built into Home Assistant core | No extra integration is needed. This recipe reads `azimuth` and `elevation` attributes. |
| Room occupancy or presence | `binary_sensor` | mmWave, PIR, room presence sensor, grouped occupancy helper | Use a delay before turning cooling off so the fan does not stop every time someone leaves briefly. |
| Window or door contact | `binary_sensor` | Zigbee, Z-Wave, Wi-Fi contact sensor | Cooling is blocked when the relevant window is open. |
| Fan, AC, or IR controller | `switch`, `climate`, `remote` | Smart plug fan, Sensibo AC controller, Broadlink IR blaster | The YAML includes both switch-style and climate-style patterns. Adapt the service call to your device. |

Map the entities before writing the clever part
Do this once in a helper note, package comment, or dashboard card. The automation will be easier to debug if the names describe the job rather than the vendor. For example, `sensor.outdoor_temperature`, `sensor.living_room_temperature`, `cover.east_shutters`, `cover.south_shutters`, `cover.west_shutters`, `binary_sensor.living_room_occupancy`, and `binary_sensor.living_room_window` are much easier to audit at 4 p.m. than a trail of factory names.
If your temperature layer is still inconsistent, fix that before adding shutter logic. A room sensor that reads direct sun, sits above an appliance, or drops off Zigbee during the afternoon will make every later decision look haunted. NestGrid’s temperature sensor walkthrough is the place to sort out pairing, placement, and entity naming before this recipe depends on those readings.
Create one heatwave mode binary sensor
The binary sensor is the switchboard. Without it, every automation ends up carrying its own outdoor threshold, indoor threshold, season check, and exception logic. That is how heat-advisory setups become unmaintainable after the first edit.
template:
  - binary_sensor:
      - name: Heatwave Mode
        unique_id: heatwave_mode
        icon: mdi:weather-sunny-alert
        state: >
          {{ states('sensor.outdoor_temperature') | float(0) >= 30
             or states('sensor.living_room_temperature') | float(0) >= 26 }}
Put this in your template configuration, reload template entities, and confirm that Home Assistant creates `binary_sensor.heatwave_mode`. The logic follows a simple rule from the source recipe: either outdoor heat is already high enough to prepare the envelope, or indoor heat is already high enough that the house should stop behaving like a normal summer day.[1]
This is the same broad pattern used in alert-driven automations: one inspected binary state carries the event, and the rest of the system reacts to that state. If you have built weather-alert logic before, NestGrid’s tropical depression warning recipe is a useful comparison: the event sensor should be boring, visible, and easy to override.
Close shutters by façade, not by clock
Windows deserve first priority because a large share of unwanted heat enters through them. RealSimple cites ConEdison data that about 40% of unwanted heat enters through windows, which is a better-supported basis for shutter-first automation than unverifiable smart-blind marketing percentages.[2]
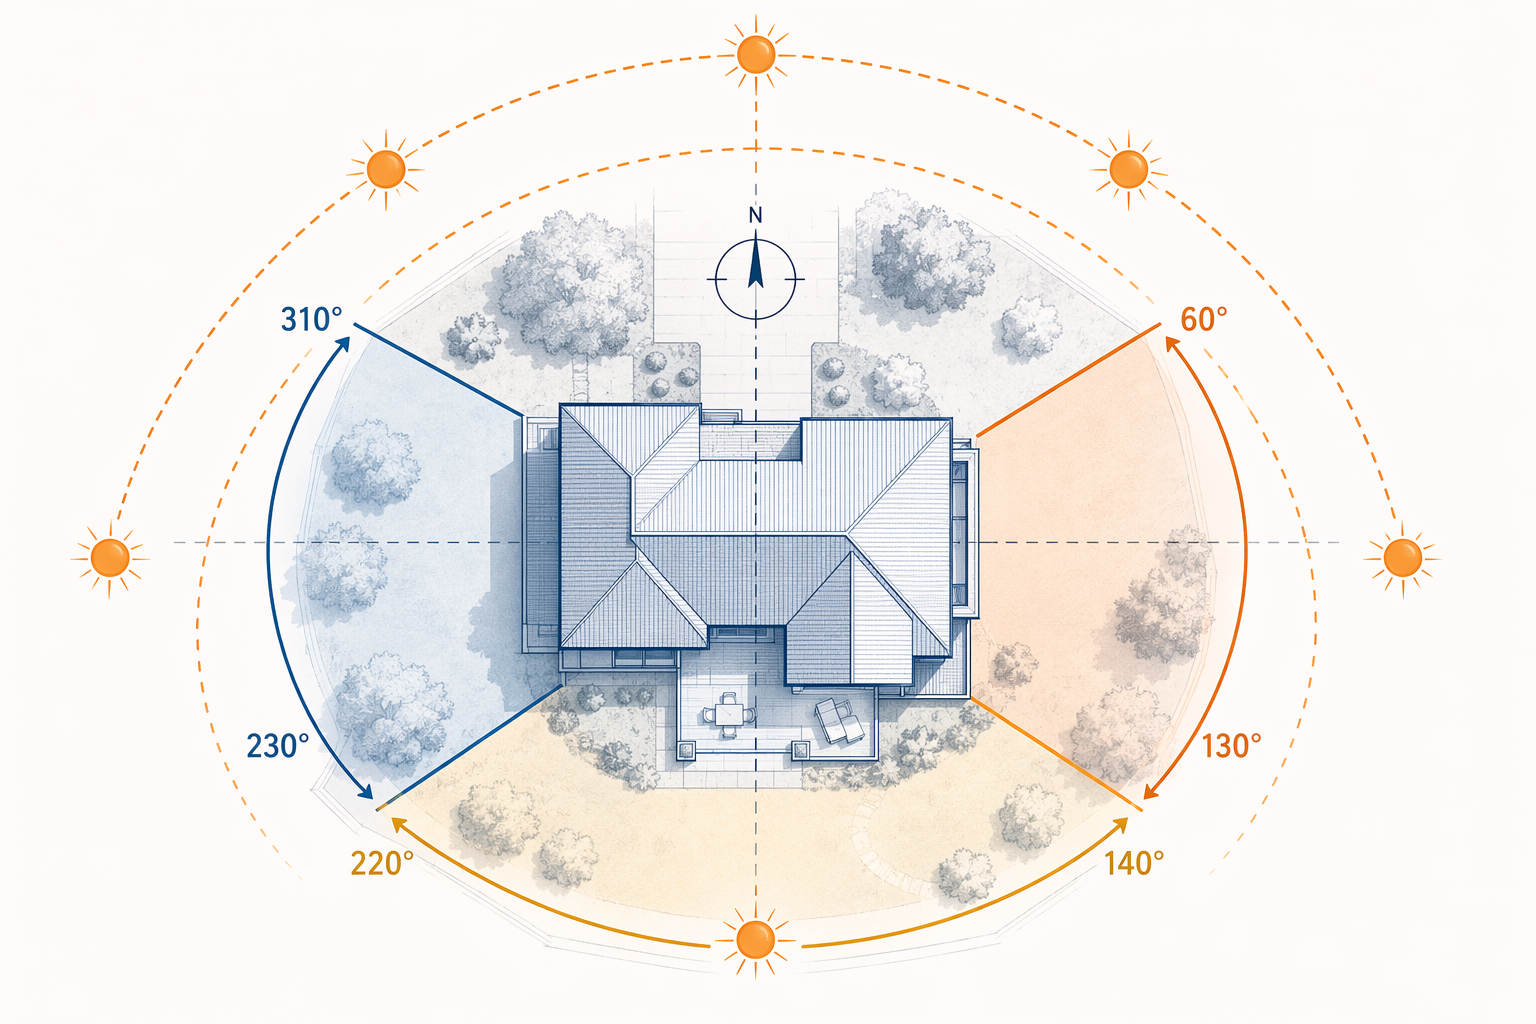
A fixed schedule is crude here. East-facing glass gets hit in the morning, south-facing glass later, and west-facing glass can punish the house near the end of the day. The Maison et Domotique ranges are a practical starting point: east 60°–130°, south 140°–220°, and west 230°–310°.[1] Solar elevation matters too. A low sun can pass through an azimuth range when it is not yet meaningfully loading the room, so the conditions below also require minimum elevation.
automation:
  - alias: Heatwave - Close east shutters before morning solar gain
    id: heatwave_close_east_shutters
    mode: single
    trigger:
      - platform: time_pattern
        minutes: "/10"
      - platform: state
        entity_id: binary_sensor.heatwave_mode
        to: "on"
    condition:
      - condition: state
        entity_id: binary_sensor.heatwave_mode
        state: "on"
      - condition: template
        value_template: >
          {{ 60 <= state_attr('sun.sun', 'azimuth') | float(0) <= 130 }}
      - condition: template
        value_template: >
          {{ state_attr('sun.sun', 'elevation') | float(0) >= 10 }}
    action:
      - service: cover.close_cover
        target:
          entity_id: cover.east_shutters

  - alias: Heatwave - Close south shutters during high sun
    id: heatwave_close_south_shutters
    mode: single
    trigger:
      - platform: time_pattern
        minutes: "/10"
      - platform: state
        entity_id: binary_sensor.heatwave_mode
        to: "on"
    condition:
      - condition: state
        entity_id: binary_sensor.heatwave_mode
        state: "on"
      - condition: template
        value_template: >
          {{ 140 <= state_attr('sun.sun', 'azimuth') | float(0) <= 220 }}
      - condition: template
        value_template: >
          {{ state_attr('sun.sun', 'elevation') | float(0) >= 20 }}
    action:
      - service: cover.close_cover
        target:
          entity_id: cover.south_shutters

  - alias: Heatwave - Close west shutters before afternoon solar gain
    id: heatwave_close_west_shutters
    mode: single
    trigger:
      - platform: time_pattern
        minutes: "/10"
      - platform: state
        entity_id: binary_sensor.heatwave_mode
        to: "on"
    condition:
      - condition: state
        entity_id: binary_sensor.heatwave_mode
        state: "on"
      - condition: template
        value_template: >
          {{ 230 <= state_attr('sun.sun', 'azimuth') | float(0) <= 310 }}
      - condition: template
        value_template: >
          {{ state_attr('sun.sun', 'elevation') | float(0) >= 10 }}
    action:
      - service: cover.close_cover
        target:
          entity_id: cover.west_shutters
The time-pattern trigger is intentionally unromantic. Home Assistant does not need a new integration to watch the sun move; it just needs to recheck `sun.sun` often enough that the shutters move before the façade is already hot. Ten-minute polling is usually easier to reason about than a pile of calculated one-off times.
Do not paste this blindly if one façade includes a door, a plant room, or a window someone relies on for daylight. Split `cover.west_shutters` into smaller groups if one west room should behave differently. The automation is only safe when the cover group matches how the house is actually used.
Trigger free cooling only when the outdoor delta is real
Free cooling is not magic ventilation. It is a notification that outside air is finally cool enough to be worth using. The recipe threshold is a 1.5°C gap: outdoor temperature must be at least 1.5°C below indoor temperature before Home Assistant asks someone to open windows or start a ventilation routine.[1]
automation:
  - alias: Heatwave - Notify when free cooling is available
    id: heatwave_free_cooling_available
    mode: single
    trigger:
      - platform: time_pattern
        minutes: "/10"
      - platform: state
        entity_id:
          - sensor.outdoor_temperature
          - sensor.living_room_temperature
    condition:
      - condition: state
        entity_id: binary_sensor.heatwave_mode
        state: "on"
      - condition: template
        value_template: >
          {{ states('sensor.outdoor_temperature') | float(99)
             <= (states('sensor.living_room_temperature') | float(0) - 1.5) }}
    action:
      - service: notify.mobile_app_your_phone
        data:
          title: Free cooling window
          message: >
            Outdoor air is at least 1.5°C cooler than the living room.
            Open safe windows or start ventilation if security and air quality are acceptable.
That last sentence in the notification matters. A temperature delta does not know about smoke, pollen, street noise, unlocked ground-floor windows, or a sleeping child. Keep the automation as a prompt unless your window motors, contact sensors, and safety conditions are good enough to automate the opening step.
Run cooling after prevention, and only where it helps
Once shutters have reduced solar gain and free cooling has had a chance to help, mechanical cooling can be stricter. The room has to be occupied, the window has to be closed, and the heatwave binary sensor has to be on. LinknLink’s guide supports a 10–15-minute presence-off delay so fans or AC do not short-cycle when someone steps out briefly.[3]
automation:
  - alias: Heatwave - Cool occupied living room only if window is closed
    id: heatwave_cool_occupied_living_room
    mode: restart
    trigger:
      - platform: state
        entity_id: binary_sensor.living_room_occupancy
        to: "on"
      - platform: numeric_state
        entity_id: sensor.living_room_temperature
        above: 26
    condition:
      - condition: state
        entity_id: binary_sensor.heatwave_mode
        state: "on"
      - condition: state
        entity_id: binary_sensor.living_room_occupancy
        state: "on"
      - condition: state
        entity_id: binary_sensor.living_room_window
        state: "off"
    action:
      - choose:
          - conditions:
              - condition: template
                value_template: "{{ states('climate.living_room_ac') not in ['unknown', 'unavailable'] }}"
            sequence:
              - service: climate.set_hvac_mode
                target:
                  entity_id: climate.living_room_ac
                data:
                  hvac_mode: cool
          - conditions:
              - condition: template
                value_template: "{{ states('switch.living_room_fan') not in ['unknown', 'unavailable'] }}"
            sequence:
              - service: switch.turn_on
                target:
                  entity_id: switch.living_room_fan

  - alias: Heatwave - Stop living room cooling after vacancy delay
    id: heatwave_stop_living_room_cooling_when_empty
    mode: single
    trigger:
      - platform: state
        entity_id: binary_sensor.living_room_occupancy
        to: "off"
        for: "00:15:00"
      - platform: state
        entity_id: binary_sensor.living_room_window
        to: "on"
    condition:
      - condition: state
        entity_id: binary_sensor.heatwave_mode
        state: "on"
    action:
      - service: climate.set_hvac_mode
        target:
          entity_id: climate.living_room_ac
        data:
          hvac_mode: "off"
      - service: switch.turn_off
        target:
          entity_id: switch.living_room_fan
The action block shows both `climate` and `switch` patterns because real houses are messy. A Sensibo-controlled mini-split may appear as `climate.living_room_ac`; a fan may be a smart plug or switch; a Broadlink IR command may need `remote.send_command` instead. Keep the conditions and swap the action to match your device.
# Example replacement action for a Broadlink-style IR controller.
# Use the command names from your own remote integration.
action:
  - service: remote.send_command
    target:
      entity_id: remote.living_room_ir
    data:
      device: living_room_ac
      command: cool_on
Do not let this become a thermostat war. Use whatever cooling setpoint is safe and normal for your household, then let Home Assistant enforce the conditions around it: occupied room, closed window, heatwave mode on. The meaningful automation win is avoiding cooling an empty room or cooling against an open window.
Add vulnerable-room alerts without making occupancy the only truth
Presence logic is useful until it is too clever. A pet room, nursery, medical recovery room, or elder-care space should not simply stop mattering because the occupancy sensor is quiet. LinknLink specifically frames pet and elder-care temperature thresholds as useful heatwave safeguards, but the threshold itself should be chosen for the person, animal, room, and equipment you are protecting.[3]
input_number:
  vulnerable_room_max_temperature:
    name: Vulnerable room max temperature
    min: 20
    max: 35
    step: 0.5
    unit_of_measurement: "°C"

input_boolean:
  vulnerable_room_heat_alerts:
    name: Vulnerable room heat alerts

automation:
  - alias: Heatwave - Vulnerable room temperature alert
    id: heatwave_vulnerable_room_temperature_alert
    mode: single
    trigger:
      - platform: template
        value_template: >
          {{ states('sensor.vulnerable_room_temperature') | float(0)
             >= states('input_number.vulnerable_room_max_temperature') | float(99) }}
        for: "00:05:00"
    condition:
      - condition: state
        entity_id: binary_sensor.heatwave_mode
        state: "on"
      - condition: state
        entity_id: input_boolean.vulnerable_room_heat_alerts
        state: "on"
    action:
      - service: notify.mobile_app_your_phone
        data:
          title: Vulnerable room heat alert
          message: >
            The vulnerable room is above its configured heat threshold.
            Check the room, window state, shade position, and cooling device.
The helper-based threshold is less tidy than hard-coding a number, but it is safer to adjust during a heat wave. You can raise or lower the value from the UI after checking the room instead of editing YAML while someone is waiting for relief.
Verify the heat-advisory response before trusting it
Test the system in pieces. In Developer Tools, inspect `binary_sensor.heatwave_mode` first. Then check `sun.sun` attributes and confirm the correct façade automation would run only inside its azimuth and elevation range. After that, temporarily lower the free-cooling threshold or use test sensor values to confirm the notification fires only when the outdoor reading is at least 1.5°C below the indoor reading.
- `binary_sensor.heatwave_mode` turns on at 30°C outdoor or 26°C indoor.
- East shutters close only from 60°–130° azimuth with sufficient sun elevation.
- South shutters close only from 140°–220° azimuth with the higher elevation guard.
- West shutters close only from 230°–310° azimuth before late-day solar gain hits the room.
- Free-cooling notification fires only when outside air is at least 1.5°C cooler than inside.
- Fan or AC control is blocked when the room is empty or the relevant window is open.
If you want to measure what the automations actually change, pair the fan or portable AC with an energy-monitoring plug and log runtime before and after the recipe. NestGrid’s energy-monitoring smart plug recipes are a practical companion once the heat-advisory response is stable.
At that point the setup has earned some trust: one heatwave mode turns on, shutters respond by sun position, free cooling waits for the outdoor delta, and cooling refuses to run for empty or open-window rooms. That is a coordinated heat-advisory response, not just a thermostat reacting after the house is already hot.
References
- Heatwave and home automation: turn Home Assistant into a heat shield, Maison et Domotique
- The Ideal AC Temperature to Set During a Heat Wave, RealSimple
- Home Assistant Heatwave Automation Guide, LinknLink
If a step doesn’t work as described
Route to the diagnostic surface instead of retrying blind: check Troubleshooting Center for a symptom that matches what you’re seeing.
Spot something outdated?
Flag anything that no longer matches current firmware, app, or spec behavior. This is recorded for internal review, not published automatically.