Yes, Starlink internet for smart home use can support a real setup: cameras, locks, sensors, voice assistants, Home Assistant, and remote monitoring. The catch is that it should not be treated like cable or fiber with a different modem. Three things change the design: upload speed becomes the camera limit, Starlink Residential’s CGNAT breaks normal port-forwarding advice, and the stock router is too limited for serious IoT isolation.
That does not make Starlink a bad smart home connection. Residential Starlink upload is commonly reported around 10–25 Mbps, which is enough for a house full of smart devices but not enough to casually push every camera’s full-quality feed to the cloud all day [1]. The reliable version is built more deliberately: Starlink dish, bypass mode, third-party router, segmented device networks, local control for critical automations, and remote access that works around CGNAT instead of pretending it is not there.
The Network Shape That Actually Holds Up
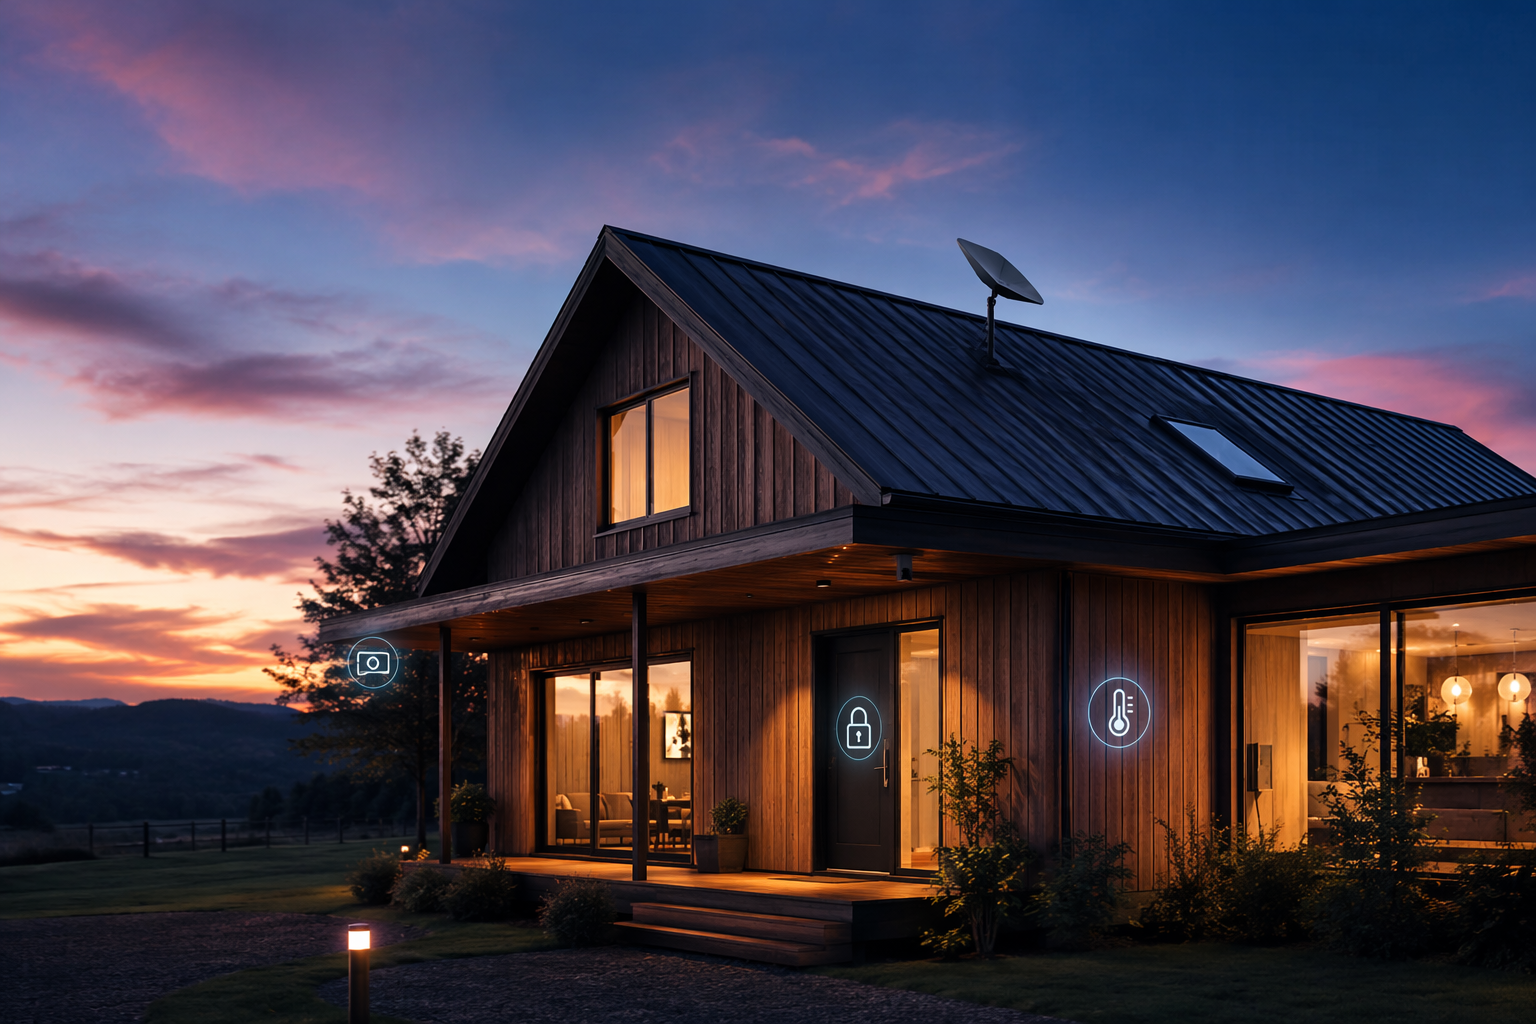
A working Starlink smart home starts with one uncomfortable admission: the internet connection is part of the smart home system. It is not just a pipe. If the router cannot separate devices, if remote access depends on an inbound port that Starlink Residential will not give you, or if every automation waits on a cloud server, the failure shows up as a dead camera feed, a lock you cannot check, or a thermostat schedule that stops being predictable.
| Layer | What To Use | Why It Matters |
|---|---|---|
| Starlink access | Dish and Starlink modem/router in bypass mode | Leaves satellite access to Starlink while handing real routing to better hardware |
| Main router | Third-party router with VLANs and QoS | Separates cameras, IoT devices, and personal devices instead of keeping one flat network |
| Device networks | Separate VLANs for Personal, IoT, and Security | Limits what a camera, plug, or voice assistant can reach if it misbehaves |
| Local smart home layer | Home Assistant, Zigbee, Z-Wave, Thread, or local hubs | Keeps basic automations working when internet or cloud access fails |
| Remote access | Tailscale, Nabu Casa, NoPorts, or a plan with public IP | Avoids the Starlink Residential CGNAT port-forwarding trap |
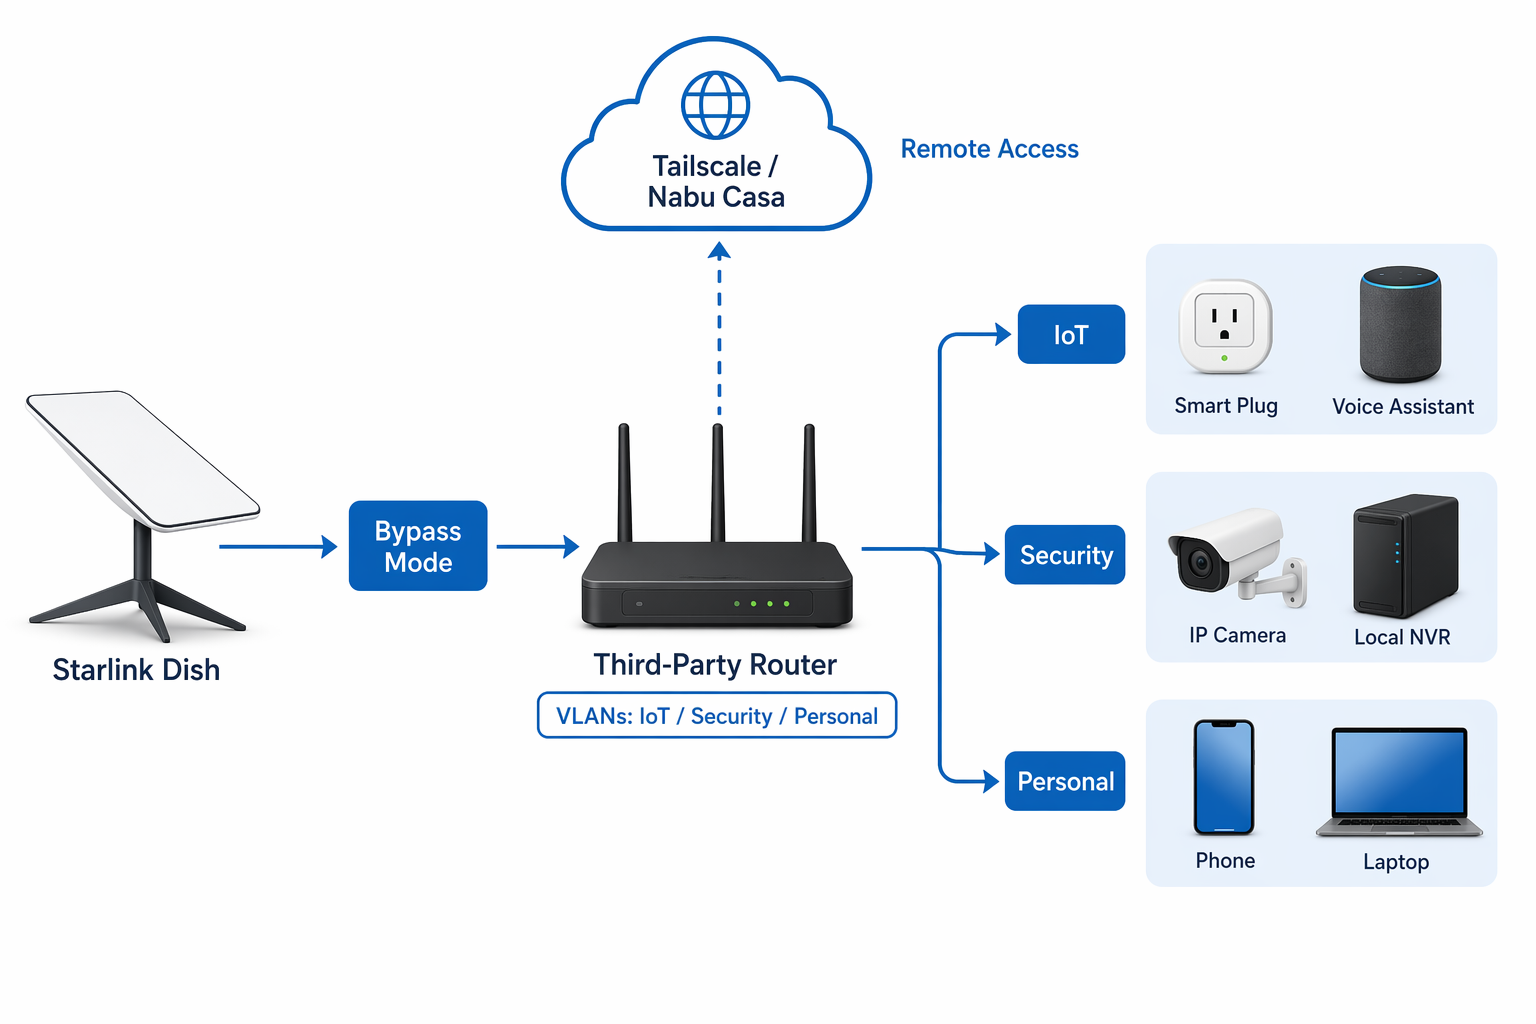
In plain terms, bypass mode turns the Starlink router into a handoff point. Your own router then becomes the brain of the home network. That is where you decide that laptops and phones live on one network, cameras and the NVR live on another, and low-trust IoT devices sit somewhere they cannot freely browse the rest of the house.
Plan Cameras Around Upload, Not Download
Smart home traffic is usually tiny until cameras arrive. A lock checking in, a thermostat changing state, or a motion sensor reporting activity barely registers next to video. Cameras are different because the direction is wrong for Starlink’s strongest number: you are sending video out.
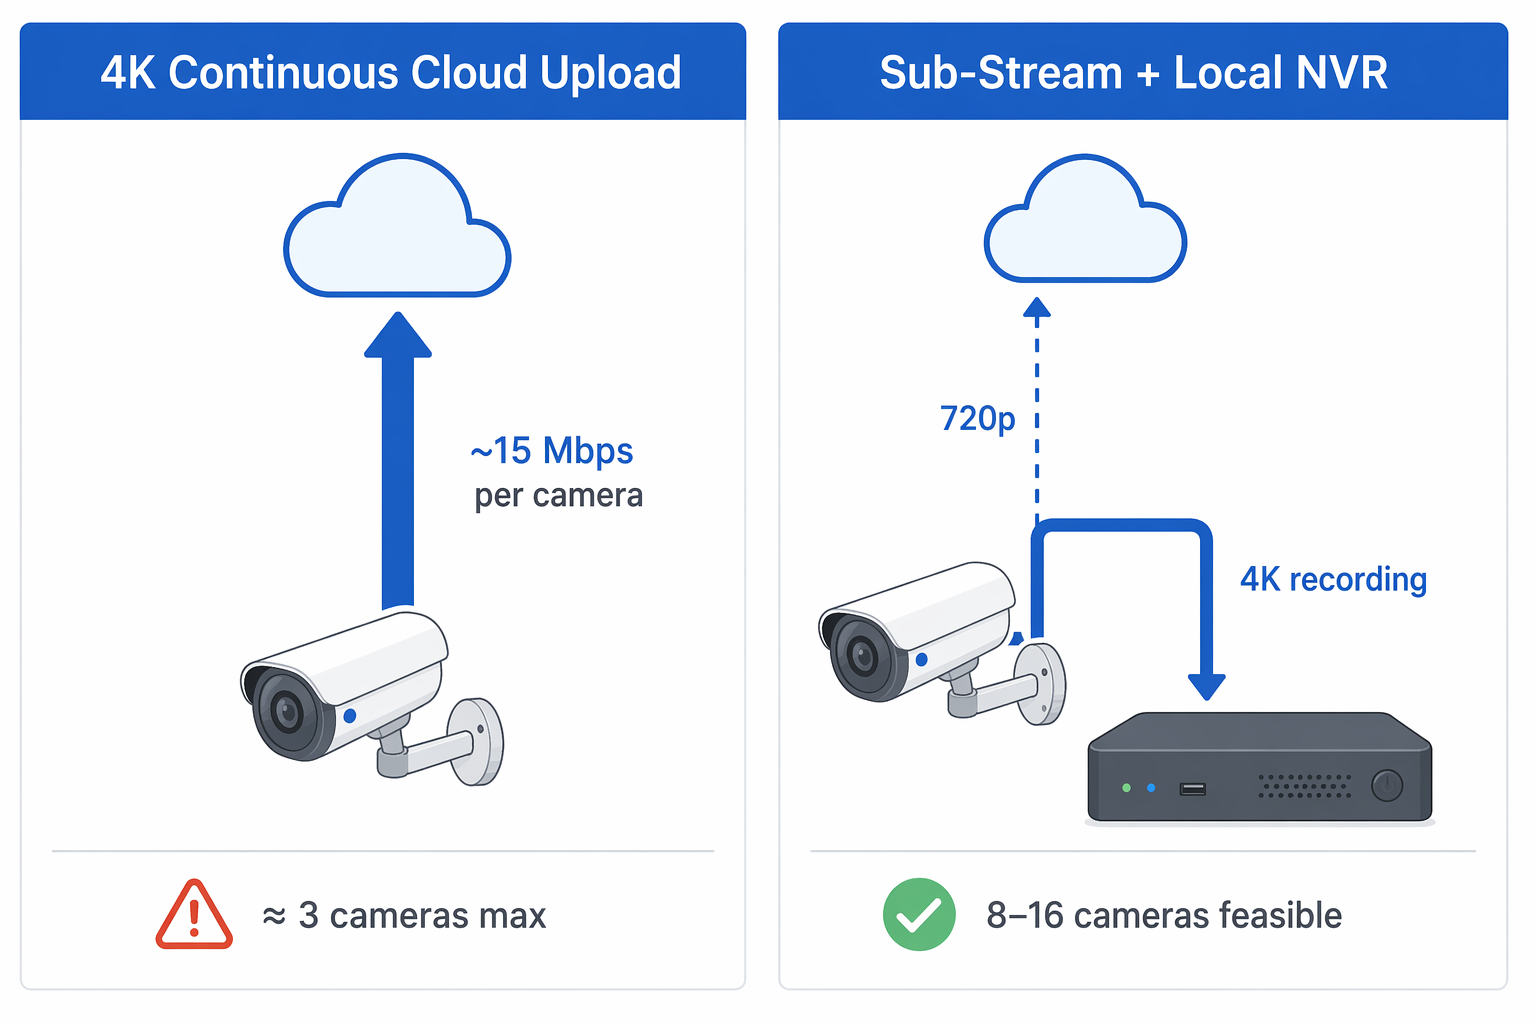
This is where some camera advice gets slippery. A vendor guide from Tentosoft says 8–16 cameras can be feasible over Starlink when using a sub-stream approach, while the same guide’s math also shows the harsh case: full-resolution continuous 4K cloud upload cuts the usable count to roughly three cameras on a typical Residential connection [2]. That is not a contradiction. Those are two different camera designs.
| Camera Pattern | What Happens On Starlink | Practical Judgment |
|---|---|---|
| Full-resolution 4K continuous cloud upload | Every camera pushes a heavy stream through the upload link all the time | Expect only a small camera count; roughly three simultaneous 4K cloud streams is the hard-case estimate |
| Motion-triggered clips only | Upload spikes when events happen instead of running constantly | Works better, but busy driveways, livestock areas, or windy tree lines can still create long upload periods |
| Sub-stream to cloud plus local NVR for full quality | Low-resolution video leaves the property while 4K stays on a local recorder | This is the pattern where 8–16 cameras becomes plausible |
| Local-only recording with remote viewing through a tunnel | The NVR records locally and you connect in only when needed | Best fit when reliability matters more than cloud convenience |
The sub-stream design is the one I would build around. Let the camera or NVR record full quality locally. Send a lighter 720p stream, thumbnails, alerts, or event clips to the cloud if the camera system supports it. When you need the detailed plate, gate, driveway, barn, or porch footage, pull it from the local NVR instead of trying to make Starlink behave like a symmetrical fiber line.
Quality settings matter more than brand names here. Frame rate, bitrate, codec, night scenes, and motion frequency can all move the upload load. A quiet camera watching a shed door is not the same as a camera aimed at a road, trees, animals, or a busy yard. If the system allows separate main-stream and sub-stream settings, use them. If it only offers one always-cloud stream at high quality, it is a poor fit for Starlink unless the camera count is small.
A Sensible Camera Setup
- Record 4K or high-resolution footage to a local NVR, NAS, or camera base station.
- Use lower-resolution sub-streams for remote previews, dashboards, and cloud viewing.
- Prefer motion alerts and event clips over continuous cloud upload.
- Put cameras and the recorder on a Security VLAN instead of the same network as laptops and phones.
- Test upload during the worst normal hour, not during a quiet afternoon when nothing is moving.
Remote Access: Stop Starting With DuckDNS
On many cable or fiber connections, the old recipe is familiar: set up Dynamic DNS, forward a port, point an app at your home IP, and call it done. Starlink Residential changes that because it uses Carrier-Grade NAT. With CGNAT, your router does not receive a normal public IPv4 address that the outside internet can directly reach, so DuckDNS and traditional port forwarding do not solve the real problem [3].
That is why so many Starlink smart home threads eventually land on Tailscale, Nabu Casa, outbound tunnel services, or a Starlink plan that includes public IP capability. Home Assistant users have reported reaching their systems through Starlink with tunnel-style approaches rather than ordinary inbound forwarding [4]. These are community-reported solutions, not a guarantee that every VLAN and firewall rule will be correct on the first try, but the direction is right: make the home initiate the connection outward, then ride that secure path back in.
| Remote Access Method | Fit For Starlink Residential | Notes |
|---|---|---|
| DuckDNS plus port forwarding | Poor default choice | CGNAT prevents normal inbound access on Residential service |
| Tailscale | Strong fit | WireGuard-based mesh VPN; useful for Home Assistant, NVR admin, and router access when configured carefully |
| Nabu Casa | Strong fit for Home Assistant | Simple remote access path for Home Assistant without exposing ports |
| NoPorts or outbound-only tunnel | Good fit | Built around outbound connections, which suits CGNAT environments |
| Business/Priority plan with public IP | Works, but plan-dependent | Useful when you specifically need public-IP behavior and are willing to pay for the plan tier |
For most homes, the cleanest split is simple. Use Nabu Casa if the main thing you need is Home Assistant remote access with the least fiddling. Use Tailscale if you want broader access to the home network, such as Home Assistant, a local NVR web interface, a NAS, or router admin pages. Use an outbound tunnel product when you need a more service-specific path and do not want to manage inbound firewall exposure. Consider a public-IP Starlink plan only when there is a clear reason, not just because an old guide told you port forwarding was the normal way.
Why The Stock Router Is The First Thing To Outgrow
The Gen 3 Starlink router is not useless. Reviews and setup coverage describe it as a Wi-Fi 6 router with coverage around 3,200 square feet, which may be enough for a modest house layout before outbuildings, metal siding, long driveways, or detached garages enter the story [5][6]. Coverage, though, is not the same as control.
The missing feature that matters most for a serious smart home is VLAN support. Without VLANs, the easy version is one flat network: phones, laptops, cameras, smart plugs, voice assistants, tablets, TVs, and random vendor bridges all sharing the same neighborhood. That may work on day one. It is also exactly how a cheap device with weak security gets a better view of the household network than it deserves.
The fix is to put the Starlink router in bypass mode and let a third-party router do the actual routing. Home Assistant community users have documented bypass-mode setups with routers such as Ubiquiti’s UDM Pro, which is the kind of hardware that can handle VLANs, firewall rules, and more deliberate network layouts [7]. Similar roles can be filled by systems such as TP-Link Omada, Firewalla, or capable Asus setups, as long as the specific model supports the features you need.
A Practical VLAN Layout
| Segment | Typical Devices | Allowed Access |
|---|---|---|
| Personal | Phones, laptops, tablets | Internet, Home Assistant dashboard, selected access to trusted local services |
| IoT | Smart plugs, thermostats, speakers, TVs, vendor bridges | Internet as needed; limited access back to Home Assistant or a hub |
| Security | Cameras, doorbells, NVR | Local NVR and selected management access; restricted internet if the system allows it |
| Guest | Visitors and temporary devices | Internet only |
The point is not to build a corporate network in a farmhouse. The point is to decide what should be able to talk to what before a device vendor decides for you. Your voice assistant does not need open access to the NVR. A bargain smart plug does not need to see your laptop. A camera may need to reach the recorder, but it may not need open outbound internet all day if the NVR handles alerts and remote viewing.
Where Home Assistant Fits
Home Assistant is useful here, but it should sit on top of a sane network rather than compensate for a messy one. Its Starlink integration reports local sensors such as ping, throughput, obstruction percentage, power draw, and uptime, and the official integration page listed 2,705 active installations when checked [8]. Those sensors are genuinely handy for a rural setup because they help separate a bad automation from an obstruction, a weak Wi-Fi link, or a satellite-side problem.
There is one routing detail that catches people after bypass mode: the Starlink dish management interface lives on 192.168.100.0/24, so Home Assistant needs a static route to that subnet when your third-party router takes over [8]. Without that route, the internet may work fine while Home Assistant cannot read the dish data you expected to see.
Once that route is in place, Home Assistant can become the local operator: alert when obstruction rises, show throughput alongside camera activity, expose whether a remote-access problem is really a Starlink problem, and keep automations running through Zigbee, Z-Wave, Thread, or local integrations instead of depending on cloud round trips for every light and lock.
Build For The Day The Internet Is The Thing That Fails
A remote home should not assume perfect cloud reachability. PCWorld documented a complete Starlink network outage in 2025, and that kind of event is where the difference between local control and cloud dependence stops being theoretical [9]. If the outage takes down remote access, voice assistants, and cloud dashboards, the home still needs to do the boring important things.
That means thermostat schedules should not require a cloud server to fire. Basic lighting automations should still respond to local motion sensors. Door sensors should still report locally. Cameras should continue recording to the NVR even if remote viewing is unavailable. Locks should not be designed around the assumption that someone can always reach an app from town.
This is also where Zigbee, Z-Wave, Thread, and local hubs earn their keep. Wi-Fi devices are fine for many jobs, but a smart home made entirely of cloud-first Wi-Fi gadgets is brittle on any rural connection. Starlink improves the reach of broadband; it does not make vendor clouds local.
What 2026 Improvements Change, And What They Do Not
The broader Starlink trend is encouraging. SpaceX’s 2025 progress figures, as reported by DISHYtech, said Starlink added 4.6 million subscribers in 2025, median global speeds rose 50% to more than 200 Mbps down, and latency was around 26 ms [10]. That is why the old dismissal that satellite internet cannot run a modern home feels increasingly stale.
There is also a forward-looking capacity story: V3 satellites launched via Starship are expected to provide much higher downlink and uplink capacity than V2 Mini satellites, with DISHYtech reporting claims of 10x downlink and 24x uplink capacity improvements [10]. If that capacity becomes widely available to Residential users, camera math could get less tight.
For a smart home being built in Q3 2026, though, I would not design around future uplink promises. Design around the upload you have, the CGNAT you have, and the router features you do not have until you add them. If capacity improves later, the same architecture only gets more comfortable.
The Build I Would Trust
Use Starlink for the WAN. Put the Starlink router in bypass mode. Install a third-party router that supports VLANs, firewall rules, and traffic visibility. Create at least separate Personal, IoT, Security, and Guest networks. Keep camera recording local, with sub-streams or event clips leaving the property instead of continuous full-resolution cloud upload. Reach the home through Tailscale, Nabu Casa, NoPorts, or a public-IP plan rather than ordinary port forwarding.
Then make the smart home local where it matters. Home Assistant, a local NVR, and Zigbee/Z-Wave/Thread devices are not just hobbies in this setup; they are the parts that keep the property usable when remote access breaks, when upload gets crowded, or when a cloud service has a bad day.
So the answer is practical yes. Starlink is viable for a full smart home in Q3 2026, but the dependable version is bypassed, segmented, locally resilient, and reached remotely through a CGNAT-aware tunnel instead of traditional port forwarding.
References
- Starlink Internet Review, CNET.
- CCTV Over Starlink, Tentosoft.
- Starlink Remote Access, NoPorts.
- How to reach Home Assistant through Starlink, Home Assistant Community.
- I switched to Starlink — these 6 advantages surprised me most, PCWorld.
- Starlink: How to Get Set Up With SpaceX Satellite Internet, PCMag.
- Starlink in bypass mode with UDM Pro, Home Assistant Community.
- Starlink, Home Assistant.
- I got Starlink internet at home — I wish I knew these key details first, PCWorld.
- Starlink Just Had a Massive 2025 and 2026 Could Be Even Bigger, DISHYtech.